Adding Charging Back To Old Apple Accessories

From time-to-time we’ve been frustrated by the lack of backwards compatibility for Apple accessories. We have a great Monster FM transmitter that used the screen of the original iPod to select a channel. That was a feature we just loved which it never worked with any future hardware. We may not be able to get that back, but perhaps this hack can help us implement the ability to charge newer Apple devices using older accessories.

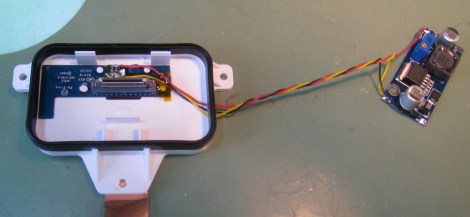
Seen above is the mounting dock from the iPod Hi-Fi speakers released back in 2006. Apparently the sound out of this set of speakers is just great, but you won’t be able to charge your modern device while it’s playing music. That is unless you’re not afraid to solder on a few simple components and roll in a switching regulator which can source at least one Amp of current. As we’ve seen in the past, Apple uses a couple of voltage dividers to identify modern chargers. These are installed on the D+ and D- lines of the USB connector and are pretty easy to recreate if you know the voltage levels the device is looking for. In this case a 39K, two 51k, and one 75k surface mount resistors are free-formed right next to the connector on the Hi-Fi’s dock PCB. The regulator on the right supplies the juice for charging. It’ll charge modern devices now, and even work with the iPhone five if you use a simple dock connector adapter.

Heads Up Controls For Your IPod

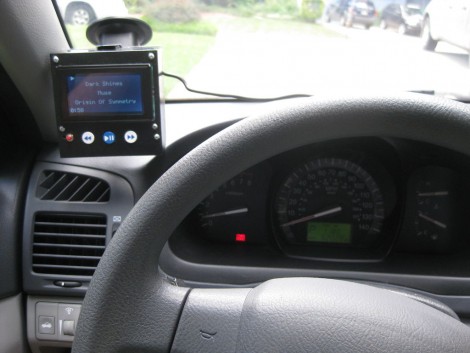
[Cmonaco3’s] girlfriend wanted a better way to control her iPod when driving. She didn’t want to take her eyes of the road and asked him if he could help. He ended up building a heads up display which reads out track information and offers a few simple buttons for control.

The display includes controls for track forward, track back, and play/pause. Those buttons, along with the LCD screen, mount on the windshield using a suction cup. This way the driver doesn’t have to completely remove focus from the road to control the iPod which is sitting in the passenger’s seat.

To accomplish this [Cmonaco] used a dock connector breakout board for communication between an Arduino and the iPod. The Arduino pulls song information to be displayed on the graphic LCD screen, and sends commands to the iPod when it detects a button push. See a quick demo of the setup after the break.

Continue reading “Heads Up Controls For Your IPod”

Tunes In The Icebox

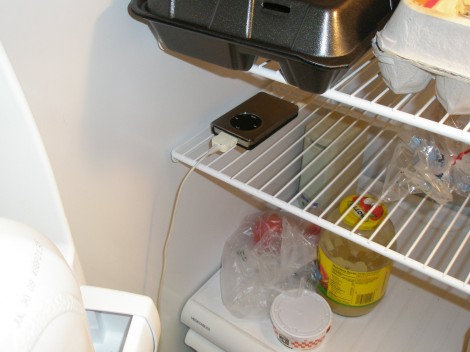
A couple of years back [Bryan’s] iPod went on the fritz. It wasn’t completely broken, as long as he kept it really cold it still worked. So what was he to do with the crippled device? We’ve all heard of elevator music. [Bryan] decided to invent refrigerator music.

First he needed some speakers. A trip to the Goodwill store netted him a pair for under $5. They need A/C power, and the project depends on sensing when the door to the refrigerator is open. He killed two birds with one stone by adding a light socket outlet adapter. This provides a place to plug in the speakers’ power adapter, and it only gets juice when the door is opened. The gimpy iPod just constantly loops through the tracks stored within, but you’ll only hear it when the door is open and the speakers receive power. Of course the iPod will eventually run its own battery down so [Bryan] ran an extension cord out the side of the door to a wall outlet. This interrupts the door seal and we wish there were another way to keep it contained within.

Hacking IPod Headphone Controller For Use With Android

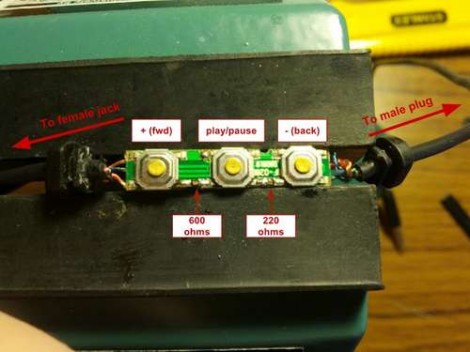
[Buddhra] wanted to use a set of ear buds that also had a controller built into the wire. The headset he chose to go with is meant for use with iPod, but he figured it should be possible to make it work with Android too. He was right, and managed to alter the controller for Android use and still fit it into the original case.

He had already made a custom control module that has fast forward and rewind features and play/pause events. The signals used for the controls are based on resistive dividers. The play/pause button on the iLuv headset already worked, so he cracked the controller open to see why the forward and back buttons didn’t work. It turns out all he needed to do was add the right resistors to those buttons. Here you can almost see the 0603 surface mount packages he used to add a 220 Ohm resistor to the back button, and a 600 Ohm resistor to the forward switch.

A DIY Audio Player For When All That Matters Is The Music

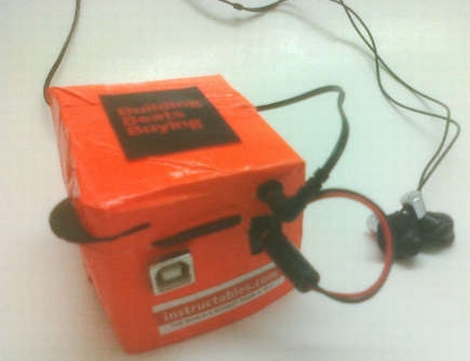
orange-mepod

[Grissini] hasn’t had the best of luck when it comes to personal audio players. He estimates that he’s gone through about half a dozen iProducts/iKnockoffs over the years, which ultimately adds up to a lot of money poured right down the drain. Rather than lay down his cold hard cash for yet another music player that would succumb to a dead battery or cracked screen, [Grissini] decided that he would be better off if he built one himself.

His Orange mePod isn’t exactly the most attractive or sleekest music player out there, but [Grissini] says it works like a charm. An Arduino Uno powers the device, and he uses an Adafruit Wave Shield to handle the audio playback. Power is supplied via 4AA batteries which keep the tunes going for a reasonable amount of time, and afford him the ability to swap them out for recharging without much fuss.

The player was encased with some leftover cardboard and wrapped in bright orange duct tape, before being mounted on [Grissini’s] belt. He says he gets plenty of looks when he’s out and about, which you would expect from such a unique design.

Stick around to see a quick video of the audio player in action.

Continue reading “A DIY Audio Player For When All That Matters Is The Music”

Reverse Engineering The Nike+ Hardware

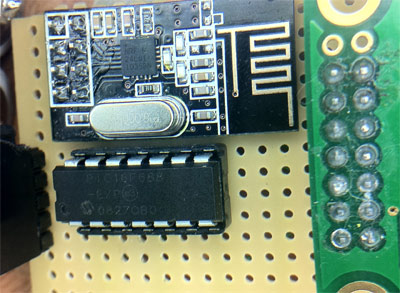
The Nike+ hardware is obviously an interesting device.  We haven’t heard a whole lot about hacking one until now, but [Dimitry] has decided to change that. Many would assume that the data transmitted off of these sensors is quite simple, however there’s a bit more than meets the eye. Amongst other challenges, all the data packets coming out of the transceiver are encrypted. [Dimitry] claims to have decoded this data stream and made use of it.

This hack also outlines how one can use this without the stock iPod receiver using a 2.4 GHz chip from Sparkfun. A lot of work has been done to figure out how these packets are decoded and the process one goes through to do this is well outlined in this post. This could serve as a good example for those wanting to figure out similar devices.

One thing [Dimitry] hasn’t done yet is release the source code for this hack. He cites some ethical issues that might not seem obvious on first glance, including the ability to follow someone in a crowd or simply jamming their data. He does add though that if you have a good reason for wanting it, to simply email him. We’re looking forward to what [Dimitry] comes up with in the future using this setup!

Analog IPhone Amplifier Made From Recycled Trumpets

analog_telephonographer

It’s no secret that the audio quality of the iPhone’s built-in speakers isn’t exactly what you would consider to be hi-fi. Sound quality aside, there are plenty of times where even the volume doesn’t do the music justice. While you can always go out and buy a fancy dock to amplify your iGadget’s sound, artist [Christopher Locke] has a different take on the subject.

For a while now, he has been constructing what he calls “Analog Tele-Phonographers”, metal sculptures that can be used to amplify a mobile phone’s audio. Built out of steel and old trumpets, his audio sculptures require no electricity, instead utilizing the same amplification technology as the original phonographs.

While the Tele-Phonographers won’t make your iPhone sound like a high quality tube amp, they do undoubtedly increase the phone’s volume and they are nice to look at. We can certainly get behind this sort of recycling/reuse of old items.

Continue reading to see a quick video of his Analog Tele-Phonographer in action.

[Thanks, Chris]

Continue reading “Analog IPhone Amplifier Made From Recycled Trumpets”