Amiga In The MiST Gets Online With An ESP8266

While he couldn’t quite come up with the cash to buy one in their hayday, [Bruno Antunes] has always been fascinated with the Amiga. When PCs got fast enough he used emulators like UAE to get a taste of the experience, but it was never quite the same thing. Not until he found the MiST anyway, which uses an FPGA to implement several retro computers such as the Apple II, Atari, and of course his beloved Amiga.

The only downside for [Bruno] was that the MiST has no network interfaces. To get onto the Internet, he had to install an ESP8266 inside the device and spend some quality time tweaking various software settings to get everything talking to each other. The end result is a BBS hosted on an Amiga 1200, that’s running on an FPGA, that’s connected to WiFi via an ESP8266. What a time to be alive.
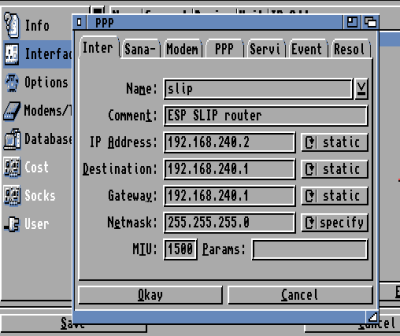
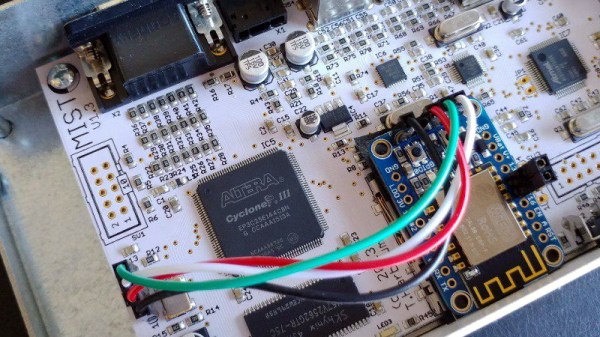
Adding the ESP8266 to the MiST was actually quite straightforward, as there’s an unpopulated serial port header right on the board. Though [Bruno] cautions this header has been removed as of version 1.4 of the device, so if you’re in the market for an FPGA retro box and might want to get it online at some point, that may be a detail to keep in mind. The ESP is running a firmware which implements Serial Line IP (SLIP); which allows you to use TCP/IP over a serial port, albeit very slowly.

The hardware implant went well enough, but unfortunately [Bruno] found the ESP8266 was unable to communicate through the thick metal case of the MiST. He enlisted his girlfriend to make a new papercraft enclosure for the MiST that the ESP could talk though, and it even has the added benefit of glowing thanks to the internal LEDs. We probably would have just got one of the ESP modules that includes an external antenna, but to each their own.

With the hardware taken care of, the rest of the considerable write-up details how he got the Amiga operating system to talk to the Internet through the SLIP connection. He goes over everything from setting the system time with NTP to getting a Telnet daemon installed. As you might expect, this involves installing a number of additional software packages, but [Bruno] is kind enough to provide links for everything you’ll need.

We’ve seen the ESP8266 used to get other retro computers onto the modern Internet before, but it’s usually through the use of an external device. This internal modification is very clean, and seems like a no-brainer for anyone who owns a MiST and a soldering iron.

Continue reading “Amiga In The MiST Gets Online With An ESP8266”

A Laser Effect Projector Built With Safety In Mind

There’s just something about wielding a laser pointer on a dark, foggy night. Watching the beam cut through the mist is fun – makes you feel a little Jedi-esque. If you can’t get enough of lasers and mist, you might want to check out this DIY “laser sky” effect projector.

The laser sky effect will probably remind you of other sci-fi movies – think of the “egg scene” from Alien. The effect is achieved by sweeping a laser beam in a plane through swirling smoke or mist. The laser highlights a cross section of the otherwise hidden air currents and makes for some trippy displays. The working principle of [Chris Guichet]’s projector is simplicity itself – an octagonal mirror spun by an old brushless fan motor and a laser pointer. But after a quick proof of concept build, he added the extras that took this from prototype to product. The little laser pointer was replaced with a 200mW laser module, the hexagonal mirror mount and case were 3D printed, and the mirrors were painstakingly aligned so the laser sweeps out a plane. An Arduino was added to control the motor and provide safety interlocks to make sure the laser fires only when the mirror is up to speed. The effect of the deep ruby red laser cutting through smoke is mesmerizing.

If laser sky is a little too one-dimensional for you, expand into two dimensions with this vector laser projector, and if monochrome isn’t your thing try an RGB vector projector.

Continue reading “A Laser Effect Projector Built With Safety In Mind”

Fixing A Product Design Flaw In A Misting System

[Xerxes3rd] works at a place where they raise reptiles in terrariums. Such enclosures require controlled lighting, temperature and humidity. Humidity is maintained using “misting” devices. These are usually water containers with a pump whose outlet ends in a series of very fine spray nozzles which create the mist. A timer controls the pump’s on and off cycles.

[Xerxes3rd] purchased an Exo Terra Monsoon RS400 misting system – a low-cost misting device and soon discovered that it had a serious design flaw. The built-in timer malfunctions, and it mists a hundred times more than it should! A lot of folks who buy a product and discover it has an inherent design flaw will return it back for a refund. Instead,  [Xerxes3rd] decided to break in and fix it instead –  “warranty void if tampered” be damned.

To start with, he needed to figure out what the problem was. He went about it in clinical fashion, eventually creating a slick document (PDF) outlining his observations and diagnosis. The timer controller board has a PIC micro, some buttons, potentiometers, LED’s and an IR receiver. The misting cycles are set using the two potentiometers – Off time and On time for the pump. His analysis and resolution makes for interesting reading.

What he found was that the PIC micro was reading inconsistent values from the potentiometers. More specifically, the software isn’t doing any smoothing on the analog values it reads from the potentiometers. Since the PIC that controls the system wasn’t easily re-programmable, he opted to replace it with an Arduino Nano. At the same time, he got rid of the potentiometers that were used to set the misting frequency and duration, and added a 16×2 LCD. Time setting is now done using the three on board buttons. He removed the PIC micro and replaced it with two female header sockets, onto which he plugged a small board containing an Arduino Nano and a few components. He also cut the original PCB in half, removing the potentiometers and crystal oscillator in order to make room for the 16×2 character LCD.

The lizards are now probably thanking him for their perfectly timed doses of moisture. Having done this, he could probably add in more features such as a temperature-humidity sensor, a water level sensor or maybe even throw in an ESP8266 module and have the Lizards tweet when they need to be hydrated. Because that’s another thing hackers love – feature creep.

Man Made Rainbow Uses ONLY Sunlight And Rainwater

This rainbow is and is not natural. It’s the product of rainwater and sunlight so in that respect it’s natural. But as you can see, it’s not raining. This is an art installation that uses captured rainwater, stored solar electricity, and irrigation equipment to float a heavy blanket of mist in the air. The prismatic effects of the suspended water particles separate the sunlight into various bands by wavelength and a rainbow springs into existence.

We’ve done this before with a garden hose in the back yard. It might be fun to try to build a version that recycles the water as this does, perhaps using a rain barrel as a reservoir. It would certainly be much easier than pulling off that water-based 3-D display we’ve been meaning to undertake.

[Thanks Xb0xGuru]