Hackaday Prize Entry: A $100 CT Scanner

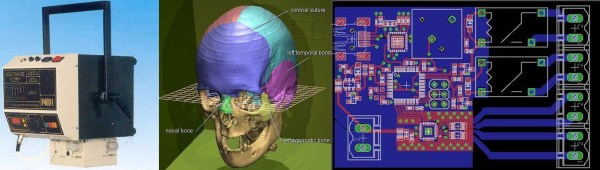
What do you do when you’re dad’s a veterinarian, dumped an old x-ray machine in your garage, and you’re looking for an entry for The Hackaday Prize? Build a CT scanner, of course. At least that’s [movax]’s story.

[movax]’s dad included a few other goodies with the x-ray machine in the garage. There were film cassettes that included scintillators. By pointing a camera at these x-ray to visible light converting sheets, [movax] can take digital pictures with x-rays. From there, it’s just building a device to spin around an object and a lot – a lot – of math.

Interestinly, this is not the first time a DIY CT scanner has graced the pages of Hackaday. [Peter Jansen] built a machine from a radiation check source, a CMOS image sensor, and a beautiful arrangement of laser cut plywood. This did not use a proper x-ray tube; instead, [Peter] was using the strongest legally available check source (barium 133). The scan time for vegetables and fruit was still measured in days or hours, and he moved on to build an MRI machine.

With a real source of x-rays, [movax]’s machine will do much better than anything the barium-based build could muster, and with the right code and image analysis, this could be used as a real, useful CT scanner.


The 2015 Hackaday Prize is sponsored by:

Fixing A Product Design Flaw In A Misting System

[Xerxes3rd] works at a place where they raise reptiles in terrariums. Such enclosures require controlled lighting, temperature and humidity. Humidity is maintained using “misting” devices. These are usually water containers with a pump whose outlet ends in a series of very fine spray nozzles which create the mist. A timer controls the pump’s on and off cycles.

[Xerxes3rd] purchased an Exo Terra Monsoon RS400 misting system – a low-cost misting device and soon discovered that it had a serious design flaw. The built-in timer malfunctions, and it mists a hundred times more than it should! A lot of folks who buy a product and discover it has an inherent design flaw will return it back for a refund. Instead,  [Xerxes3rd] decided to break in and fix it instead –  “warranty void if tampered” be damned.

To start with, he needed to figure out what the problem was. He went about it in clinical fashion, eventually creating a slick document (PDF) outlining his observations and diagnosis. The timer controller board has a PIC micro, some buttons, potentiometers, LED’s and an IR receiver. The misting cycles are set using the two potentiometers – Off time and On time for the pump. His analysis and resolution makes for interesting reading.

What he found was that the PIC micro was reading inconsistent values from the potentiometers. More specifically, the software isn’t doing any smoothing on the analog values it reads from the potentiometers. Since the PIC that controls the system wasn’t easily re-programmable, he opted to replace it with an Arduino Nano. At the same time, he got rid of the potentiometers that were used to set the misting frequency and duration, and added a 16×2 LCD. Time setting is now done using the three on board buttons. He removed the PIC micro and replaced it with two female header sockets, onto which he plugged a small board containing an Arduino Nano and a few components. He also cut the original PCB in half, removing the potentiometers and crystal oscillator in order to make room for the 16×2 character LCD.

The lizards are now probably thanking him for their perfectly timed doses of moisture. Having done this, he could probably add in more features such as a temperature-humidity sensor, a water level sensor or maybe even throw in an ESP8266 module and have the Lizards tweet when they need to be hydrated. Because that’s another thing hackers love – feature creep.

Wii U Laptop

Stuffing A Wii U Into A Laptop

For some reason, a lot of hackers seem to have an obsession with jamming video game consoles into smaller boxes with screens. It’s more portable yes, but be honest — how much use is it actually going to get? Regardless, [RedmagnusX] has just finished up what might be the first Wii U laptop.

He’s using a 17″ laptop screen from a Dell XPS M1730, which he’s combined with a case of his own design that fits the Wii U’s guts. To interface the screen from the Wii, he picked up a driver-board from NJYtouch. He’s also managed to cram the power regulator into the laptop, and a few small speakers for audio output. He also integrated the sensor bar into the top of the unit. Not too shabby!

It reminds us a lot of this older Xbox 360 laptop mod, and looks surprisingly similar. However our favorite case mod still has to be the PlayBox — [Eddie Zarick’s] beautiful combination unit featuring an Xbox One and the PS4 in a single 22″ box.

[Thanks for the tip Jon!]

CAPTION CERN CONTEST – Accidents Happen

Week 14’s image may have had us at a loss for words, but it definitely didn’t slow down the intrepid caption contest entrants on Hackaday.io! Thanks to everyone who entered. We still have no idea what that device is, though we are sure that we wouldn’t want to be standing under it. Just look at those 4×4 sections of lumber holding everything up. What’s the French translation for “sketchy as hell”? The device definitely includes a pressure or vacuum vessel of some sort. Beyond that, your guess is as good as ours. We’ll keep an eye on CERN’s image discussion page in case an answer does pop up.

The Funnies:

  • “Damn it Athol, stop harping about protocol and hand me the duck tape. This is nuclear physics, not rocket science!” – [The Green Gentleman]
  • “This will mix a mean Margarita for the party tomorrow, I promise you!.”- [Mats L]
  • “To long have we tried to smash particles, now we will blend them.” – [paul]

The winner for this week is [LongHairedHacker] with: “After weeks of complicated assembly the team finally found out that the IKEA Årc, was in fact not a fusion reactor. It did make a hell of an espresso though.”

As promised, [LongHairedHacker] will be taking home a Bus Pirate From The Hackaday Store!Congratulations!

Week 15

cern-15-smAccidents happen! When you’re working on the bleeding edge of science and technology, things don’t always go as planned. In this image, we’re looking at what appears to be the result of some sort of failure. We’re not sure what the piece of equipment was, but “was” is the proper term – as it’s now charred to a crisp.

The two scientists investigating the damage don’t seem to be worried about the radiation warning posted on the end of the machine’s aperture. Hopefully they know what they’re doing! 

Last week’s prize was a Bus Pirate. This week we’re giving away another Dangerous Prototypes design, a Logic Pirate from The Hackaday Store.

logic-pirate

Add your humorous caption as a comment to this project log. Make sure you’re commenting on the contest log, not on the contest itself.

As always, if you actually have information about the image or the people in it, let CERN know on the original image discussion page.

Good Luck!


Move Over Red Bull, Hot Wire Foam Cutter Now Gives You Wings

Not many people will argue with flying RC airplanes is super fun. One big bummer is when a crash damages a part beyond repair. Sure, the RC pilot could keep buying replacement parts but doing so will add up after a while. RC plane builder and general guy with a cool name, [HuckinChikn], decided to build a hot wire foam cutter so making replacement wings would be quick and cheap.

The actual hot wire part is nothing special, just some wire pulled taut across a frame and a 24 vdc power supply pumping out current and heating the wire so it melts any foam in its path. The unique part of the build is that one side of the hot wire frame is secured in place and only allowed to pivot about that point. The other side of the frame traces an airfoil-shaped pattern. This setup allows [HuckinChikn] to make tapered wings. The difference between a straight wing and a tapered wing is similar to that of a cylinder and cone.

hotwire foam wing cutter

Check out the video after the break for a quick demonstration how easy it is to make a wing when you have the right tool!

Continue reading “Move Over Red Bull, Hot Wire Foam Cutter Now Gives You Wings”

Need Custom Parts? This Week We’re Giving Out $2k In 3D Printing

We’re having an excellent time watching your project builds take shape. All summer long we’re giving away prizes to make this easier and to help move great prototypes along. Last week we offered up 125 Teensy-LC boards; the winners are listed below. This week we want to see interesting parts come to life so we’re giving away two-thousand dollars in 3D Printing.

These 3D printed parts will be delivered to 40 different project builds in the form of $50 gift cards from Shapeways. Basically, you just design your parts, choose a printing medium like plastic or metal, and before you know it your digital creation appears as a real part shipped in the mail.

Time to write down your Hackaday Prize idea and get it entered! You’re best chance of winning will come when you publish a new project log describing how having custom-printed parts would move your build forward. Whether or not you score something this week, you’ll be eligible for all the stuff we’re giving away this summer. And of course, there’s always that Grand Prize of a Trip into Space!

Last Week’s 125 Winners of a Teensy-LC Board

50k-in-play-teensy-lc-featured

Congratulations to these 125 projects who were selected as winners from last week. You will receive a Teensy-LC board. The name makes them sound small, but the ARM Cortex-M0+ packs a punch. 62k of flash, 8k of RAM, and these run at up to 48 MHz. Program them bare-metal or use the ease of the Arduino IDE. Don’t forget to post pictures and information about what you build using your newly acquired powerhouse!

Each project creator will find info on redeeming their prize as a message on Hackaday.io.


The 2015 Hackaday Prize is sponsored by:

Reading Resistors With OpenCV

Here’s a tip from a wizened engineer I’ve heard several times. If you’re poking around a circuit that has failed, look at the resistor color codes. Sometimes, if a resistor overheats, the color code bands will change color – orange to brown, blue to black, and so forth. If you know your preferred numbers for resistors, you might find a resistor with a value that isn’t made. This is where the circuit was overheating, and you’re probably very close to discovering the problem.

The problem with this technique is that you have to look at and decode all the resistors. If automation and computer vision is more your thing, [Parth] made an Android app that will automatically tell you the value of a resistor by pointing a camera at it.

The code uses OpenCV to scan a small line of pixels in the middle of the screen. Colors are extracted from this, and the value of the resistor is displayed on the screen. It’s perfect for scanning through a few hundred through hole resistors, if you don’t want to learn the politically correct mnemonic they’re teaching these days.

Video below, and the app is available for free on the Google Play store.

Continue reading “Reading Resistors With OpenCV”