World’s Oldest Functioning Digital Computer Reminds Us Of A Telephone Exchange

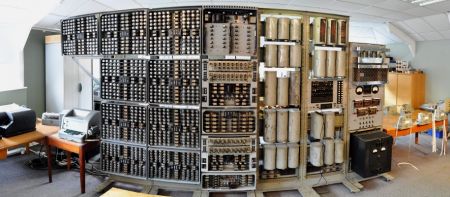
This is the WHICH, the Wolverhampton Instrument for Teaching Computing from Harwell. It is the oldest functioning digital computer and thanks to a lengthy restoration process you can go and see it in person at The National Museum of Computing in Milton Keynes (Northwest of London in the UK).

The system was first put into operation in 1951. It’s function is both familiar and foreign. First off, it uses decimal rather than binary for its calculations. And instead of transistors it uses electromechanical switches like are found in older automatic telephone exchanges. This makes for very noisy and slow operation. User input is taken from strips of paper with holes punched in them. As data is accumulated it is shown in the registers using decatrons (which have since become popular in hobby projects). Luckily we can get a look at this in the BBC story about the WITCH.

According to the eLinux page on the device, it was disassembled and put into storage from 1997 until 2009. At that point it was loaned to the museum and has been undergoing cleaning, reassembly, and repair ever since.

[Thanks David]

Sculpting With LCD Pixels

Each one of the small squares in this sculpture is actually an LCD cell, and this is just the tip of the iceberg. What you see here is just a small portion of the sculpture that spans multiple floors of the atrium at the North Carolina Museum of Natural Sciences. It’s made up of multiple panels hosting a total of 3600 LCD cells. We first saw it way back in April, but now there is a ‘making of’ video which you can see embedded after the break.

The project took about 18 months to complete, starting with a 256 pixel prototype. That served as proof that the non-lit hardware would achieve the look they were going for. From there they designed the code which would generate patterns on the sculpture and used it to drive a digital model (we’d bet that was to get the go-ahead and funding). The fast-motion footage of the three-man assembly line formed when soldering up the circuits is fun to watch, the real nail-biting stuff comes when they start mounting the fragile panels in the space.

Continue reading “Sculpting With LCD Pixels”

Radio Built From The London Underground Map

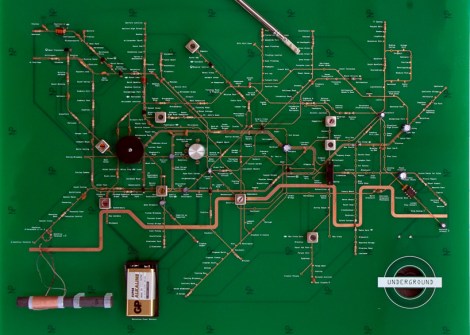
We love it when PCB artwork is actually artwork. Here’s one example of a radio whose layout mimics the map of London’s subway system.

The build is for an exhibit at the London Design Museum. They have an artist in residence program which allowed Yuri Suzuki time and resources to undertake the project. He speaks briefly about the concepts behind it in the video after the break.

The top layer of copper, and silk screen was positioned to mirror the subway lines and stops on a traditional transportation map. Major components represent various transfer hubs. In this way he hopes the functioning of the circuit can be followed by a layman in the same way one would plan a trip across town.

This may be a bit more abstract than you’re willing to go with your own projects. But there are certainly other options to spicing you track layout.

Continue reading “Radio Built From The London Underground Map”

Building A Giant Game Of Life Spinner

We see a lot of projects related to Conway’s Game of Life, but this one is Hasbro’s Game of Life. The board game company recently commissioned a giant game spinner as part of a museum exhibit. Here’s the build log that shows how it was pulled off.

The first thing to note is that [Jzzsxm] does this for a living. His company was hired to build several exhibits related to board games for a children’s museum in Springfield, MA. But don’t let that stop you from offering to help at your own local museum. We know some hackers love doing that kind of work.

The scale of the project is what makes the build really interesting. It starts with a design which can be cut out with a CNC router. First the spinner frame and numbers are cut out of MDF to verify the code. From there the design is cut in two pieces out of HI-MACS, a durable solid-surface material. Pegs for spinning the dial are milled from more HI-MACS stock. The clicker mechanism uses a steel rod as a pivot point. On the underside of the table it has opposing springs to hold it in place no matter which way the thing is spun. [Jzzsxm] mentions that it sees a lot of abuse from the young patrons, but seems to be holding up just great!

[via Reddit]

[Bill Porter] Repairs A Science Museum Exhibit

For those who are unfamiliar, “Freeze Frame” is the name of a common display in science museums. It is a small dark room with a single wall covered in phosphorescent material. Opposite of this wall is a flash on a timer. You enter the room, strike a pose and wait for the flash, then view your shadow preserved on the wall behind you.

[Bill] was saddened to see the display at his local science museum had been decommissioned long ago. All that was left was a dark room with a phosphorescent coated wall. Some industrious employees had rigged up some LED pens for people to “draw with light”, but in [Bill’s] opinion this wasn’t as impressive.  He promptly volunteered to rebuild the display himself and we commend him, both on the fantastic job he did as well as his service to his local community. Great job [Bill], keep up the good work.

Laser Spirograph Exhibit Repair And Upgrade

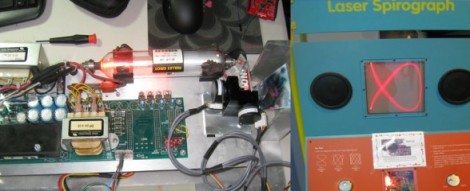
[Bill Porter] continues finding ways to help out at the local museum. This time he’s plying his skills to fix a twenty-year-old exhibit that has been broken for some time. It’s a laser spirograph which had some parts way past their life expectancy.

He started by removing all of the electronics from the cabinet for further study in his lair. He examined the signal generator which when scoped seemed to be putting out some very nice sine waves as it should. From there he moved on to the galvos which tested way off of spec and turned out to be the offending elements.

A bit of searching around the interwebs and [Bill] figured out an upgrade plan for the older parts. But since he was at it, why not add some features at the same time? He rolled in a port so that just a bit of additional circuitry added later will allow shapes and logos to be drawn on the screen. One of his inspirations for this functionality came from another DIY laser projector project.

Take a look at the results of the repair process in the clip after the break.

Continue reading “Laser Spirograph Exhibit Repair And Upgrade”

Adding Sound To Children’s Museum Exhibits

Believe it or not, the local Children’s Museum staff was happy that [Bill Porter] left this mess of wires and equipment in one of their offices. It makes up an ambient sound system for a couple of their exhibits. A movie without sound just doesn’t fully entertain, and the same can be said for these exhibits. The ambient sound that goes with a boat room, and a hospital room in the Museum really helps to snag your attention. And [Bill’s] material cost came in at just over $200 for both rooms.

He started off by purchasing a speaker, amp, and MP3 breakout board (SparkFun). The speaker mounts in one of the ceiling tiles, with the wire running to a different room where the audio equipment is housed. There were a couple of problems with this; the museum staff forgot to turn on the system, and for all of its expense this only provided one room with audio. Bill figured that since only one speaker was being used he could make an audio file with a different clip on the left and right channel, then feed them to different rooms. He also added that programmable timer so the sounds will turn themselves on and off.

This isn’t the first time we’ve seen hacks end up as museum pieces. Check out this other project that rigs up some interactive telephones.