Ugly DIY Portable Soldering Iron

If you’ve ever wanted a battery-operated soldering iron and you just can’t stand the thought of buying one, you might check out the video below from [Just5mins]. In it, he takes a candy tube, some scrap materials, a lithium ion battery, a nichrome wire, a USB charger, and a switch and turns it into an apparently practical soldering iron.

Paradoxically, [Just5mins] used a soldering iron to build this one, so it probably can’t be your only soldering iron, although we suppose you could figure something out in a pinch. Maybe in rep-rap style, make a poor quality one with no soldering and use it to solder up the next one.

Continue reading “Ugly DIY Portable Soldering Iron”

Taste The Rainbow One Color At A Time

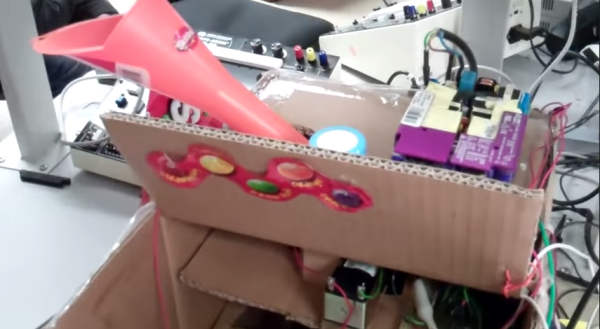
It’s the end of another fall semester of Bruce Land’s ECE4760 class at Cornell, and that means a fresh crop of microcontroller-based student projects. For their project, [Alice, Jesse, and Mikhail] built a Skittle-sorting miniature factory that bags and seals same-colored candies into little pouches of flavor.

Their design is split into three stages, which are visually delineated within the all-cardboard housing. Skittles are loaded into a funnel at the top that leads to the color detection module. The color is determined here with an RGB LED and OPT101 photodiode driven by an ATMega1284.  Because the reflected RGB values of red and orange Skittles are so similar, the detector uses white light to make the final determination.

Once the matchmaking is over, a servo in the second stage rotates to the angle that corresponds with the color outcome. The Skittle then slides down a cardboard chute, passes through a hole in a cardboard disk, and drops into a hanging bag. Once the bags have reached the predetermined capacity, another servo moves the carousel of bags to a nichrome wire sealing rig. Lead factory worker [Jesse] must intervene at this point to pull the bags off the line. You can see the full walk-through and demonstration of this Skittle flavor separator after the break.

Continue reading “Taste The Rainbow One Color At A Time”

Piles Of Foam With A Hot Wire Slicer

foam

There are a million things you can do with foam, from some very impressive RC airplanes, all the way up to full-scale planes you can fly off into the wild blue yonder. Cutting foam, though, that’s a problem, and your best option is usually a hot wire foam cutter. [Darcy] put up some plans for a very nice bow cutter, but there’s also some experimentation for a foam slicer – a hot wire machine that takes a foam part and slices it like a smokehouse ham.

The bow-style cutter features laser cut parts, a pair of 1/4-20 bolts, a power supply, and about a foot of nichrome wire. It’s the bare minimum for cutting foam, but it seems to work really, really well.

The hot wire foam slicer is a much more interesting contraption, capable of making multiple thin sheets out of foam. Basically, it’s a laser cut tray with a bolt hole pattern running along the sides. Put two bolts along the side, loop some nichrome wire around the screw flights, and you have a way to cut foam in thicknesses of about 1/20th of an inch. Great if you’re trying to skin a model in very thin depron, or you just can’t find the right thickness of foam for your project.

Triggering Remote Fireworks With An Arduino And An Android

LIGHTING ROCKET

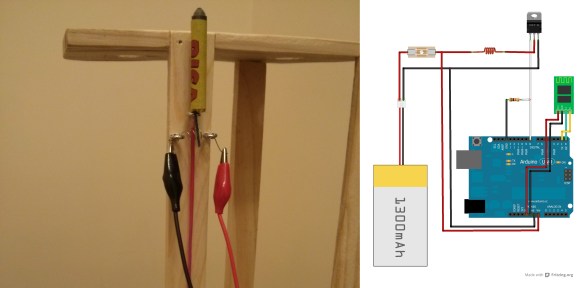
With Canada day and Independence day fast approaching, some makers are looking towards setting up their own fireworks to shoot off in celebration – sure you could use a match or lighter… or you could crack out your trusty Arduino and a cellphone! (translated)

To ignite the fuse, [Oscar] is using a short length of Nichrome wire which is controlled via a Mosfet by the Arduino. To control the Arduino he’s using ArduDroid with a Bluetooth module. The app lets you trigger the various digital and analog outputs, and send and receive data.

Stick around to see a few different demonstration videos of the circuit, testing, and launching some little bottle rockets!

Continue reading “Triggering Remote Fireworks With An Arduino And An Android”

Recovering Nichrome Wire From Unexpected Sources

115b-guitar-hero

Don’t you hate it when you’re in a pinch and all your favorite surplus or electronic stores are closed? You’ve gotta finish this project, but how? He’s a nice real hack for you guys.  How to recover nichrome wire from a ceramic heater!

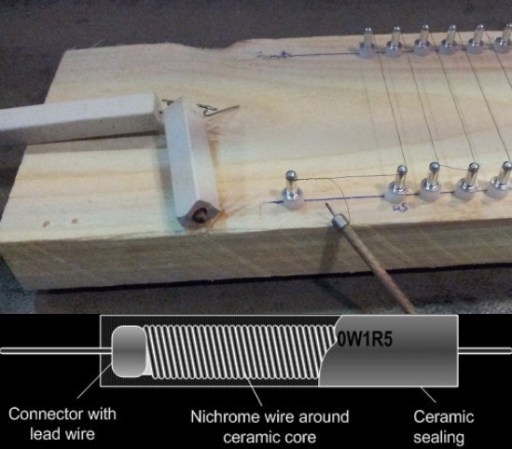
Necessity spawned this idea, as [Armilar] needed to make 45 cuts in two pieces of foam in order to ship some long circuit boards. Not wanting to make the 90 cuts individually, he improvised this nichrome slicing jig. Not having a spool of nichrome handy, he decided to use a less conventional method. He pulled out a sledgehammer and smashed open a ceramic wirewound resistor.

According to him, nice big ceramic resistors like this 10W one have about a meter of nichrome wire inside!  After breaking the ceramic, it’s quite easy to remove. He made up a jig using nylon spacers and rivets, and then wrapped his wire back and forth across the whole length. It worked perfectly — though he was using 240VDC @ about 1.2A…

If you don’t need such a complex setup, there’s always the bare bones wire foam cutters we’ve featured many times before.

Bending Materials With A Simple Hot Wire Forming Tool

bending-with-a-hot-wire-former

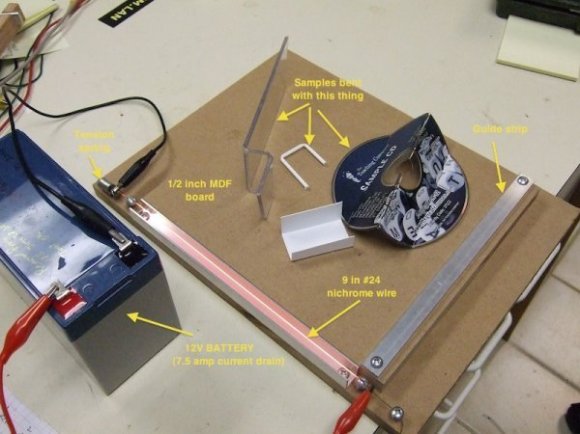
Regular reader [RoadWarrior222] has watched as we’ve featured several projects that show how to bend acrylic. But so far he hasn’t seen us cover his favorite technique developed by [Dale A. Heatherington] which uses a hot wire forming tool to make precise bends. The tool is simple to use plus it’s cheap and easy to build. It’s a great choice if you don’t have a heat gun, and it may be possible to make cleaner bends than other techniques.

The business end of the bending tool is the red-hot Nichrome wire running through the aluminum channel. That channel is used to protect the MDF and act as a spacer so that the wire doesn’t touch the acrylic. On the near side the wire is anchored with a screw, but on the far end it is kept taught by including a spring. The wire heats up as it is connected to a 12V battery, but since the heating is cause by the wire’s resistance it will only get red-hot in between the alligator clips providing power. To make sure your bends will be perpendicular to the edge of the acrylic there’s an aluminum guide strip on one side of the MDF platform.

You can salvage Nichrome wire from an old hair dryer. If you have any left over it’s great for other projects like building a CNC hot-wire cutter.

Wireless Fireworks Controller Includes Several Safety Features

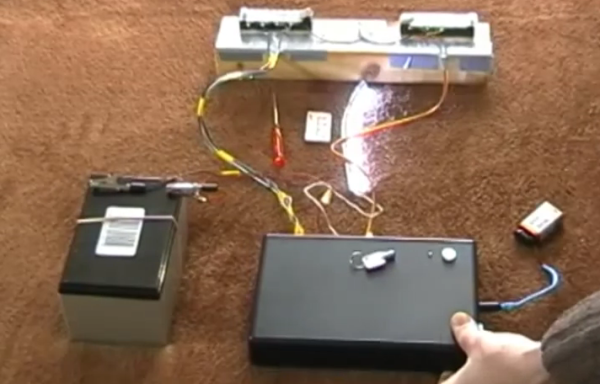
[Craig Turner] wrote in to tell us about the wireless fireworks controller he just finished building. It has eight total channels and offers the kind of safety features we like to see when working with explosives.

The image above details the launcher side of the project. The project box houses an Arduino which is powered by a 9V battery. To enable this base station the key lying on top of the project box must be inserted and turned to the on position. To the left is the 12V battery which is used to supply the igniters via a set of eight relays. In the demo video after the break [Craig] is using nichrome wire to demonstrate, but we’ve even see projects that actually burn up resistors to light the fireworks.

The system uses RF12 wireless modules to communicate with the control panel. That also has an Arduino, along with a number pad. After switching on the power the operator must enter a PIN code before the system will allow any of the fireworks to be launched.

Continue reading “Wireless Fireworks Controller Includes Several Safety Features”