A Solar Powered Cattle Crossing Gate

solar-powered-cattle-crossing-gate

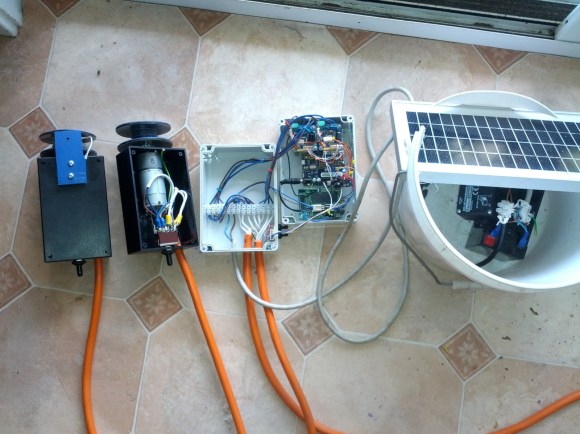
Anyone who’s traveled the grounds of a cattle ranch will tell you there’s a lot of stopping to open and close gates. But this project is aimed at letting you operate the gate from the comfort of your vehicle. It uses a spool of wire as the gate, lowering it for vehicle access with the use of a remote control.

The base station uses a solar panel to keep the battery topped off. But if you’re not frequently using the system it shouldn’t take much electricity at all. An Arduino board listens for the signal from the remote control. It then unspools the wire until it lays flat across the ground and can be driven over. Once the car has passed another click of the remote raises the gate back into position. There’s even a version that uses two gates which make up a cattle corridor.

We were thinking that it would be easy enough for the cows to push right through this. But after seeing the clip after the break it’s obvious they like to follow the rules.

Continue reading “A Solar Powered Cattle Crossing Gate”

Hackaday Links: February 28th, 2013

Xbox 360 control for a toy heli

links-xbox-helicopter-remote

[Jason] leveraged the IR control libraries for Arduino to use an Xbox 360 controller to fly his Syma S107G helicopter.

Windows 7 running on Raspberry Pi

links-win7-rpi

Why, oh god why? Well, the guys at Shackspace got their hands on a laser cutter that can only be driven with a Windows program. Their solution was to run Win7 on RPi as a virtual machine.

Twin-servos for your third hand

links-servo-third-hand

After growing tired of constantly flipping over the substrate being held with a third hand [Nidal] came up with a better way. He mounted his third hand on two servo motors so that it can be positioned with a joystick.

Depopulating SMD resistors

links-removing-smd-resistors

If you’ve ever tried to remove small surface mount resistors or capacitors with an iron you know it can be tricky. Take a look at the technique that [Scott] uses to remove the components.

Photographing the die of MSP430, Z80, PIC, and several other chips

links-decapping-chips

Here’s the latest work from [Michail] on photographing the die of various chips. You may remember reading his previous post on decapping chips with boiling sulfuric acid.

Optical Data Transfer Project At Local School’s Family Science Night

optical-data-at-family-science-night

[Dave] wanted to show off a project at his 4th-grade son’s school during their family science night. We haven’t heard of an event like this before but it sounds like a fabulous idea! He had a new laser he wanted to include in the project, and noticed that his son was learning about how ASCII maps letters to binary number when the idea struck. He ended up building an optical data transfer system that demonstrates binary code.

This presents a fantastic learning opportunity as the project invited the school kids to select encoded strips like the ones seen above to form a secret message. The laser is pointed at a photosensor which is being read by a Raspberry Pi board. The Python code looks for a baseline and then records increases and decreases in intensity. Since the translucent tokens have either holes or black lines for 0 and 1 the baseline approach does away with the need to clock in the data. [Dave] reports that everyone who tried out the experiment was fully engaged at the prospect of pushing pieces of tape through the sensor and watching their secret message appear on a monitor.

He was motivated to write about this project after reading about data transfer using an LCD screen and photosensor.

Bending Materials With A Simple Hot Wire Forming Tool

bending-with-a-hot-wire-former

Regular reader [RoadWarrior222] has watched as we’ve featured several projects that show how to bend acrylic. But so far he hasn’t seen us cover his favorite technique developed by [Dale A. Heatherington] which uses a hot wire forming tool to make precise bends. The tool is simple to use plus it’s cheap and easy to build. It’s a great choice if you don’t have a heat gun, and it may be possible to make cleaner bends than other techniques.

The business end of the bending tool is the red-hot Nichrome wire running through the aluminum channel. That channel is used to protect the MDF and act as a spacer so that the wire doesn’t touch the acrylic. On the near side the wire is anchored with a screw, but on the far end it is kept taught by including a spring. The wire heats up as it is connected to a 12V battery, but since the heating is cause by the wire’s resistance it will only get red-hot in between the alligator clips providing power. To make sure your bends will be perpendicular to the edge of the acrylic there’s an aluminum guide strip on one side of the MDF platform.

You can salvage Nichrome wire from an old hair dryer. If you have any left over it’s great for other projects like building a CNC hot-wire cutter.

Hacking A Ham Radio

For Christmas, [Lior] received a Baofeng UV5R radio. He didn’t have an amateur radio license, so he decided to use it as a police scanner. Since the schematics were available, he cracked it open and hacked it.

This $40 radio communicates on the 136-174 MHz and 400-480 MHz bands. It uses a one-time programmable microcontroller and the RDA1846 transceiver. With the power traces to the MCU cut, [Lior] was able to send his own signals to the chip over I2C using an Arduino. He also recorded the signals sent by the stock microcontroller during startup, so that he could emulate it with the Arduino.

Once communication was working on an Arduino, [Lior] decided to get rid of the stock microcontroller. He desoldered the chip, leaving exposed pads to solder wires to. Hooking these up to the Arduino gave him a programmable way to control the device. He got his radio license and implemented transmission of Morse Code, and an Arduino sketch is available in the write up.

[Lior] points out that his next step is to make a PCB to connect a different microcontroller to the device. This will give him a $40 radio that is fully programmable. After the break, check out a video of the hacked radio in action.

Continue reading “Hacking A Ham Radio”

Uzebox Coding Challenge

Uzebox Coding Challenge 2013

The 2013 Uzebox Coding Challenge is currently underway. This competition runs until June 1st, with registration open until April 1st. The Uzebox is an open source, 8 bit game console that uses only two chips: an ATmega644 microcontroller and a AD725 RGB to NTSC converter. We’ve featured it a few times in the past.

The competition rules are pretty loose: build a game or a useful piece of software that runs on the Uzebox, and fits in 61 kB. Entries will be judged on game play, originality, graphics, sound, completeness, and technical prowess. There’s prizes for the top six entries, including a few Uzeboxes and cash.

If you don’t have an Uzebox, check out the Uzem emulator. This lets you emulate the Uzebox hardware on Windows, Mac, or Linux. The emulator also has an internal GDB debug server to help with development. The low cost console can be built for about $30, and a number of kits are available.

Thanks to [Ben] for sending this in.

Adding A Home Theater Without Ruining A Victorian Home

projector-screen-in-a-victorian-home
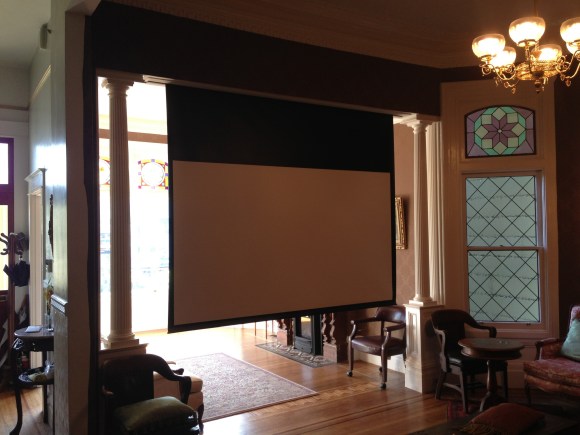
We understand where [John Clarke Mills] is coming from when he says he wants a home theater but not at the expense of dedicating a room to it. His situation is a bit more sticky than most folks in that he has a beautifully kept Victorian era home. Recently he was removing a renovation from ages past that didn’t fit with the style and it gave him the opportunity to build in this hidden projector screen.

Years ago someone walled in this opening and added french doors. After opening up the wall [John] sized up the situation and decided he had just enough room to build a soffit which could hide a rolled up projection surface. He purchased a motorized screen (we’ve seen a few diy projection screens but can’t remember one that rolls up) and built a slot into the design just large enough for the screen to pass through. He’s testing it out in the clip after the break before doing the plaster work.

The columns on either side are his additions as well. The floor of the house is unlevel and one of those columns ended up a full inch longer than the other. We certainly can’t tell.

Continue reading “Adding A Home Theater Without Ruining A Victorian Home”