The INFRA-NINJA — A PC Remote Receiver

F3GULGEHTOUJI73.MEDIUM

Laziness sometimes spawns the greatest inventions. Making things to reduce effort on your part is quite possibly one of the greatest motivators out there. So when [Kyle] had to get out of bed in order to turn off Netflix on his computer… He decided to do something about it.

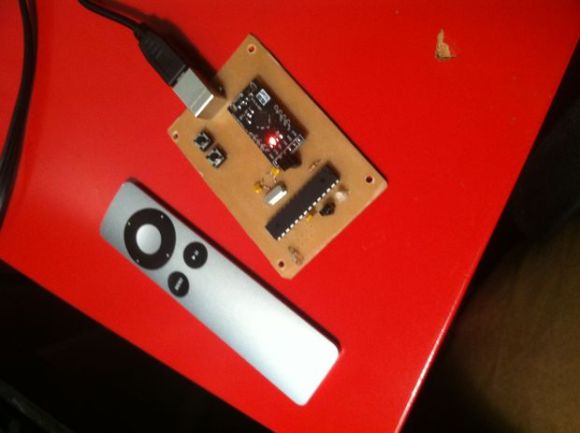
He already had an Apple remote, which we have to admit, is a nice, simple and elegant control stick — so he decided  to interface with it in order to control his non-Apple computer. He quickly made up a simple PCB up using the good ‘ol toner transfer method, and then populated it with a Bareduino, a CP2102 USB 2.0 to TTL UART 6PIN Serial Converter, an IR receiver, a USB jack, header pins, and a few LED and tactile switches.

It’s a bit tricky to upload the code (you have to remove the jumper block) but then it’s just a matter of connecting to it and transferring it over with the Arduino IDE. The Instructable is a bit short, but [Kyle] promises if you’re really interested he’ll help out with any questions you might have!


Never Lose Your Pencil With OSkAR On Patrol

OSkAR

[Courtney] has been hard at work on OSkAR, an OpenCV based speaking robot. OSkAR is [Courney’s] capstone project (pdf link) at Shepherd University in West Virginia, USA. The goal is for OSkAR to be an assistive robot. OSkAR will navigate a typical home environment, reporting objects it finds through speech synthesis software.

To accomplish this, [Courtney]  started with a Beagle Bone Black and a Logitech C920 webcam. The robot’s body was built using LEGO Mindstorms NXT parts. This means that when not operating autonomously, OSkAR can be controlled via Bluetooth from an Android phone. On the software side, [Courtney] began with the stock Angstrom Linux distribution for the BBB. After running into video problems, she switched her desktop environment to Xfce.  OpenCV provides the machine vision system. [Courtney] created models for several objects for OSkAR to recognize.

Right now, OSkAR’s life consists of wandering around the room looking for pencils and door frames. When a pencil or door is found, OSkAR announces the object, and whether it is to his left or his right. It may sound like a rather boring life for a robot, but the semester isn’t over yet. [Courtney] is still hard at work creating more object models, which will expand OSkAR’s interests into new areas.

Continue reading “Never Lose Your Pencil With OSkAR On Patrol”

3D Printed Cyclone Dust Separator

DSCN7011

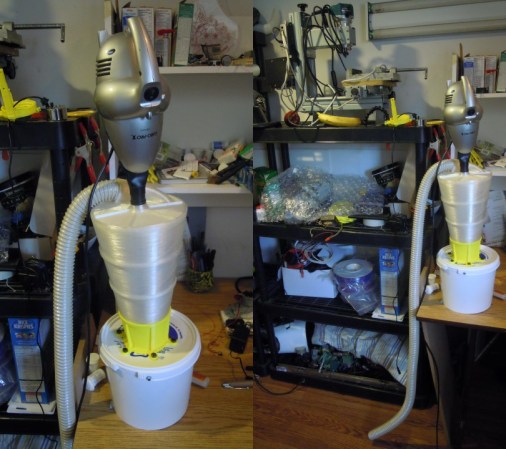
[Nicholas] has been reading Hackaday for a few months now, and after seeing several people’s dust extractor setups, he decided to make his own 3D printed version. And he’s sharing the files with everyone!

He has a small Lobo mill which produces a lot of dust and to clean up he’s been using a small “Shark” brand vacuum cleaner. It’s a powerful little thing, but has little to no capacity which makes it rather frustrating to use. This makes it a perfect candidate for a cyclone upgrade! If you’re not familiar with cyclonic separator it’s a way of removing dust from air using vortex separation — between rotational forces and gravity, this keeps the dust out of your vacuum cleaner and means you never need to change another filter!

Using Autodesk inventor he designed this 4-stage cyclone separator. It’s made for a 1.75″ OD vacuum hose (the Shark standard) but could be easily modified for different vacuums. We’ve seen lots of cyclone separators before, but this 3D printed one certainly makes it easier to fabricate to exacting standards!

Developed On Hackaday: 2 Days Left To Submit Your Design!

We’re sure that many of Hackaday readers already know that one of the two main components of the Mooltipass project is a smart card, containing (among others) the AES-256 encryption key. Two weeks ago we asked if you’d be interested coming up with a design that will be printed on the final card. As usual, many people were eager to contribute and recently sent us a few suggestions. If you missed the call and would like to join in, it’s not too late! You may still send your CMYK vector image at mathieu[at]hackaday[dot]com by sunday. More detailed specifications may be found here.

In a few days we’ll also publish on Hackaday a project update, as we recently received the top and bottom PCBs for Olivier’s design. The low level libraries will soon be finished and hopefully a few days later we’ll be able to ship a few devices to developers and beta testers. We’re also still looking for contributors that may be interested in helping us to develop browser plugins.

The Mooltipass team would also like to thank our dear readers that gave us a skull on Hackaday projects!

Recovering Nichrome Wire From Unexpected Sources

115b-guitar-hero

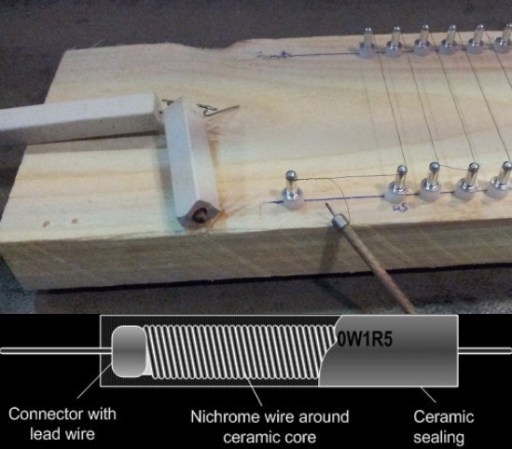
Don’t you hate it when you’re in a pinch and all your favorite surplus or electronic stores are closed? You’ve gotta finish this project, but how? He’s a nice real hack for you guys.  How to recover nichrome wire from a ceramic heater!

Necessity spawned this idea, as [Armilar] needed to make 45 cuts in two pieces of foam in order to ship some long circuit boards. Not wanting to make the 90 cuts individually, he improvised this nichrome slicing jig. Not having a spool of nichrome handy, he decided to use a less conventional method. He pulled out a sledgehammer and smashed open a ceramic wirewound resistor.

According to him, nice big ceramic resistors like this 10W one have about a meter of nichrome wire inside!  After breaking the ceramic, it’s quite easy to remove. He made up a jig using nylon spacers and rivets, and then wrapped his wire back and forth across the whole length. It worked perfectly — though he was using 240VDC @ about 1.2A…

If you don’t need such a complex setup, there’s always the bare bones wire foam cutters we’ve featured many times before.

Fail Of The Week: Rewiring Robosapien

fotw-rewiring-robosapien

Our first thought was “check out all of those TO-92 components!”, but then we saw the wiring nightmare. [Tom] picked up a Robosapien from an estate sale for just $10. Most hackers couldn’t resist that opportunity, but the inexpensive acquisition led to a time-consuming repair odyssey. When something doesn’t work at all you crack it open to see what’s wrong. He was greeted with wiring whose insulation was flaking off.

This is no problem for anyone competent with a soldering iron. So [Tom] set to work clipping all the bad wire and replacing it with in-line splices. Voila, the little guy was dancing to his own tunes once again! But the success was short-lived as the next day the robot was unresponsive again. [Tom] plans to do some more work by completely replacing the wires as soon as he receives the replacement connectors he ordered. So what do you think, is this an issue that will be resolved with a wire-ectomy or might there be actual damage to the board itself?


2013-09-05-Hackaday-Fail-tips-tileFail of the Week is a Hackaday column which runs every Wednesday. Help keep the fun rolling by writing about your past failures and sending us a link to the story — or sending in links to fail write ups you find in your Internet travels.

Fake Audiophile Opamps Revealed

chip

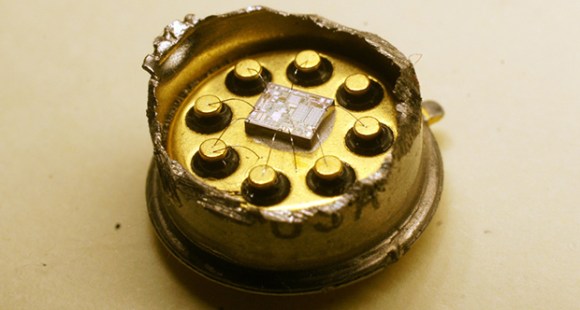
The OPA627 is an old, popular, and very high-end opamp found in gear cherished by the most discerning audiophiles. This chip usually sells for at least $15, but when [Zeptobars] found a few of these expensive chips on ebay going for $2, his curiosity was piqued. Something just isn’t right here.

[Zeptobars] is well known for his decapsulating and high-resolution photography skills, so he cut the can off a real OPA627, and dissolved one of the improbably cheap ebay chips to reveal the die. Under the microscope, he found an amazing piece of engineering in the real chip – laser trimmed resistors, and even a nice bit of die art.

The ebay chip, if it were real, would look the same. It did not. The ebay chip only contained one laser trimmed resistor and looks to be a much simpler circuit. After a bit of research, [Zeptobars] found it was actually an AD774 opamp. The difference is small, but the AD774 still has much higher noise – something audiophiles could easily differentiate with their $300 oxygen-free volume knobs.

This isn’t the first instance of component counterfeiting [Zeptobars] has come across. He’s found fake FTDI chips before, and we’re counting the days until he gets around to putting a few obviously fake ebay 6581 SID chips under the microscope.