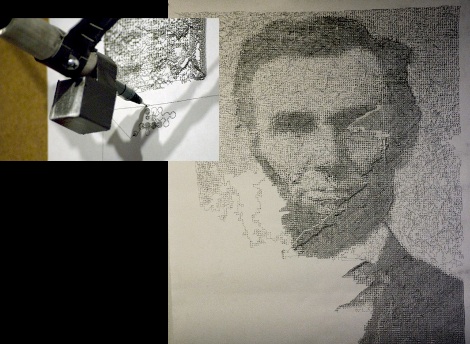
Drawbot Produces Portraits… Very Slowly

This robot artist, the Drawbot, produces images using an Arduino and Processing. A piece of paper is attached to a wall as a stylus connected to a couple of stepper motors scribbles out patterns that gradually become the image seen above. Each drawing is different and can take several weeks of constant operation to finish. That must have made debugging a real problem for [Harvey] during development. We wonder if this would work with homemade pencils?

Self-portrait Machine

selfportraitmachine

[Jen Hui Liao] created a device that guides the user into drawing a portrait of themselves. Dubbed Self-Portrait Machine, it comments on how much in society is created by machines and we are dependent on them. Unlike previous drawing robots, the user is part of the sketching process. The machine holds the users hands and uses stepper motors and servos to move them around like a LOGO turtle. Liao promises to have more details available soon. Video of the machine after the jump.

Continue reading “Self-portrait Machine”

Functional Etch A Sketch Costume

etchasketch

We love all of the creative Halloween costumes that have started trickling in now that the holiday is finally over, and people have found time to document their last minute projects. Take this functional Etch A Sketch costume made by [mazinbenny]. The knobs are lawnmower wheels. The pulley system is strung with 1/16″ wire rope to move a carrier for a dry erase marker. The marker draws directly on an acrylic screen. HowStuffWorks has a post on how a real aluminum powder based Etch A Sketch works.

We’ve covered more technical Etch A Sketch projects in the past. We’ve seen them hooked up to computer mice, drawing portraits at Maker Faire, and commenters have even suggested turning mechanical dry erase boards into giant Etch A Sketches.

Portrait Robot


[bre] passed along this portrait drawing robot from the same people that brought you the chief cook robot. Like the previous project, the portrait drawing bot emphasizes man machine interaction. The subject sits down and is asked for the quill. The robot captures the subject’s image and runs it through several processing steps. One set is to determine the contours and another is to determine the fill. The robot then draws the the contours and fills returning to the ink pot each time it reaches a trajectory threshold. Quill drawing can be quite hard for novice illustrators, but the robot’s smooth trajectory calculations prevent drips and stains.