AVR Vs PIC, Round 223: Fight!

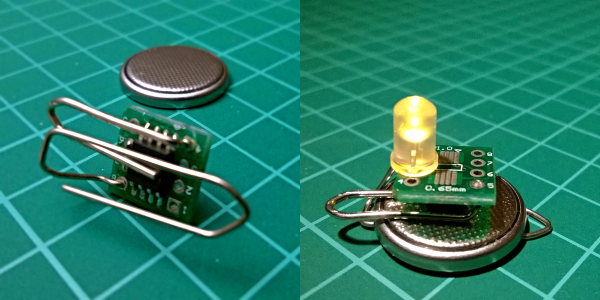
Get ready to rumble! [Thierry] made the exact same Hello-World-esque project with two microcontrollers (that are now technically produced by the same firm!) to see how the experience went.

It’s not just an LED-blinker, though. He added in a light-detection function so that it only switches on at night. It uses the Forest Mims trick of reverse-biasing the LED and waiting for it to discharge its internal capacitance. The point is, however, that it gives the chip something to do instead of simply sleeping.

Although he’s an AVR user by habit, [Thierry] finds in favor of the PIC because it’s got a lower power draw both when idling and when awake and doing some computation. This is largely because the PIC has an onboard low-power oscillator that lets it limp along at 32 kHz, but also because the chip has a lower power consumption in general. In the end, it’s probably a 10% advantage to the PIC on power.

If you’re competent with one of the two chips, but not the other, his two versions of the same code would be a great way to start familiarizing yourself with the other. We really like his isDarkerThan() function which makes extensive use of sleep modes on both chips during the LED’s discharge period. And honestly, at this level the code for the two is more similar than different.

(Oh, and did you notice [Thierry]’s use of a paper clip as a coin-cell holder? It’s a hack!)

Surprisingly, we’ve managed to avoid taking a stray bullet from the crossfire that occasionally breaks out between the PIC and AVR fans. We have covered a “shootout” before, and PIC won that round too, although it was similarly close. Will the Microchip purchase of Atmel calm the flames? Let’s find out in the comment section. We have our popcorn ready!

A Desktop Binary Clock

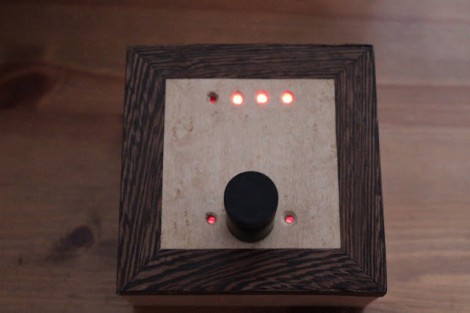
This is the desktop binary clock which [Tim the Floating Wombat] recently finished building. He calls it the Obfuscating Chronoscope since it’s a bit more difficult to read than your traditional analog or digital timepieces. But the simple design looks neat and it’s a great way to learn about board layout and microcontroller code.

He started by solving a few questions about the display technique. He wanted to use as few LEDs as possible. He settled on just four, and to prevent unnecessary confusion, decided to make sure each type of display (seconds, minutes, hours) would have at least one LED on at a time. Hours are easy enough to display, but with just four bits how can minutes be shown? He uses a 5-minute resolution, always rounding up to the next division of five. This way the first bit will be illuminated on the hour.

A PIC 24F16KA102 microcontroller keeps time using its built-in RTC and a clock crystal. It puts itself into deep sleep mode after displaying the time. The black knob at the bottom is a push-button which resets the chip, waking it up just long enough show the time once again.

Building A Battery-powered Motion Alarm

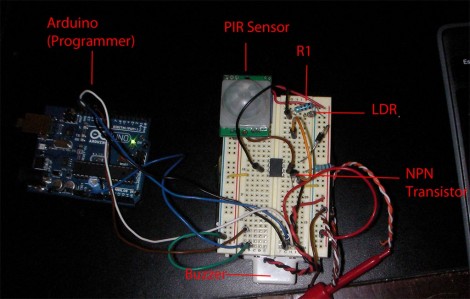
[Brad] was asked by his Sister to design a motion-based alarm that would help her catch her son sneaking out of the house at night. Obviously this didn’t need to be a long-term installation so he decided to throw something together that is only active at night and can be battery-powered. What he came up with is a light-sensitive motion sensor that uses very little power.

He knew that an Arduino would be overkill, and decided to try his hand at using the Arduino to develop code for an ATtiny85. It has an external interrupt pin connected to the output of the PIR module, which triggers action when motion is detected. The first thing it does is to check the photoresistor via the ADC. If light levels are low enough, the buzzer will be sounded. [Brad] measured the current consumption of his circuit and was not happy to find it draws about 2.5 mA at idle. He spent some time teaching himself about the sleep functions of the AVR chips and was able reduce that to about 500-600 uA when in sleep mode. Now all he has to do is find a nice place behind the house to mount the alarm and there’ll be no more sneaking around at night.

If you’re trying to keep a tight leash on your own kids you could always make them punch the time clock.

Stretch Your Circuit’s Battery Life By Putting Your PIC To Sleep

pic_power_savings

[Rajendra Bhatt] wrote in to share the latest in a series of PIC tutorials, which covers the microcontroller’s Sleep mode – a very useful tool for limiting current consumption in battery-powered applications.

He discusses how to put the PIC in sleep mode, as well as some common mistakes to watch out for, such as accidentally allowing I/O pins to sink or source current while sleeping. [Rajendra] also walks through the various ways a PIC can be brought out of sleep mode, focusing the majority of his tutorial to the mcu’s watchdog timer.

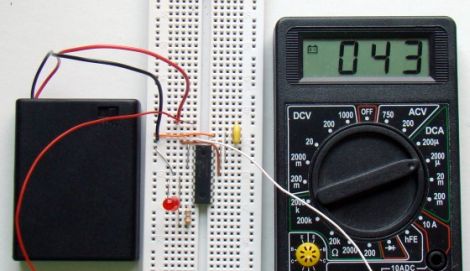
Using a PIC16F628A, he constructs a test circuit which allows him to demonstrate the power savings gained by using sleep mode rather than the microcontroller’s built-in delay function. The circuit simply blinks an LED every 4.3 seconds, using the watchdog timer for the first 2.3 seconds, and a delay() call for the rest of the time.

The power savings are quite substantial, similar to the results we saw using AVR microcontrollers a few weeks ago. [Rajendra] found that using the sleep function limited current consumption to about 4.5% of the current used when calling the mcu’s delay function – a huge savings.

Sleepy Arduino Saves Batteries

06_11 (Custom)

Battery life is often overlooked when building projects, especially for beginners. This tutorial takes you through the setup of power saving modes for the Arduino. Utilizing the watchdog and sleep functions, they put the chip into a hibernation mode between cycles. An optimum configuration could take your battery life from 4 days to about 3 years.  For a lot of you, this is old news. But for the rest, this is really good stuff. You can download a sample application from the site that mimics the singing of a nightingale when the sun goes down.