Emulating And Cloning Smart Cards

A few years ago, we saw a project from a few researchers in Germany who built a device to clone contactless smart cards. These contactless smart cards can be found in everything from subway cards to passports, and a tool to investigate and emulate these cards has exceptionally interesting implications. [David] and [Tino], the researchers behind the first iteration of this hardware have been working on an improved version for a few years, and they’re finally ready to release it. They’re behind a Kickstarter campaign for the ChameleonMini, a device for NFC security analysis that can also clone and emulate contactless cards.

While the original Chameleon smart card emulator could handle many of the contactless smart cards you could throw at it, there at a lot of different contactless protocols. The new card can emulate just about every contactless card that operates on 13.56 MHz.

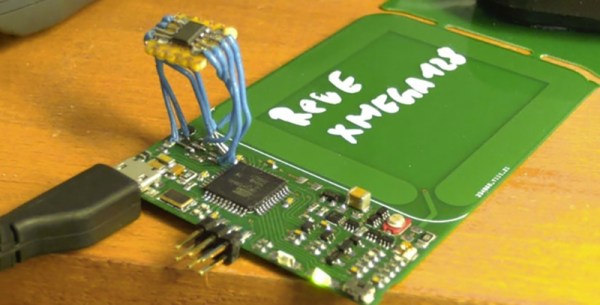
The board itself is mostly a PCB antenna, with the electronics based on an ATXMega128A4U microcontroller. This micro has AES and DES encryption engines, meaning if your contactless card has encryption and you have the cryptographic key, you can emulate that card with this device. They’re also making a more expensive version that also has a built-in reader that makes the ChameleonMini a one-stop card cloning tool.

OLED display, blue LED and Smartcard

Developed On Hackaday: Front Panels And Beta Testers Program

mooltipass front panel

We’re pretty sure that most of our readers already know it by now, but we’ll tell you anyway: the Hackaday community (writers and readers) is currently developing an offline password keeper, the Mooltipass. As it has been more than two weeks since we wrote an article about our progress, today’s will be about the Mooltipass front panels and our beta testers program.

At the end of our mechanical design rundown article we showed that we were originally planning to put a slightly tinted acrylic panel on top of our device. We however could still make out the Mooltipass’ insides, which wasn’t in line with the nice professional look we wanted. We then designed another front panel, one which was transparent above the OLED screen/LEDs and opaque (black) on top of the rest. To our surprise the result still wasn’t as good as we had hoped, as the contrast between the front panel and the screens/LEDs was too big. We finally came up with the panel shown above (see GitHub repository folder) which combines the two techniques previously described. As it is still in China, we’ll show you the final result when we get it in our hands.

We launched around 10 case prototypes in production, they will soon be shipped to our current contributors/advisers together with the smart cards chosen by Hackaday readers. In the meantime we sent our official call for beta testers to our mailing list recipients and hackaday.io followers, in which we asked them to fill a small form that will allow us to know them a bit better. We asked about their home/work computer setup, their level of expertise, their willingness to contribute to the prototype cost and finally specifics about who would use the Mooltipass they’d receive. We are targeting a broad range of users but also testers that will provide us with detailed feedback and clear bug reports.

We also spent quite a while searching for cheaper alternate parts that could be sourced in relatively big quantities. This is usually an overlooked aspect of a project so we preferred to tackle this as soon as possible. In a few weeks the contributors and I will receive all the components required to assemble our final prototype (front panels / case / top & bottom PCBs / smart cards) and it will be time to write a new update. Want to stay informed? You can join the official Mooltipass Google Group or follow us on Hackaday Projects.

Developed On Hackaday: Coding Conventions And GitHub Pull Requests

The Hackaday community is currently very busy coding the low-level libraries of our open-source offline password keeper project. And when many talented contributors work together on a common concept, interesting discussions take place. In our dedicated Google Groups, some of them were about the choice of naming/coding conventions and also how/when to approve GitHub pull requests. But don’t leave already… this topic is actually more interesting than it sounds.

The age difference between the older and younger firmware contributor is guessed to be approximately 30 years… and many things can happen in such a time frame. Even though our coders are writing in C, most of them code in other programming languages at school/work. They also use different text editors on different operating systems. Understandably, each one of them therefore has its preferred coding / naming convention and indent style. The Mooltipass conventions were selected based on majority voting, and after many emails we settled on an Allman style convention with camelCase:

main(void)
{
    if (foo)
    {
        functionCall();
    }
    else
    {
        foo = 0;
        anotherFunctionCall();
    }
}
– 79 characters line length as a soft requirement
– 4 spaces, no tabs

Most of the contributors believe that it is the best compromise between code clarity and cross-platform compatibility, but we would be curious to know our Hackaday readers’ opinions on this particular topic.

The second matter is a bit more of a management one. What is the best strategy to manage and review code changes made to a main GitHub repository, when a project is at its infancy and composed of (more or less) non-remunerated contributors?
It is perfectly understandable that interest, spare time and willingness to contribute may vary over time. Perhaps some of our readers may already be familiar with Agile software development, a group of software development methods based on iterative and incremental development, which promotes adaptive planning, evolutionary development and encourages rapid and flexible response to change. Do you think this can be applied to the Mooltipass project?

We would be curious to hear similar experiences on these topics, as we gladly accept constructive criticism. You may also want to join our dedicated Google group to check out the different discussions that already happened there. On a side note, we are also currently looking for capacitive wheel / touch button footprints libraries for Kicad.

Developed On Hackaday: The Current Project State

It has been quite a while since we updated our readers with the current state of the Mooltipass, the offline password keeper project developed by the Hackaday staff and community.

A few weeks ago we presented you the designs that our mechanical contributors had thought of. We organized a poll to get a feeling of what the favorite designs may be and around one thousand people expressed their opinions. The first three favorite designs with their corresponding votes were:

Continue reading “Developed On Hackaday: The Current Project State”

Developed On Hackaday: The Designs

We know that many of our readers have been impatiently waiting to discover what the Hackaday community-developed offline password keeper project will look like. Today we present you several designs that our mechanical contributors came up with and we will ask you to give your opinion about them. Obviously these are just preliminary cases that may evolve along the way, but we will only produce the electronics for the designs you prefer.

All the designs are embedded after the break, with a multiple-choices poll to express your interest. You may also want to join the Mooltipass Google Group in case you’d want to talk about the designs in more depth or meet their creators. On the firmware side, I just finished soldering many mooltipass prototypes that will be shipped in the coming days to our firmware developers. As you may have noticed, this project is gaining speed!

Continue reading “Developed On Hackaday: The Designs”

Developed On Hackaday: We Have Pixels!

It has been a while since we kept you informed about the current state of the Mooltipass project. Well, several days ago we finally received the PCBs we got produced at Seeedstudio. Keep in mind that this first version (shown in the picture above) is only meant to check that the chosen components can suit our needs while our mechanical contributors work on their designs. Moreover, we may add empty footprints for our readers that may want to hack the device.

After a few hours of soldering and a few days of coding, we finally got a basic firmware running. The OLED screen is easily readable and has an amazing contrast (the picture doesn’t do it justice). So far we checked all basic functionalities of the on-board components and it’ll still take a few days/weeks to be certain that we can settle with them. We are therefore starting to ship a few platforms to the firmware developers that want to work on the core functions of the Mooltipass. So if you’re an experienced C developer and have some spare time, you may get onboard by contacting me at mathieu[at]hackaday[dot]com or by joining the Mooltipass Google Group.

In a few days we will publish the designs that our mechanical guys came up with and we’ll ask you to let us know which ones are your favorites. Depending on how things will go, we may produce PCBs for several of them to select our final design based on user experience and ease of use. We look forward to hearing your feedback in the comments section below!

Developed On Hackaday: First Version Of The Hardware

mooltipass-schematic-featured

The Hackaday writers and readers are currently working hand-in-hand on an offline password keeper, the mooltipass (click to see the project description). 

Next in our Developed on Hackaday series, we present the first version of our schematics. There’s already been a lot of discussions going on in our dedicated Google group, mainly about the project’s basic functionality. Because our firmware developers wanted to get to work, we decided to send the first version of our hardware into production a few days ago. Before going through the schematics, let’s review the required list of the mooltipass’s core components:

  • an easily-readable screen
  • a read-protected smart-card
  • large flash memory to store the encrypted passwords
  • an Arduino-compatible microcontroller with USB connectivity

We’ve been drowning in component suggestions from motivated hobbyists, so we figured we’d make the mooltipass v1 as simple as possible and then move from there. Given this device is developed on Hackaday, we also wanted future users to modify it, building completely new projects based around these main components. Keep reading for our schematics…

Continue reading “Developed On Hackaday: First Version Of The Hardware”