Developed On Hackaday : HaDge Update – It’s A HACK

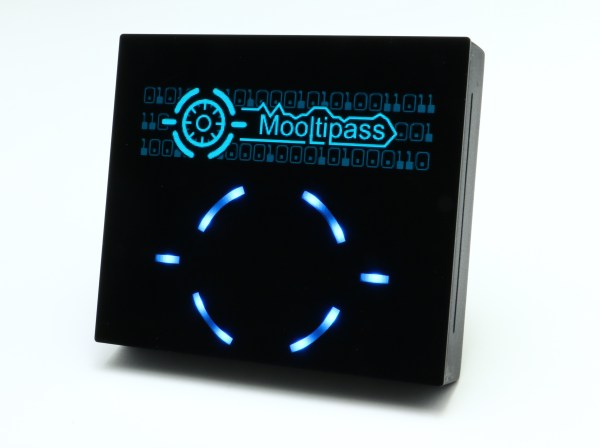
Work on HaDge – the Hackaday con badge, continues in bits and spurts, and we’ve had some good progress in recent weeks. HaDge will be one conference badge to use at all conferences, capable of communicating between badges.

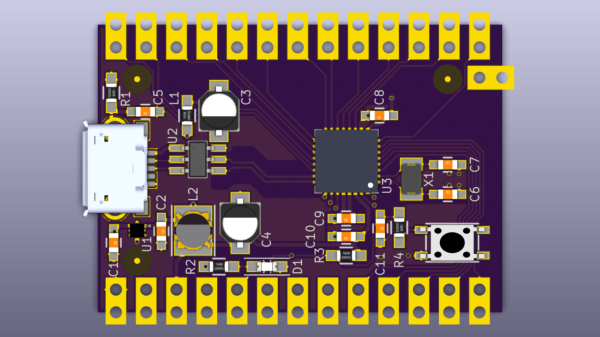
Picking up from where we left off last time, we had agreed to base it around the Atmel D21, a 32-bit ARM Cortex M0+ processor. To get some prototype boards built to help with software development, we decided to finish designing the HACK before tackling HaDge. HACK is a project that [Michele Perla] started that we have sort of assimilated to act as the prototyping platform for HaDge. We wanted a compact micro-controller board and hence opted for the SAM D21E – a 32 pin package with 26 IO’s.

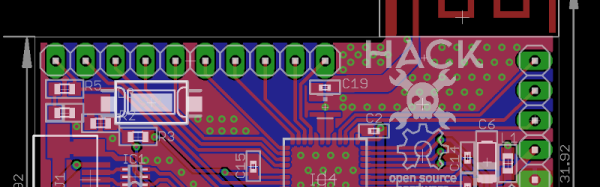
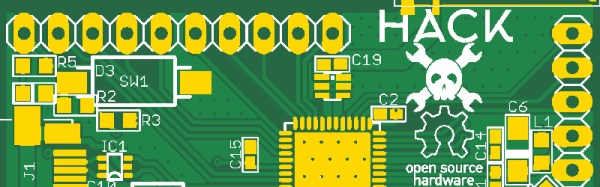
[Michele Perla] had earlier designed HACK based on the larger 32 pin SAM D21G and used Eagle to hack-brd
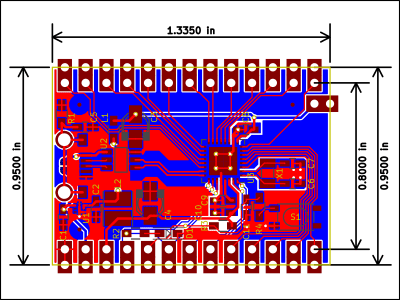
draw the schematic and layout. Using the Eagle to KiCad script, he quickly converted the project and got on to making the board layout. I took up the rear guard, and worked on making his schematic (pdf) “pretty” and building up a schematic library of symbols. While [Michele] finished off the board layout, I worked on collecting STEP models for the various footprints we would be using, most of which I could get via 3dcontentcentral.com. The few I couldn’t were built from scratch using FreeCAD. The STEP models were converted to VRML using FreeCAD. Using [Maurice]’s KiCad Stepup script, we were able to obtain a complete STEP model of the HACK board.

HACK is now ready to go for board fabrication and assembly. We plan to get about 20 boards made and hand them out to developers for working on the software. The GitHub repository has all the current files for those who’d like to take a look – it includes the KiCad source files, PDFs, gerbers, data sheets and images. The board will be breadboard compatible and also have castellated pads to allow it to be soldered directly as a module. Let us know via group messaging on the HACK project page if you’d like to get involved with either the software or hardware development of HaDge.

In a forthcoming post, we’ll put out ideas on how we plan to take forward HaDge now that HACK is complete. Stay tuned.

Developed On Hackaday – HaDge Is Back To The Drawing Board

A couple of days back, we wrote about the HACK – a prototyping platform designed by [Michele Perla] based on the Atmel SAM R21 MCU. It’s one of the new breed of devices consisting of an ARM Cortex-M0 MCU + IEEE 802.15.4 Wireless radio bundled together. This was exciting since we could pack a lot of punch in the HaDge hardware. We planned to use the same design later to power the HaDge. Building HACK would have allowed us to get it in the hands of the software team, while the hardware folks worked on the real HaDge layout.

The HACK design was ready for review and we asked around to verify the antenna layout, which was the part we were not too sure about.  We asked Atmel for help with verifying the layout. That’s when we had the facepalm moment. They asked us – “What about FCC certification?” Since we plan to build the badges in quantities of a few hundred at the very least, it’s obvious we cannot escape from FCC certification. A design based around the R21 is ruled out – the cost of obtaining approval is pretty high. This means we need to punt the R21 and instead use an off-the-shelf radio module which is already FCC certified. Sigh.

Now the good news. This is a setback in terms of time, and effort put in by [Michele]. But beyond that, we’re good to go back to the drawing board and start afresh. First off, we decided to revert back to the Atmel D21 as the main controller. It’s a fairly decent MCU, and there’s a fairly robust tool chain available that a lot of people are familiar with. For the Radio, we are looking at some of these available options :

The last one from Microchip looks quite promising. But we’re open for better and cheaper suggestions, so please chime in with your comments.

Developed On Hackaday – It’s A Badge. No, It’s The HaDge

Sometime back, we announced start of a new project under the “Developed on Hackaday” series – a Badge for the Hackaday community. At its core, this badge is a single node in an Internet of Badges. At every event this badge is deployed at, a Hackaday Sub-Etha mesh network will be created, and each badge will be able to transmit and receive messages from other badge wearers. There are plans for an Sub-Etha to Internet gateway, so even if badge wearers are on the other side of the world, they’re still connected through the HaDge network.

Things have been moving along quickly, so I thought of doing a quick round-up and share progress with the community. First off, it has a name. HaDge, as in HackaDay Badge. Our objectives up until now were to set up a team, name the project, set up repositories and lock down on a working bill of materials. Within a few weeks, we’ve got all of that tied down. The HaDge group chat channel has been super active, and everyone’s been pitching in with ideas and suggestions. A spreadsheet seemed like a good idea – it let everyone add in their suggestions regarding candidate parts, create a feature list and then talk about it on the channel.

We realized early on that building the hardware is going to take some time. So in the interim, we need a dev kit platform to get in to the hands of the software developers so they can start working on the smarts that will power the HaDge. [Michele Perla] had already built JACK (Just another Cortex kit) – a development kit powered by the Atmel SAM D21. It’s pretty bare bone with just the bare minimum of parts to make it work while keeping an eye on reliability. The microcontroller+radio on the HaDge is the Atmel SAM R21 – a close relative of the D21, so it made sense to respin the JACK and create HACK (Hackaday Cortex kit) – a development kit powered by the Atmel SAM R21 that is going to be used as the core of the HaDge. [Michele] has worked hard single-handedly to complete the design and it is now ready to go for PCB fabrication soon. We are just awaiting some feedback and review of the Antenna part of the design. None of us on the hardware team have a strong RF-fu so we don’t want to make an avoidable mistake. If you’d like to review and help vet the HACK design, grab the design files from the github repo and let us know.

Once HACK board layout is cleared for fabrication, we’ll work on building kits that can be sent out to the software folks. We will also be working on porting the HACK design in to KiCad and this is something I have already stared work on. I started by using the neat Eagle2KiCad conversion tool by [LachlanA]. It’s not perfect, but it does reduce the work involved in porting over from Eagle to Kicad. Once that is done, hardware development for the actual HaDge will see some progress – keep a watch on the project page.

Developed On Hackaday: Let’s Build An Electronic Hackaday Badge

We’re going to build an electronic Hackaday Badge, and by “we”, I mean Hackaday community members who are passionate about the project.

I’ll be leading the charge. I had a great learning experience the last time I helped design the e-paper badge for the 2013 Open Hardware Summit, and hope to learn a lot along the way this time too. Since then, Badges have come a long way – at cons like DEFCON, LayerONE, Shmoocon, The Next Hope, Open Hardware Summit, The EMF, SAINTCON, SXSW Create, The Last Hope, TROOPERS11, ZaCon V and of course the rad1o from this year’s CCCamp. Word is that this year’s Open Hardware Summit badge is going to be pretty kickass too. So, we have some very big shoes to fill. But this doesn’t have to be about “my badge is better than yours”. And this badge isn’t meant to be specific to any single con or event. So what does the Badge do, then? “It’s a physical extension of the hackaday.io community, made specifically for hacker gatherings of all types and sizes.”

Continue reading “Developed On Hackaday: Let’s Build An Electronic Hackaday Badge”

Developed On Hackaday: Crowd- Funding Campaign Start!

For a little less than a year open source enthusiasts from all over the globe got together to work on an open source offline password keeper. We narrated our progress here on Hackaday and always asked our readers’ opinion when critical decisions were to be made.

Today, the wait is finally over: the Mooltipass crowdfunding campaign finally arrived.

In some of our Developed on Hackaday series posts we noticed that it was tricky for us to convey the benefits of the device we were developing. The first 3 minutes of our video therefore explain good security practices and how the Mooltipass can help users with their credentials security. For our readers that may not have followed our adventure since its beginning, the campaign’s text will provide them with a simple (yet detailed) explanation of what the Mooltipass can do. Finally, our geeky readers will find at the end of our write-up a few links supporting our claims. We would have liked offering cheaper pledges but we unfortunately need to hire professional javascript developers to finish our app & extension.

Our Mooltipass Developed on Hackaday series therefore come to an end. We would like to thank you for your support and hope that you enjoyed seeing an idea materialize into a crowdfunding-ready product!

Developed On Hackaday: The Answer Is Below

In one month the Mooltipass offline password keeper project will be one year old.

We hope that our twice a month Developed on Hackaday series posts allowed our dear readers to see what are the steps involved in a device’s life, going from idea to prototype to crowdfunding-ready product. The Mooltipass is the fruit of a unique world-wide collaboration around open source, developed by and for security minded people who (for most of them) never saw each other. Relating our progress here enabled us to benefit from our readers’ feedback and make sure that we didn’t miss important wanted features. Contrary to other campaigns that we often debunk on Hackaday, we preferred to wait until we had a beta-tester approved device to move to the crowdfunding stage. Our geekiest readers will therefore find the launch date embedded in this post, other may want to subscribe to our official Google group to stay updated.

Mooltipass Installation Process Is Now Dead Simple

In a few weeks the Hackaday community offline password keeper will reach a crowdfunding platform. This is a necessary step as only a high production volume will allow our $80 early bird perk target. We’ll therefore need you to spread the word.

Thanks to the Chromium development team, a few days ago the Mooltipass installation process became as simple as installing our app & extension. As you may remember, our device is enumerated as composite HID proprietary / HID standard keyboard. This makes it completely driverless for all operating systems and enables standalone operation as the Mooltipass can type logins and passwords selected through its user interface. Management communications are therefore done through the Mooltipass HID proprietary interface, which Chrome 38 now natively supports through its chrome.hid API. The simpler our installation process is, the more likely the final users will appreciate the fruit of our hard labor.

As our last post mentioned there’s still plenty of space for future contributors to implement new functionalities. Our future crowdfunding campaign will allow us to find javascript developers for the remaining app & extensions tasks and also implement other browsers support. Want to stay tuned of the Mooltipass launch date? Subscribe to our official Google Group!