screenshow showing the supposed AllSpice interface. It resembles the GitHub interface, and shows a pull request open to add some ESD protection to a device.

AllSpice Building A Hardware Development Ecosystem For Companies

In our “hardware development gets serious” news, we’ve recently learned about AllSpice, a startup building hardware development collaboration infrastructure for companies. Hardware developers are great at building hardware tools for themselves, but perhaps not always so when it comes to software, and AllSpice aims to fill that gap at the “hardware company” level. Nowadays, what commonly happens is that software development tools and integrations are repurposed for hardware needs, and the results aren’t always as stellar as they get in the software world. In other words, AllSpice is learning from the positive outcomes of software industry and building a platform that takes the best parts from these tools, aiming to get to similarly positive outcomes in areas where currently hardware team experiences are lacking.

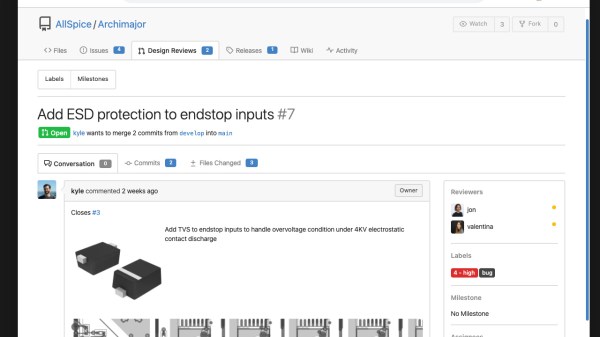
What AllSpice is building seems to be an umbrella platform designed to augment, integrate and hook into a slew of different already-developed platforms like GitHub, GitLab, Jira (and some other ones), and add much-needed features that large-scale hardware developers can’t afford to maintain and develop themselves. “Design review by screenshot” isn’t unheard of in hardware circles, and likely a thing that everyone of us with hardware collaboration experience has partaken in. On a company scale, there’s a myriad of hardware-related problems like that to solve and polish over.

Continue reading “AllSpice Building A Hardware Development Ecosystem For Companies”

Exploring The Raspberry Pi 4 USB-C Issue In-Depth

It would be fair to say that the Raspberry Pi team hasn’t been without its share of hardware issues, with the Raspberry Pi 2 being camera shy, the Raspberry Pi PoE HAT suffering from a rather embarrassing USB power issue, and now the all-new Raspberry Pi 4 is the first to have USB-C power delivery, but it doesn’t do USB-C very well unless you go for a ‘dumb’ cable.

Join me below for a brief recap of those previous issues, and an in-depth summary of USB-C, the differences between regular and electronically marked (e-marked) cables, and why detection logic might be making your brand-new Raspberry Pi 4 look like an analogue set of headphones to the power delivery hardware.

Continue reading “Exploring The Raspberry Pi 4 USB-C Issue In-Depth”

Why I Go Through So Many Arduinos

I make things for people that can’t be bought off a shelf, and in the past several years I have gone through a lot of Arduinos. More and more, they are simply the right tool for both the job and the client. This wasn’t always the case; what changed?

My clients today still include startups and other small businesses, but more and more they’re artists, hobbyists venturing into entrepreneurship, or people who make one-offs like the interactive displays you find in museums or science centers. The type of people I work for has changed, and because of this, the right tool for their job is almost always an Arduino.

Continue reading “Why I Go Through So Many Arduinos”

Developed On Hackaday : HaDge Update – It’s A HACK

Work on HaDge – the Hackaday con badge, continues in bits and spurts, and we’ve had some good progress in recent weeks. HaDge will be one conference badge to use at all conferences, capable of communicating between badges.

Picking up from where we left off last time, we had agreed to base it around the Atmel D21, a 32-bit ARM Cortex M0+ processor. To get some prototype boards built to help with software development, we decided to finish designing the HACK before tackling HaDge. HACK is a project that [Michele Perla] started that we have sort of assimilated to act as the prototyping platform for HaDge. We wanted a compact micro-controller board and hence opted for the SAM D21E – a 32 pin package with 26 IO’s.

[Michele Perla] had earlier designed HACK based on the larger 32 pin SAM D21G and used Eagle to hack-brddraw the schematic and layout. Using the Eagle to KiCad script, he quickly converted the project and got on to making the board layout. I took up the rear guard, and worked on making his schematic (pdf) “pretty” and building up a schematic library of symbols. While [Michele] finished off the board layout, I worked on collecting STEP models for the various footprints we would be using, most of which I could get via 3dcontentcentral.com. The few I couldn’t were built from scratch using FreeCAD. The STEP models were converted to VRML using FreeCAD. Using [Maurice]’s KiCad Stepup script, we were able to obtain a complete STEP model of the HACK board.

HACK is now ready to go for board fabrication and assembly. We plan to get about 20 boards made and hand them out to developers for working on the software. The GitHub repository has all the current files for those who’d like to take a look – it includes the KiCad source files, PDFs, gerbers, data sheets and images. The board will be breadboard compatible and also have castellated pads to allow it to be soldered directly as a module. Let us know via group messaging on the HACK project page if you’d like to get involved with either the software or hardware development of HaDge.

In a forthcoming post, we’ll put out ideas on how we plan to take forward HaDge now that HACK is complete. Stay tuned.

Developed On Hackaday – HaDge Is Back To The Drawing Board

A couple of days back, we wrote about the HACK – a prototyping platform designed by [Michele Perla] based on the Atmel SAM R21 MCU. It’s one of the new breed of devices consisting of an ARM Cortex-M0 MCU + IEEE 802.15.4 Wireless radio bundled together. This was exciting since we could pack a lot of punch in the HaDge hardware. We planned to use the same design later to power the HaDge. Building HACK would have allowed us to get it in the hands of the software team, while the hardware folks worked on the real HaDge layout.

The HACK design was ready for review and we asked around to verify the antenna layout, which was the part we were not too sure about.  We asked Atmel for help with verifying the layout. That’s when we had the facepalm moment. They asked us – “What about FCC certification?” Since we plan to build the badges in quantities of a few hundred at the very least, it’s obvious we cannot escape from FCC certification. A design based around the R21 is ruled out – the cost of obtaining approval is pretty high. This means we need to punt the R21 and instead use an off-the-shelf radio module which is already FCC certified. Sigh.

Now the good news. This is a setback in terms of time, and effort put in by [Michele]. But beyond that, we’re good to go back to the drawing board and start afresh. First off, we decided to revert back to the Atmel D21 as the main controller. It’s a fairly decent MCU, and there’s a fairly robust tool chain available that a lot of people are familiar with. For the Radio, we are looking at some of these available options :

The last one from Microchip looks quite promising. But we’re open for better and cheaper suggestions, so please chime in with your comments.

Developed On Hackaday – It’s A Badge. No, It’s The HaDge

Sometime back, we announced start of a new project under the “Developed on Hackaday” series – a Badge for the Hackaday community. At its core, this badge is a single node in an Internet of Badges. At every event this badge is deployed at, a Hackaday Sub-Etha mesh network will be created, and each badge will be able to transmit and receive messages from other badge wearers. There are plans for an Sub-Etha to Internet gateway, so even if badge wearers are on the other side of the world, they’re still connected through the HaDge network.

Things have been moving along quickly, so I thought of doing a quick round-up and share progress with the community. First off, it has a name. HaDge, as in HackaDay Badge. Our objectives up until now were to set up a team, name the project, set up repositories and lock down on a working bill of materials. Within a few weeks, we’ve got all of that tied down. The HaDge group chat channel has been super active, and everyone’s been pitching in with ideas and suggestions. A spreadsheet seemed like a good idea – it let everyone add in their suggestions regarding candidate parts, create a feature list and then talk about it on the channel.

We realized early on that building the hardware is going to take some time. So in the interim, we need a dev kit platform to get in to the hands of the software developers so they can start working on the smarts that will power the HaDge. [Michele Perla] had already built JACK (Just another Cortex kit) – a development kit powered by the Atmel SAM D21. It’s pretty bare bone with just the bare minimum of parts to make it work while keeping an eye on reliability. The microcontroller+radio on the HaDge is the Atmel SAM R21 – a close relative of the D21, so it made sense to respin the JACK and create HACK (Hackaday Cortex kit) – a development kit powered by the Atmel SAM R21 that is going to be used as the core of the HaDge. [Michele] has worked hard single-handedly to complete the design and it is now ready to go for PCB fabrication soon. We are just awaiting some feedback and review of the Antenna part of the design. None of us on the hardware team have a strong RF-fu so we don’t want to make an avoidable mistake. If you’d like to review and help vet the HACK design, grab the design files from the github repo and let us know.

Once HACK board layout is cleared for fabrication, we’ll work on building kits that can be sent out to the software folks. We will also be working on porting the HACK design in to KiCad and this is something I have already stared work on. I started by using the neat Eagle2KiCad conversion tool by [LachlanA]. It’s not perfect, but it does reduce the work involved in porting over from Eagle to Kicad. Once that is done, hardware development for the actual HaDge will see some progress – keep a watch on the project page.

Lessons From The Fablab Masters

I spent some time recently at the Fab11 conference, a gathering of the people behind the Fab Labs that are springing up all over the world, where entrepreneurs, hackers and the curious can learn about making things. So, it was no surprise that this was a great place to pick up some tips on designing, building and hacking things. Here are a few of the lessons I picked up at this fascinating gathering of the fabbers.

Build Quickly

If you can make something in an hour, you’ll make it better in a day

said [Joris Van Tubergen]. He knows something about making unusual things because he 3D printed a full-sized Elephant. To do this, he worked out how to hack the Ultimaker 2 3D printer to print to an unlimited Z height by flipping the printer upside down and moving the Z motor to lift the printer rather than the print head. With a few tweaks to the software, he could then print full-height elephant slices to speed up the process. He is absolutely right: while it is tempting to endlessly fiddle with a concept on paper, you learn more by building a prototype, even if it doesn’t work.

Continue reading “Lessons From The Fablab Masters”