Using Newlib With Stellaris Launchpad

using-newlibc-with-stellaris-launchpad

[Brandon] is taking us further down the rabbit hole by demonstrating how to use newlib with the TI Stellaris Launchpad. This is a nice continuation of the framework he built with his post about using GCC with ARM hardware. But it is most certainly one level of complexity deeper than that initial article.

Using newlib instead of glibc offers the option of compiling C code that includes system calls common when coding for computers but which are rare in embedded systems. Using something like printf is generally avoided because of the overhead associated with it. But these processors are getting so fast and have so much RAM that it may be useful in certain cases. We briefly thought about implementing malloc for creating a linked list when working on our STM32 snake game. [Brandon’s] work here makes the use of that command possible.

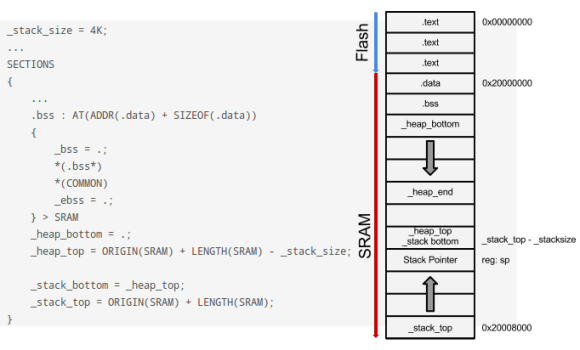
The process starts by adding labels for the beginning and end of the stack/heap. This makes it possible for functions to allocate memory. After taking care of the linker script changes you must implement a few system call functions like _sbrk.

Level Converters To Make All Your Hardware (5.5V And Under) Play With Each Other

txb0108-level-converters-ks0108-stellaris-launchpad

I finally set aside some time for one of my own projects. I have been playing around with ARM microcontrollers a lot lately and wanted to try out my GLCD display that uses the KS0108 protocol. It’s 5V but I had heard that some of these displays will work with 3.3V TTL. But the datasheet tells me otherwise. I tried using a pull-up resistor to 5V and configuring the Stellaris Launchpad pins to open drain, but the low voltage wasn’t getting below the 0.3V threshold needed by my display. My only choice was to use some type of level conversion. I actually ended up driving the KS0108 using a pair of TXB0108 level converters.

I figured this had to have been done before so I check over at Sparkfun. Their offerings are either one-way or have a direction pin that you must drive yourself. I figured there had to be a bi-directional solution and a search over at Mouser led me to the TXB0108. It is exactly what I was looking for and as you can see I etched my own circuit boards to make the TSSOP chips breadboard compatible. I’ve documented the process you can find the code and board files at my post linked above.

Update: one of the Reddit comments mentions this chip is available on a breakout board from Adafruit if you’re interested.

Mass Storage Bootloader For Stellaris Launchpad

mass-storage-bootloader-ti-stellaris-launchpad

[Andrzej Surowiec] liked the functionality of the mass storage bootloader available on some NXP LPC development boards. His latest project was to write a mass storage bootloader for the Stellaris Launchpad. It allows you to flash your compiled firmware to the chip simply by mounting the board as a USB storage device and copying over the binary file. The chip has plenty of flash memory (the bootloader itself takes up 16 KB of the available 256 KB), and the board is already set up for use as USB hardware.

There is a precompiled binary available at the linked page above or you can get the source code from his github repository. We think this project is a good stepping off point for others. For instance, it should be relatively easy to use [Andzej’s] work as the base for implementing filesystem-based I/O control like we saw in the phatIO project.

A Study Of GCC And The TI Stellaris

hard-look-at-stellaris-and-gcc

There are several things that we really like about the TI Stellaris. We think the peripheral library — called Stellarisware — has a pretty intuitive API that makes it easy to get into. But we’re also quite impressed that the software comes with makefiles that build the libraries and examples using your own GCC cross compiling toolchain. We spent quite a bit of time pawing through those makefiles and the makedefs settings file to figure out how TI was doing things. Now if you don’t want to do that sleuthing yourself you can head on over to the GCC with TI Stellaris Launchpad guide which [Brandon] just published.

Shown above is the helpful chart of compiler flags which he pulled from the files with his added comments on what each does. He did the same for the linker flags, and then discusses the program calls made during compilation and linking. He then delves into how the driver library on the chip’s ROM can be accessed in code. This is just the first in a four-part series he plans to write. We can’t wait to see what he has to say about the hardware FPU as we haven’t had time to explore that for ourselves quite yet.

MOD Player For The Stellaris Launchpad

[Ronen K.] wrote in to tell us about the MOD playing Stellaris Launchpad project he recently completed. A MOD is a sound file for the computers of days long gone. But you’ll certainly recognize the sound of the 8-bit goodness that is coming out of this device.

To understand how a MOD file stores samples you might want to glance at the Wikipedia page. There are a ton of these files out there, but this implementation is meant for files with only four channels. For now the only external hardware used is an audio jack which needs a ground connection and a PWM signal on each of the two audio channels. [Ronen] is storing the files in flash memory rather than using an SD card or other external storage. This leaves 213k of space for up to six files that can be selected by the user buttons which cycle forward or backward through the list. See this demonstrated after the break.

The project ports existing code from an STM32 application. Since that is also an ARM microcontroller there’s not a ton of work that needed to be done. But he did have to write all of the PWM functionality for this chip. This PWM tutorial turned out to be very helpful during that process.

Continue reading “MOD Player For The Stellaris Launchpad”

How To Build OpenOCD With Stellaris Launchpad Support

The stable version of OpenOCD (an open source On-Chip Debugging software package) doesn’t have support for the ICDI protocol used by the Stellaris Launchpad board. But it is pretty easy to build your own OpenOCD from source after patching it to use the protocol.

We’ve already seen an open source tool used to flash binary images to the TI ARM board. But that can’t be used with GDB. With the recent inclusion of USB-based ICDI in the OpenOCD development branches we gain all the features that come with the package. We’re quite happy hear about this as we use OpenOCD for many hardware architectures and this makes development for this board feel more like normal.

Our Stellaris Launchpad hasn’t just been sitting in the closet since we got it. We’ve learned a lot by using the lm4tools to program the chip as we work our way through the online workshop. We’re really beginning to like the Stellarisware peripheral library that has been provided. For us it works in a much more intuitive way than the one that STM uses with their ARM Discovery boards. We’d recommend taking a look at the workbook PDF (which is basically a verbose listing of what’s in the video series) and the library reference (called SW-DRL-UG-9453.pdf) which is in the docs folder of the Stellarisware package.

[via Dangerous Protoypes]

PWM On The Stellaris Launchpad

[Joonas] has been following TI’s ‘getting started’ tutorials for their new Stellaris Launchpad. Everything had been going swimmingly until [Joonas] reached the fourth tutorial on interrupts. To the ire of LEDs the world over, implementing PWM on the new Stellaris Launchpad is a somewhat difficult task. After banging his head against the documentation for hours, [Joonas] finally cracked his PWM problem and decided to share his discoveries with the world.

The Stellaris has a PWM mode for its six hardware timers, but unfortunately there are no PWM units on the chip. Solving this problem required making two 16-bit timers out of a single 32-bit one. This allowed [Joonas] to specify a ‘load’ and ‘match’ value.

After coding this up, [Joonas] discovered the PWM timer only works on two of the Launchpad’s pins. Hours of Googling later, he had real PWM on his Stellaris Launchpad.

Given the amount of time [Joonas] spent on this problem, we’re glad to help all the other frustrated Stellaris tinkerers out there by sharing this.