Japanese Drumming Sensei

taiko-drum-tutor

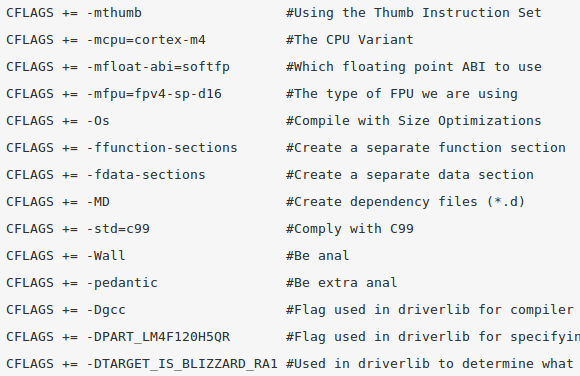
If you’re looking to learn the art of playing Japanese drums, or Taiko, this hack, done as a school project by [Cornell] students, could be a really helpful aid. The project write-up is very impressive and includes a detailed explanation of their work, the source code, and a bill of materials if you’d like to try to duplicate this device.

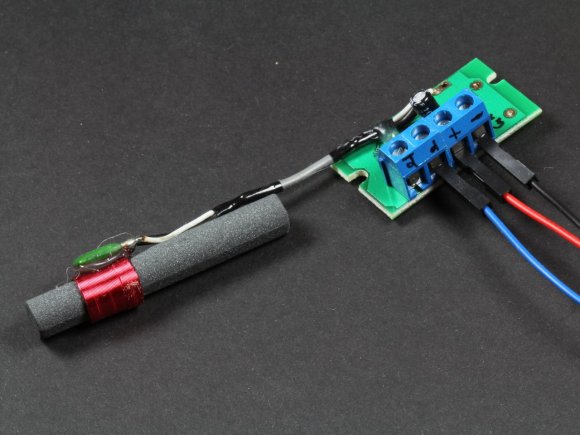
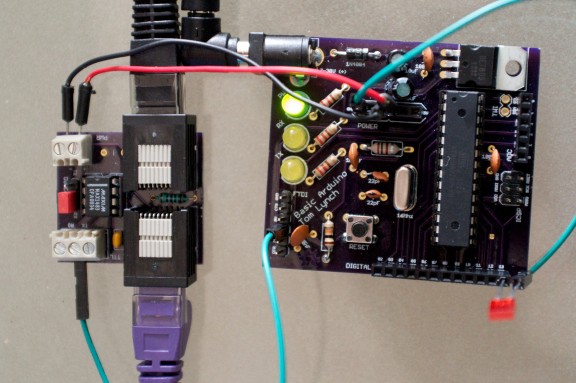
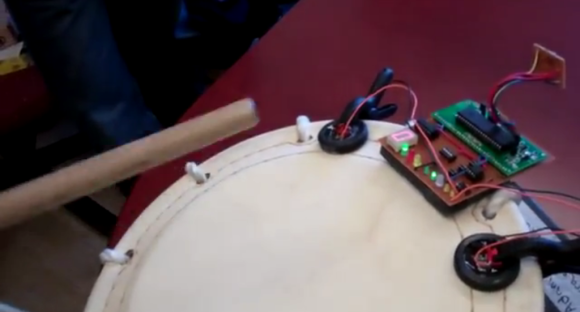
The tutor device is able to tell between soft hits, hard hits, and rimshots using a piezoelectric sensor hooked up to an ATmega1284P microcontroller. This data can then be transmitted to the “follower” drum using an infrared transmitter. These beats can be used in several modes including: follow the leader, metronome, repeat after me, and drum battle mode.

Ok, maybe there’s no drum battle mode, but be sure to check out the demonstration of the Taiko teaching aid after the break.  There’s a lot of details about the build, but they start some calibration drumming around 4:00 if you’d just like to see it in action. Continue reading “Japanese Drumming Sensei”

Building A Pirate Cannon For Fun And Plunder

Our days by the pool are behind us for the year. But playing pirate ship with a 2-year-old does sound like quite a bit of fun. That’s why [The Stone Donkey] built this pirate cannon prop complete with firing sounds.

The simplicity of the design is pretty brilliant. Three segments of PVC and five fittings make for a realistic looking barrel that won’t throw your back out when you pull this one out for playtime. After some cutting and gluing the entire thing was sprayed with matte black paint. The bit of rope wrapped around the barrel is a nice touch. The base was made with some scrap pine, but it’s that little wooden box on top that makes it really special. It is the fuse box, and a tap of the finger gives a burning fuse sound and video followed by an earth-shattering kaboom. [The Stone Donkey] used his old Droid X Android phone and wrote an app for it that puts on the sound and light show. Take a look in the clip after the break.

Continue reading “Building A Pirate Cannon For Fun And Plunder”

Simplifying Fabrication Of Soft Robots

Soft robots are a peculiar wing of technology. They don’t use frames and motors for locomotion, but as the name implies they are made of soft materials. They move by pumping fluid — it could be air or liquid — in and out of bladders that push or pull against the body itself. [Matthew] points out that fabricating soft robots has traditionally been a time-consuming and difficult task. He’s trying to make it easier by 3D printing molds into which soft robots can be cast. This way the parts can be designed in CAD, converted to a mold design, and pushed to a 3D printer.

The object with which he’s been testing the technique functions like an octopus tentacle. The image at the bottom left illustrates the internal structure, with rings separated to allow the appendage to flex, and tubes running parallel to the appendage to provide the force needed to bend it. Above that image you can see one of the molds that was used, and the final product is on the right. The video after the break shows a demonstration of this bending left and right as air is pumped in using the bulb of a blood pressure cuff (or Sphygmomanometer for those paying attention).

Continue reading “Simplifying Fabrication Of Soft Robots”

DCF77 Signal Filtering And Decoding

dcf77-filtering-and-decoding

[Udo] decided to build a clock using the DCF77 radio module seen above. This of course has been done before: the hardware draws a clock signal from the atomic clock in Braunschweig, Germany. So he grabbed a library for Arduino and got to work. But he was getting rather poor results and upon further investigation realized that the library had been written for 20 Hz modules and his operates at 300 Hz. This means better accuracy but the drawback is that the hardware is more susceptible to noise.

So began his journey to filter, process, and decode the DCF77 protocol. That link goes to the project overview. It will be in several parts all of which will be linked on that page. So far he has applied a low-pass filter and coded some exponential smoothing. He has yet to write the other four parts, but does mention that early testing shows that this technique will make the reception better than what is achieved with commercially available clocks. He was able to lock onto a signal that had more than 80% noise ratio. That’s impressive!

Just want to see a clock that uses a DCF77 module? Check out this PIC-based atomic clock.

Clock Display Taller Than You Is Just What Your Living Room Has Been Missing

huge-countdown-clock

Sure, it’s time to get the countdown clocks ready to ring in the new year, but why limit it to just one night? If you end up building a six-foot digital display you can count down trivial events; like the remaining seconds of freedom before you have to pimp yourself out in that drab cubicle.

This seven-segment display is homemade and boasts six full-sized digits and two smaller digits with each pair separated by colons. You have probably already guessed that the construction was greatly simplified by using LED strips rather than individual components. This is part of the reason for the size of the display. The strips can be cut, but only down to a minimum of 3 LEDs per segment. That explains the small digits, with their larger siblings doubled in size. But there is a benefit to this constraint, it means that current limiting is already taken care of for you.

The main assembly is a wooden frame surrounding two polycarbonate sheets. The LED strips are sandwiched between those sheets, with segment and digit driver buses exiting a one point on the side. The build doesn’t detail a driver for the display but it shouldn’t be hard to find a multiplexing example that will serve the purpose.

A Study Of GCC And The TI Stellaris

hard-look-at-stellaris-and-gcc

There are several things that we really like about the TI Stellaris. We think the peripheral library — called Stellarisware — has a pretty intuitive API that makes it easy to get into. But we’re also quite impressed that the software comes with makefiles that build the libraries and examples using your own GCC cross compiling toolchain. We spent quite a bit of time pawing through those makefiles and the makedefs settings file to figure out how TI was doing things. Now if you don’t want to do that sleuthing yourself you can head on over to the GCC with TI Stellaris Launchpad guide which [Brandon] just published.

Shown above is the helpful chart of compiler flags which he pulled from the files with his added comments on what each does. He did the same for the linker flags, and then discusses the program calls made during compilation and linking. He then delves into how the driver library on the chip’s ROM can be accessed in code. This is just the first in a four-part series he plans to write. We can’t wait to see what he has to say about the hardware FPU as we haven’t had time to explore that for ourselves quite yet.

RS-485 Node Control For Arduino

rs-485-arduino-nodes

Wanting to control a split flap display that was not near a computer [Tom] looked to a common solution for communicating over distances not practical for I2C or SPI. He developed his own hardware and packet format using the RS-485 protocol.

This is part of a larger project he has been working on to feed data to a split flap display that he plans to hang on the wall. RS-485 is designed to work over long distances and overcome noise issues. The core of the communications system is the board seen on the left. It uses a MAX1483 chip, a pair of RJ45 jacks for Ethernet cables, and two terminal blocks for power and communications. There are a few nice things about this. The board acts as a pass-through making it easy to chain nodes together, and the data structure is completely independent of the hardware itself. Because of this [Tom] developed his own packet format that will be a bit more resilient than the Arduino networking scheme we looked at the other day.