Display Twitter On An Arduino

If you ever wanted your name out on the Internet, now is your time to shine. [Chris] hooked up an Arduino to the Internet and is streaming the results of combing through Twitter live to the entire world.

The SocialBot9000, as [Chris] calls his build, is an Arduino Uno connected to an Ethernet shield and an LCD character display. The firmware uses the Twitter API to search for recent posts containing the phrase, ‘socialbot9000.’ A PHP script on the Arduino does all the heavy lifting and with the great Bildr tutorial on getting the Ethernet shield up and running, [Chris] was off to the races.

Because it’s extremely doubtful that everyone on the Internet could manage typing a message into Twitter that would be correctly parsed by the SocialBot9000, [Chris] put a small form up on the build log that will correctly generate the message and take you to your Twitter account for posting. After all that was done, [Chris] decided to have some fun and set up a live feed from a camera in front of the LCD display for the world to watch.

Cheap And Easy Logic Signal Generator

While function generators or analog signal generators are ubiquitous in their utility, we haven’t seen much of logic function generators on Hack a Day. Luckily, [Dilshan] sent in a really neat 8-channel signal injector that is amazingly simple to build and comes with a great front end for editing patterns from your computer.

The hardware portion of the build is kept to a minimum with a PIC18F chip, USB socket, and header pins as the only major components. This board serves as the hardware output for the Kidogo software. This software provides a very nice interface to generate 5 volt logic signals on eight separate channels that will immensely help exploring your digital world.

With a great interface and very easy to build hardware, we can easily see the Kidogo hardware finding its way onto workbenches around the world. We’re tempted to build our own version using an AVR, but we would hate to ruin such a simple but useful tool.

Tethering A Kindle For Free 3G

[Excelangue] just posted a guide to using the free 3G connection in your Amazon Kindle to browse the Internet on your computer.

The hack requires a Kindle Keyboard 3G and the free worldwide Internet access that comes along with the purchase price. After jailbreaking the Kindle and applying a USB network hack, [Excelangue] managed to connect his laptop to the Internet through his computer. The process of tethering the Kindle’s 3G is remarkably easy, but we expect a one-click solution will pop up on the web sometime this week.

Of course we have to note here that tethering a Kindle is against the Amazon terms & conditions, and the data going through your Kindle is tied to a unique ID. If you do this, Amazon knows who you are and is more than likely willing to brick your device. [Excelangue] is looking into tethering to the Kindle over WiFi so Android and iOS devices can get in on the action, but he’s still in the process of experimenting with his build.

Finally, LaTeX In HTML Files

Writing a paper in LaTeX will always result in beautiful output, but if you’d like to put that document up on the web you’re limited to two reasonable options: serve the document as a .PDF (with the horrors involves, although Chrome makes things much more palatable), or relying on third-party browser plugins like TeX The World. Now that [Todd Lehman] has finally cooked up a perl script to embed LaTeX in HTML documents, there’s no reason to type e^i*pi + 1 = 0 anymore.

For those not in the know, LaTeX is a document typesetting language that produces beautiful output, usually in PDF form. Unfortunately, when [Tim Berners-Lee] was inventing HTML, he decided to roll his own markup language instead of simply stealing it from [Don Knuth]. Since then, LaTeX aficionados have had to make do with putting TeX snippets into web pages as images or relying on the [; \LaTeX ;] generated from the TeX The World browser extension.

[Todd Lehman]’s perl script generates the PDF of his LaTeX file and pulls out all the weird font and math symbols into PNG files. These PNG files are carefully embedded into the HTML file generated from the normal text pulled from the LaTeX file. It’s a ton of work to get these document systems working correctly, but at least there’s a reasonable way to put good-looking LaTeX on the web now.

Visualizing A Nanosecond

We’re so glad to have run across this video where [Rear Admiral Grace Hopper] explains how to visualize a nanosecond. Now we had never heard of [Grace Hopper] before, but once you watch the clip (also embedded after the break) you’ll want to know who this person is. We work with divisions of seconds all the time when developing with microcontrollers. But those concepts are so abstract we never had a need to think about them as a physical distance. After all they’re a measure of time, right?

You can’t make it out, but she’s holding a length of wire between her hands. It is 11.8 inches long and represents how far electricity can travel in one nanosecond (one billionth of one second). She goes on to explain that this is a calculation of the distance which light can travel in one nanosecond, then really hits the concept home when she uses it to explain latency in satellite communications. For us, the waste of not putting a chip into sleep mode when it’s just stuck in the loop waiting for an interrupt is where we made the connection.

So back to the woman herself. We think you’ll really enjoy reading through her Wikipedia biography page. [Grace] was a computer science pioneer. She is credited with writing the very first computer compiler. She postulated and articulated the concepts that led to the development of COBOL, and popularized the term ‘debugging’. In short, she is one of the giants whose shoulders we all stand upon.

Continue reading “Visualizing A Nanosecond”

Make Any Photo 3D Using The Gimp

Put your face close to the screen and cross your eyes until the two images above become one. You may need to adjust the tilt of your chin to make it happen, but when they come together you’ll see [John Lennon] pop out in 3D. This was made using a 3D rendering script for The Gimp.

The process is not entirely automatic, but it won’t take too long to mask off the outlines for different depth layers. The script makes three different layers from the image. One of them is a color-coded depth map that uses a custom color palatte to choose distance for each item. If you paint the background dark blue it will be processed at the furthest distance from the viewer’s cross-eyed perspective, yellow is the nearest.

[Don] mentions a parallel output and a cross-eyed output in his write up. We understand the cross-eyed version, but are just guessing that the parallel version would be used in a stereoscopic viewer that puts a partition between the two images so that each eye sees a different frame. You know, like a View-Master.

DIY Quadcopter For Around $200

We think [FlorianH] did a bang-up job of prototyping his Minima Quadcopter on the cheap. The total bill comes in right around $200 and we’re very happy with the quality of parts as well as the results.

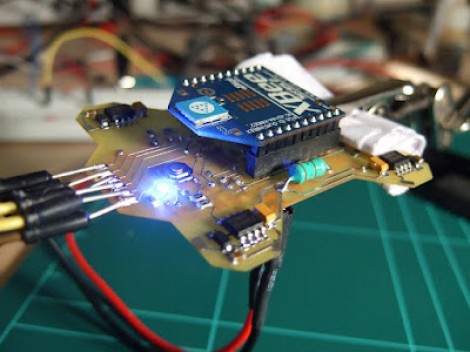
Here you can see the top of the double-sided board which he etched to host all of the components. At each corner there is a power MOSFET which drives the motor. At first glance we thought that the Xbee module was acting as the radio control and processer as well. But on the underside you’ll find an ATmega32 which is responsible for reading the Gyroscope sensor and Accelerometer, processing these signals and driving each MOSFET via PWM lines to provide stability.

You can see some flight tests after the break. [FlorianH] mentions that there is some oscillation in the feedback loop when both the gyro and accelerometer are used. But cut the accelerometer out of the equation and the platform is rock-solid.

This build uses carbon tubes to mount the motors, which we think will be a little more robust than the all-PCB designs are.

Continue reading “DIY Quadcopter For Around $200”