Bike Rim Lighting Lets The Night Crowd Know When You’re Rollin’

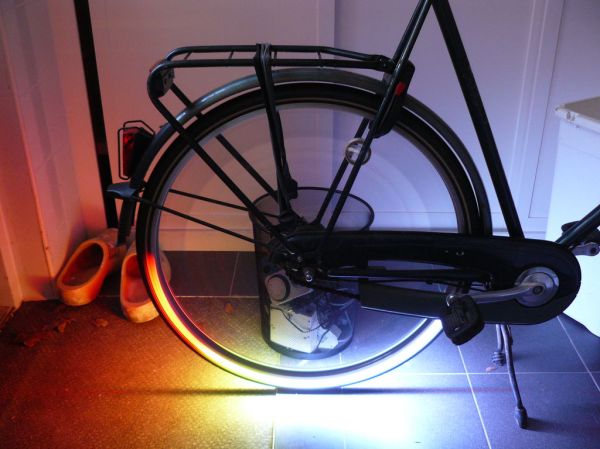
There comes a wonderful “MacGyver moment” in many hackers’ lives when we find ourselves with just the right microcosm of scrap parts to build something awesome. That’s exactly what [dragonator] did with his gifted tech box from Instructables. He’s combined RGB LEDs, a Trinket, and a hall effect sensor to add a semicircular rainbow pattern to his night ride while he rides it.

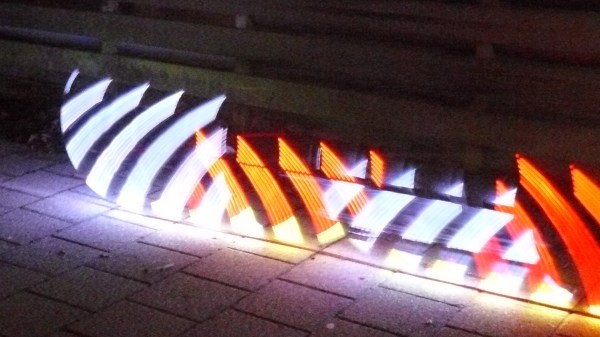
The theory behind the hack is well-known: given the time between pings from a hall-effect sensor responding to the magnet on a bike wheel, an embedded system can estimate the wheel rpm and predict the time to display a particular color on the LEDs. [dragonator] uses the known wheel speed to determine the LED pattern currently on display: either a slow breathing pulse to a half-circle rainbow that displays on the lower bike rim. He drops in the needed equations and required components to follow his trail in a well-documented instructable.

Persistence of Vision (POV) is a nice extension from blinking your first (or first hundred) LED(s). It’s just enough math to get the casual onlooker to cry “magic” and just enough embedded electronics to get those seasoned double-Es to nod their heads. If you’re new to the POV crowd, [dragonator’s] Instructable may be a great start.

Continue reading “Bike Rim Lighting Lets The Night Crowd Know When You’re Rollin’”

RGB Bike Rim Lights

[Yvo] sent us his latest creation, this awesome POV RGB bicycle rim light build, which features a circular interweaving of common RGB LEDs that face outward along the rim as they display constantly changing animations based on the wheel’s rpm.

Like many POV wheel builds, [Yvo]’s takes advantage of a hall effect sensor and stationary magnet to determine how fast the wheels are spinning. Unlike most POV builds, however, [Yvo’s] creation doesn’t have just one or two RGB sticks clamped onto a spoke. Instead, his wheels boast several individual RGB LED modules mounted along the rim.

Each wheel has six modules, and each module contains a scratch-build LED controller (a daisy chain of 74HC595 shift registers) that fits into a custom-made 3D-printed enclosure. The enclosures mounts onto some aluminum strips along with the RGB LEDs, and the aluminum strips mount to the wheels by straddling the rim.

At speed, the lights go into POV mode to simulate headlights / brakes with white in the front and red in the back. Check out the difference these custom circular modules make when riding and when at rest in a video below.

Continue reading “RGB Bike Rim Lights”

Bike Persistance of Vision

Simple POV Bike Effects With WS2811 Strips

[Andrew] wrote in with a new take on the classic persistence of vision bike spoke hack. While many of these POV setups use custom PCBs and discrete LEDs, [Andrew]’s design uses readily available off-the-shelf components: WS2811 LED strips, an Arduino, an Invensense IMU breakout board, and some small LiPo batteries.

[Andrew] also implemented a clever method of controlling his lights. His code detects when the rider taps the brakes in certain patterns, which allows changing between different light patterns. He does note that this method isn’t incredibly reliable due to some issues with his IMU, so now he senses when the rider taps on the handlebars as well.

If you want to build your own bike POV setup, you’re in luck. [Andrew] wrote up detailed instructions that outline the entire build process. He also provides links to sources for each part to make building your own setup even easier. His design is pretty affordable too, coming in at just under $50 per wheel. Check out a video of [Andrew]’s setup in action after the break.

Continue reading “Simple POV Bike Effects With WS2811 Strips”

Spoke-o-dometer Bicycle POV Speed Display

spokepov

[Rory Hyde] and [Scott Mitchell] are exploring several projects that add more information to public spaces. The first is the Spoke-o-dometer a persistence of vision device that can display bicycle speed and distance traveled. To develop the device, they first bought a few POV kits to test out. They decided to build their version using an Arduino. Once they had the display proof of concept working, they added a hall effect sensor like the SpokePOV so they could determine speed and orient the display. Check out their project site for plenty of example code and development details.

[via ladyada]