dremelduplicator

Dremel Powered Duplicating Carving Machine

[Adran] wanted to be able to accurately cut out a bunch of the same parts out of wood but didn’t have the cash to spend on buying or building an automated CNC machine. After thinking about it for a while he decided to build a mechanical device that will allow him to duplicate objects by tracing them in 3 dimensions. This type of duplicator uses a stylus to trace over the surface of an object while the cutting tool is also moved over a piece of raw material, cutting as it goes. The end result is a newly carved object that is the same shape as the original. The idea is like a pantograph that works in 3 dimensions.

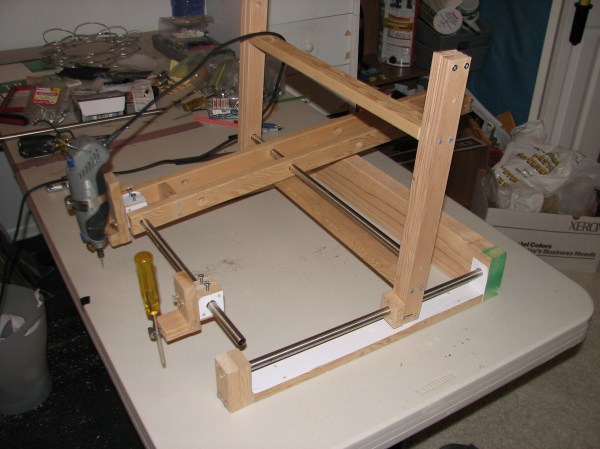
The wood frame is constructed to move freely front to back and left to right. To control the height of the cutting tool, in this case a Dremel, the frame pivots up and down and the X-axis rail. A screw driver is mounted off the side of the Dremel that acts as a stylus. It is mounted in the same orientation as the Dremel bit and is constrained such that it and the Dremel move in the same direction and amount at all times. When the tip of the screwdriver is traced over a 3D part, the Dremel moves the exact same amount carving a part out of a block of material.

Although the machine works, [Adran] admits there is some room for improvement. The left to right motion is a little choppy as the wood frame is riding directly on steel rails. He plans on adding linear bearings for the next revision to smooth things out.

Pandaphone

Pandaphone Is A DIY Baby Toy

[Tyler] was looking for a gift for his friend’s one year old son. Searching through the shelves in the toy store, [Tyler] realized that most toys for children this age are just boxes of plastic that flash lights and make sound. Something that he should be able to make himself with relative ease. After spending a bit of time in the shop, [Tyler] came up with the Pandaphone.

The enclosure is made from a piece of 2×4 lumber. He cut that piece into three thinner pieces of wood. The top piece has two holes cut out to allow for an ultrasonic sensor to poke out. The middle piece has a cavity carved out using a band saw. This would leave room to store the electronics. The bottom piece acts as a cover to hide the insides.

The circuit uses an ATtiny85. The program watches the ultrasonic PING sensor for a change in distance. It then plays an audio tone out of a small speaker, which changes pitch based on the distance detected. The result is a pitch that is lower when your hand is close to the sensor, but higher when your hand is farther away. The case was painted with the image of a panda on the front, hence the name, “Pandaphone”. Based on the video below, it looks like the recipient is enjoying it! Continue reading “Pandaphone Is A DIY Baby Toy”

Christmas Village Spin On The Weasley Clock

Have we seen any Christmas village hacks before? None come to mind and our Google-fu didn’t turn up any either. No matter, even if there were a handful this would rank quite high. [Kyle Anderson] built models of the homes each of his loved-ones inhabit. Each model lights up when its occupant is at home.

This reminds us of the Weasley Clock, itself a popular concept to hack on. The idea is that each family member’s location is shown with a unique clock hand and a set of whimsical locations on the clock face.

The Etherhouse, as [Kyle] calls it, performs a similar action. The WiFi access point in each loved one’s home is monitored for their smart phone. When it is detected, the light for their home model is illuminated. Since each person has their own copy of the village, everyone knows who is home and who is away.

Continue reading “Christmas Village Spin On The Weasley Clock”

Weird Clocks And A Two Chip Apple I

The Apple I, [Woz]’s original, had about sixty chips on a single board. Most of these chips were logic glue or hilariously ancient DRAMs. The real work was done by the 6502, the 6821 PIA, and the Signetics video chip. It’s a simple computer, really, and following the now popular tradition of two-chip computers, [Dave] built a replica of the Apple I using a 6502 and an ATMega.

The ATMega in this project takes care of everything – the 4k of RAM, the few bytes of ROM, the IO, and even the clock. With the 6502 you can have a little bit of fun with the clock; because the 6502 reads data off the bus a few nanoseconds off the falling edge of the clock and writes on the rising edge, [Dave] played around with the duty cycle of the clock to give the ATMega a bit more time to do its thing. With a 50% duty cycle, the 16Mhz ‘Mega has about eight cycles to decode an address and read or write some data. By making the low part of a clock cycle longer, he has about 45 cycles on the ‘Mega to do all the work. All of this was inspired by a fantastic tutorial on the 6502 clock.

Right now [Dave] has some hex values displaying on a small LCD, while the real I/O is handled by a serial connection to a computer. It’s retro enough, and a future update will include a faux cassette interface, possibly using an SD card for storage.

Ambilight For Your Piano (Hero)

That old upright piano still sounds great, and now it can easily have its own special effects. [DangerousTim] added LED strips which change color when he tickles the ivories. The strips are applied along the perimeter of the rear side of the upright causing the light to reflect off of the wall behind the instrument. This is a familiar orientation which is often seen in ambilight clone builds and will surely give you the thrill of Guitar Hero’s brightly changing graphics while you rock the [Jerry Lee Lewis].

Key to this build is the electret microphone and opamp which feed an Arduino. This allows the sound from the piano to be processed in order to affect the color and intensity of the LED strips. These are not addressable, but use a transistor to switch power to the three colors of all pixels simultaneously.

We think there’s room for some clever derivative builds, but we’re still scratching our heads as to how we’d use addressable pixels. Does anyone know a relatively easy way to take the mic input and reliably establish which keys are being played? If so, we can’t wait to see your ambilight-piano-clone build. Don’t forget to tip us off when you finish the hack!

The Four Thousand Dollar MP3 Player

[Pat]’s friend got a Pono for Christmas, a digital audio player that prides itself on having the highest fidelity of any music player. It’s a digital audio device designed in hand with [Neil Young], a device that had a six million dollar Kickstarter, and is probably the highest-spec audio device that will be released for the foreseeable future.

The Pono is an interesting device. Where CDs have 16-bit, 44.1 kHz audio, the Pono can play modern lossless formats – up to 24-bit, 192 kHz audio. There will undoubtedly be audiophiles arguing over the merits of higher sampling rates and more bits, but there is one way to make all those arguments moot: building an MP3 player out of an oscilloscope.

Digital audio players are limited by the consumer market; there’s no economical way to put gigasamples per second into a device that will ultimately sell for a few thousand dollars. Oscilloscopes are not built for the consumer market, though, and the ADCs and DACs in a medium-range scope will always be above what a simple audio player can manage.

[Pat] figured the Tektronicx MDO3000 series scope sitting on his bench would be a great way to capture and play music and extremely high bit rates. He recorded a song to memory at a ‘lazy’ 1 Megasample per second through analog channel one. From there, a press of the button made this sample ready for playback (into a cheap, battery-powered speaker, of course).

Of course this entire experiment means nothing. the FLAC format can only handle a sampling rate of up to 655 kilosamples per second. While digital audio formats could theoretically record up to 2.5 Gigasamples per second, the question of ‘why’ would inevitably enter into the minds of audio engineers and anyone with an ounce of sense. Short of recording music from the master tapes or another analog source directly into an oscilloscope, there’s no way to obtain music at this high of a bit rate. It’s just a dumb demonstration, but it is the most expensive MP3 player you can buy.

Dual Porting A C64 Flash Cart

The old cartridges for the Commodore 64 use EEPROMs to store their data, and the newer Flash carts use either a Flash chip or an SD card to put a whole bunch of games in a small plastic brick. [Stian] and [Runar] thought that wasn’t good enough – they wanted to program cartridges in real time, the ability to reboot the C64 without ever touching it, and a device for coding and testing. What they came up with is the latest advance in Commodore cartridge technology.

The device presents 8k of memory to the C64, but it doesn’t do this with Flash or an EEPROM. Instead, [Stian] and [Runar] are using a dual-port static RAM, specifically one from the IDT7005 series. This chip has two data busses, two address busses, and /CE, /OE, and R/W lines for either side of the chip, allowing other digital circuits to be connected to one small section of the C64’s memory.

Also in the cart is an ATmega16 running V-USB to handle the PC communications. It takes about 1 to 1.5 seconds to transfer an entire 8k over to the cartridge, but this chip can read and write the RAM along with the C64 simultaneously.

If you want a box that will give you the ability to put ever game in existence on a single cartridge, this isn’t the one. However, if you want to write some C64 games and do some live debugging, this is the one for you. The Eagle files are available, and there’s a video demo below.

Continue reading “Dual Porting A C64 Flash Cart”