Push Button, Receive Candy (or Death)

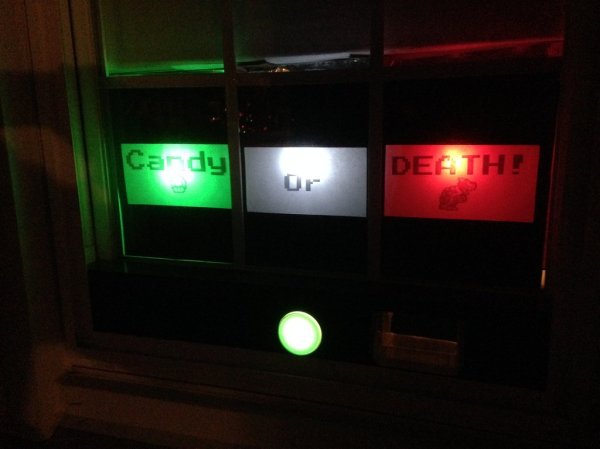
Will you be handing out candy on Halloween? Maybe you have a party to attend or kids to take around the neighborhood and can’t be home to answer the bell. You don’t want to be The Dark House With No Candy, ’cause that’s a good way to get TP’d. We’re not exactly sure what [Ben]’s catalyst was aside from trying to avoid tempting would-be thieves with an unattended bowl on the porch. Whatever the reason, we’re happy to present Candy or Death, his gamified candy (or death)-dispensing machine.

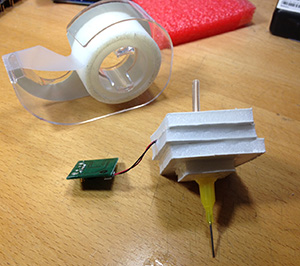
Okay, so it only dispenses candy for now. [Ben] hasn’t quite worked the kinks out of his death ray. He designed it to sit behind a porch-facing window so it can’t be messed with. All trick-or-treaters can do is push the button and take the candy. It’s built around a cereal dispenser that’s modified to be cranked by a piece of round rod driven with a NEMA-17 stepper motor and an Arduino Uno with a motor shield. The candy slides down a length of aluminium rain gutter into a plastic stacking bin, and the whole thing is built into a nice wood frame.

A few adjustments were necessary to keep it from jamming. The dispenser’s hopper uses rubber blades to govern the flow, and he ended up removing a few and trimming the others. [Ben] has an album up of all his build pics and put his code on the gits. Stick around to see videos of the machine from the front and rear.

Continue reading “Push Button, Receive Candy (or Death)”

Improving The Parallax Propeller In An FPGA

The Parallax Propeller is an interesting chip that doesn’t get a lot of love, but since the entire chip was released as open source, that might be about to change: people are putting this chip inside FPGA and modifying the binaries to give the chip functions that never existed in the original.

Last August, Parallax released the source for the P8X32A, giving anyone with an FPGA board the ability to try out the Prop for their own designs. Since then, a few people have put some time in, cleaning up the files, unscrambling ROM images, fixing bugs, and all the general maintenance that an open source microcontroller core requires.

[Sylwester] has grabbed some of the experimental changes found on the Parallax forum and included them as a branch of the Propeller source. There is support for a second 32-bit port, giving the new chip 64 I/O pins, multiply instructions, video generators, hard-coded SD card libraries, and a variant called a microProp that has four cores instead of eight.

You can grab all the updated sources right here and load them up on a DE0 Nano FPGA board. If you’re exceptionally lucky and have the Altera DE2-115 dev board, you’ll also be able to run the upcoming Propeller 2.

Flaming Jack-o’-lanterns Light Up The Night

[misterdob] wanted to spice up his Halloween decor, so he built these flaming concrete jack -o’-lanterns to decorate his walkway. He started with the classic plastic jack-o’-lanterns that trick-or-treaters have been using to collect candy for years. [misterdob] filled the plastic pumpkins halfway with concrete mix, then dropped in metal coffee cans. He then filled the pumpkins up to the top with concrete, shaking them up a bit to avoid air pockets.

Once the concrete had set, [misterdob] cut away the plastic revealing nearly perfect concrete duplicates. He used acid stain to color his creations – though it looks like he missed a spot or two.

We have to disagree with [misterdob’s] choice of fuels. In fact, we think he was out of his gourd when he picked gasoline for his flaming pumpkins. Seriously though, gasoline is a horrible choice for a fire pot like this for a multitude of reasons. Gas has a particularly foul odor and its fumes are explosive. If a Halloween prankster were to try kicking one of the pumpkins over, not only would they have a broken foot, they’d also be covered in burning gas.

Thankfully, the folks on [misterdob’s] Reddit thread had better fuel suggestions – citronella torch cans with lamp oil and wicks, kerosene, or gel fuel would be better suited for these hot pumpkins.

If you still don’t believe how dangerous gas and its fumes can be, check out this video of a bonfire gone wrong (language warning).

Piezo Vacuum Pump For Lightweight Pick And Place

If you’re building a pick and place machine, or even just a vacuum pen, you’ll need some way to pick up tiny part. This means something that sucks, aquarium tubing, and everything that goes with that. A few months ago, [Wayne] found an interesting device called a Micro Blower that will blow small amounts of air from a small, lightweight device. A few modifications later, and he had a piezoelectric vacuum pump for picking up tiny parts.

The Micro Blower [Wayne] found is available on Mouser for about $45, but this device blows. To turn it into something that sucks, he would need to find a way to block up the input side of the pump so it could draw a vacuum. Eventually settling on mounting the blower inside a stack of foam board, [Wanye] glued on a 20 gauge needle and was able to suck up 0603 SMD parts.

The new piezoelectric sucker is extremely light, and the power draw is very reasonable: 18V and 20mA. This would be a great device to mount to a certain pick and place machine without having to run vacuum lines through the mechanics of a motion platform. Video below.

Continue reading “Piezo Vacuum Pump For Lightweight Pick And Place”

Hackaday Munich: DJ Muallem, Workshop Info, And More

DJ Muallem

btn-get_ticketsIf you don’t have your ticket to the Hackaday Prize Party at Hackaday Munich you better scramble for one. We are excited to announce that [muallem] is the DJ for the event. He is the driving force behind the music at the Bob Beaman Club in Munich and is sure to deliver a set to remember. Don’t take our word for it, we’ve been cranking his Soundcloud channel for a couple of days now and it’s hard to wait the two weeks left before the party starts.

Workshop details whether you have a ticket or not

For those able to show up during the afternoon we have started to post details about the workshops. One point of confusion has been the All-day tickets versus the Workshop tickets. Here’s a rundown:

  • Workshop tickets were limited based on the hardware we are able to bring to the event with us.
  • All day tickets are welcome to participate in the workshops if you bring your own hardware to hack. Of course you are also welcome to come and watch, visit, or work on a completely separate hardware hack of your own!

If you have a ticket you’ll want to check out the details about getting a head start (by pre-loading embedded development software and learning a bit about the challenges). If you don’t have a workshop ticket we’re recommending hardware you can bring in order to participate.

So far we’ve posted about the Roboto and Moog workshops but will add details about Reverse Engineering and Computer Vision workshops soon!

The Hackaday Prize: Space Trip or Cash?

There has been a brewing debate about whether the winner of The Hackaday Prize (who will be revealed live at Hackaday Munich) will take the Trip to Space or grab the $196,418 in cash. Tell us which what you would do and why.

Reverse Engineering A Blu-ray Drive For Laser Graffiti

There’s a whole lot of interesting mechanics, optics, and electronics inside a Blu-ray drive, and [scanlime] a.k.a. [Micah Scott] thinks those bits can be reused for some interesting project. [Micah] is reverse engineering one of these drives, with the goal of turning it into a source of cheap, open source holograms and laser installations – something these devices were never meant to do. This means reverse engineering the 3 CPUs inside an external Blu-ray drive, making sense of the firmware, and making this drive do whatever [Micah] wants.

When the idea of reverse engineering a Blu-ray drive struck [Micah], she hopped on Amazon and found the most popular drive out there. It turns out, this is an excellent drive to reverse engineer – there are multiple firmware updates for this drive, an excellent source for the raw data that would be required to reverse engineer it.

[Micah]’s first effort to reverse engineer the drive seems a little bit odd; she turned the firmware image into a black and white graphic. Figuring out exactly what’s happening in the firmware with that is a fool’s errand, but by looking at the pure black and pure white parts of the graphic, [Micah] was able guess where the bootloader was, and how the firmware image is segmented. In other parts of the code, [Micah] saw thing vertical lines she recognized as ARM code. In another section, thin horizontal black bands revealed code for an 8051. These lines are only a product of how each architecture accesses code, and really only something [Micah] recognizes from doing this a few times before.

The current state of the project is a backdoor that is able to upload new firmware to the drive. It’s in no way a complete project; only the memory for the ARM processor is running new code, and [Micah] still has no idea what’s going on inside some of the other chips. Still, it’s a start, and the beginning of an open source firmware for a Blu-ray drive.

While [Micah] want’s to use these Blu-ray drives for laser graffiti, there are a number of other slightly more useful reasons for the build. With a DVD drive, you can hold a red blood cell in suspension, or use the laser inside to make graphene. Video below.

Continue reading “Reverse Engineering A Blu-ray Drive For Laser Graffiti”

Developed On Hackaday: The Answer Is Below

In one month the Mooltipass offline password keeper project will be one year old.

We hope that our twice a month Developed on Hackaday series posts allowed our dear readers to see what are the steps involved in a device’s life, going from idea to prototype to crowdfunding-ready product. The Mooltipass is the fruit of a unique world-wide collaboration around open source, developed by and for security minded people who (for most of them) never saw each other. Relating our progress here enabled us to benefit from our readers’ feedback and make sure that we didn’t miss important wanted features. Contrary to other campaigns that we often debunk on Hackaday, we preferred to wait until we had a beta-tester approved device to move to the crowdfunding stage. Our geekiest readers will therefore find the launch date embedded in this post, other may want to subscribe to our official Google group to stay updated.