Your Halloween Costume May Be Cool, But It’s Not Laser-Cut Cardboard Vintage Airplane Cool

While others are absorbed in baseball playoffs, [Aidan] has spent his recent Octobers planning incredible Halloween costumes for his son. We don’t know what he did last year, but there’s no way it’s better than this laser-cut cardboard airplane costume.

He had a few specs in mind and started with a model of a Grumman F4F-4 Wildcat from 3D Warehouse. Using SketchUp, he simplified the model and removed the landing gear and the propeller. [Aidan] created a simpler model on top of that, and set to work changing the proportions to make it adorable and toddler-sized.

To build around his son’s proportions, he inserted a 10-inch diameter scaled tube vertically into the model and squished down the fuselage in SketchUp. The plan was to have it laser-cut by Ponoko, which meant turning the design into flat pieces for them to cut. He ended up with 58 parts, many of them mirror images due to the symmetry of his design.

When the box from Ponoko arrived, [Aidan] was giddy. He was astonished at the quality of the pieces and found the plane very satisfying to build. But, he didn’t stop there. Using LayOut, he created a custom instrument cluster with reflections and shadows. The plane also has a Wii steering wheel, a motorized propeller, and of course, decals.

Writing A Message In Hypnotizing Style

If you’ve ever encountered a rapidly spinning split-flap displays at an airport terminal, it’s hard not to stop and marvel at them in action for a few extra seconds. Because of this same fascination, [M1k3y] began restoring an old one-hundred and twenty character sign, which he outlines the process of on his blog.

Finding documentation on this old relic turned out to be an impossibility; the producers of the model themselves didn’t even keep it off-hand any longer. In spite of that, [M1k3y] was able to determine the function of the small amount of circuitry driving the sign through process of elimination by studying the components. After nearly a year of poking at it, he happened across a video by the Trollhöhle Compute Club, demonstrating the successful use of the same display model. Luckily, they were kind enough to share their working source code. By reverse engineering the serial protocol in their example, he was able to write his own software to get the sign moving at last.

Once up and running, [M1k3y] learned that only eighty of the sign’s characters were still operable, but that is plenty to make a mesmerizing statement! Here is a video of the cycling letters in action:

Continue reading “Writing A Message In Hypnotizing Style”

3D printed Chivalry Medieval Warfare Mace

3D Printing Models From Computer Games

Wouldn’t it be cool to extract 3D models from your favorite video games and then 3D print them? As it turns out, it’s pretty easy to do!

In the following video tutorial he shows us how to extract the 3D meshes from a video game called Chivalry, Medieval Warfare. The game is based on the unreal engine which makes it super easy to get the files.

Quick note on legality: If you choose to rip 3D models from your video games and print them, make sure you’re just printing them for yourself, not to sell. 

To start, you’ll need a few pieces of software to help you out. First up is something called Umodel, which is an Unreal Engine Resource Viewer, which allows you to view and extract files from any game that uses the Unreal Engine. Once you find your model in the game directory, you can open it up in Umodel and save it as a .PSK file. From there you can open .PSK files with another program called Milkshape 3D, and then export in .OBJ file. Finally you can use MeshMixer to import .OBJ files, repair the mesh by removing the extra shells (you can use the cloud NetFabb service to help repair files for 3D printing as well), and then finally save as .STL ready to print.

Continue reading “3D Printing Models From Computer Games”

Mouse Brain with neurons exhibiting GFP expression

UC Davis Researchers Use Light To Erase Memories In Genetically Altered Mice

Much like using UV light to erase data from an EPROM, researchers from UC Davis have used light to erase specific memories in mice. [Kazumasa Tanaka, Brian Wiltgen and colleagues] used optogenetic techniques to test current ideas about memory retrieval. Optogenetics has been featured on Hackaday before. It is the use of light to control specific neurons (nerve cells) that have been genetically sensitized to light.  By doing so, the effects can be seen in real-time.

For their research, [Kazumasa Tanaka, Brian Wiltgen and colleagues] created genetically altered mice whose activated neurons expressed GFP, a protein that fluoresces green. This allowed neurons to be easily located and track which ones responded to learning and memory stimuli. The neurons produced an additional protein that made it possible to “switch them off” in response to light.  This enabled the researchers to determine which specific neurons are involved in the learning and memory pathways as well as study the behavior of the mouse when certain neurons were active or not.

Animal lovers may want to refrain from the following paragraph. The mice were subjected to mild electric shocks after being placed in a cage. They were trained so that when they were put in the cage again, they remembered the previous shock and would freeze in fear. However, when specific neurons in the hippocampus (a structure in the brain) were exposed to light transmitted through fiber optics (likely through a hole in each mouse’s skull), the mice happily scampered around the cage, no memory of the earlier shock to terrify them. The neurons that stored the memory of the shock had been “turned off” after the light exposure.

Continue reading “UC Davis Researchers Use Light To Erase Memories In Genetically Altered Mice”

Announcing The Five Finalists For The Hackaday Prize

Six months ago we challenged you to realize the future of open, connected devices. Today we see the five finalists vying for The Hackaday Prize.

These five were chosen by our panel of Launch Judges from a pool of fifty semifinalists. All of them are tools which leverage Open Design in order to break down the barriers of entry for a wide range of interests. They will have a few more weeks to polish and refine their devices before [Chris Anderson] joins the judging panel to name the winner.

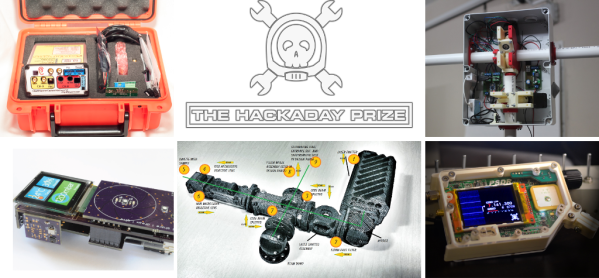
Starting on the top left and moving clockwise:

ChipWhisperer, an embedded hardware security research device goes deep into the world of hardware penetration testing. The versatile tool occupies an area in which all-in-one, wide-ranging test gear had been previously non-existant or was prohibitively expensive to small-shop hardware development which is so common today.

SatNOGS, a global network of satellite ground stations. The design demonstrates an affordable node which can be built and linked into a public network to leverage the benefits of satellites (even amateur ones) to a greater extent and for a wider portion of humanity.

PortableSDR, is a compact Software Defined Radio module that was originally designed for Ham Radio operators. The very nature of SDR makes this project a universal solution for long-range communications and data transfer especially where more ubiquitous forms of connectivity (Cell or WiFi) are not available.

ramanPi, a 3D printed Raman Spectrometer built around a RaspberryPi with some 3D printed and some off-the-shelf parts. The design even manages to account for variances in the type of optics used by anyone building their own version.

Open Source Science Tricorder, a realization of science fiction technology made possible by today’s electronics hardware advances. The handheld is a collection of sensor modules paired with a full-featured user interface all in one handheld package.

From Many, Five

The nature of a contest like the Hackaday Prize means narrowing down a set of entries to just a few, and finally to one. But this is a function of the contest and not of the initiative itself.

The Hackaday Prize stands for Open Design, a virtue that runs far and deep in the Hackaday community. The 50 semifinalists, and over 800 quarterfinalists shared their work openly and by doing so provide a learning platform, an idea engine, and are indeed the giants on whose shoulders the next evolution of hackers, designers, and engineers will stand.

Whether you submitted an entry or not, make your designs open source, interact with the growing community of hardware engineers and enthusiasts, and help spread the idea and benefits of Open Design.

BORAT: Bathroom Monitor For The Future

A recent company move has left [kigster] and his 35 coworkers in a frustrating situation. Their new building only has two single occupancy bathrooms. To make matters worse, the bathrooms are located on two different floors. Heading to one bathroom, finding it occupied, then running upstairs to find the second bathroom also occupied became an all to common and frustrating occurrence at the office.

It was obvious the office needed some sort of bathroom occupancy monitoring system – much like those available on commercial aircraft. [kigster] asked for a budget of about $200 to build such a system. His request was quickly granted it by office management. They must have been on their way to the bathroom at the time.

borat1
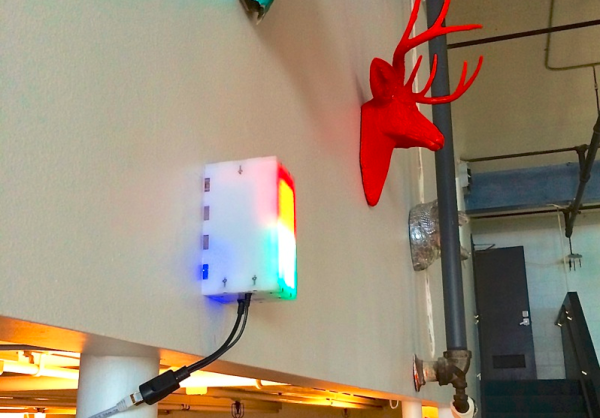
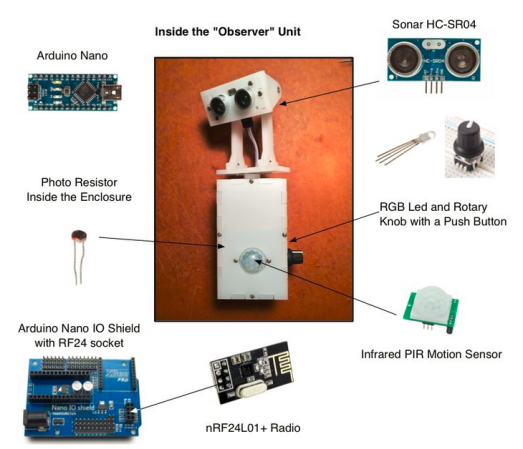
[kigster] began work on BORAT: Bathroom Occupancy Remote Awareness Technology. The initial problem was detecting bathroom occupancy. The easiest method would be to use door locks with embedded switches, much those used in aircraft. Unfortunately, modifying or changing the locks in a rented office space is a big no-no. Several other human detection systems were suggested and rejected. The final solution was a hybrid. Sonar, Passive Infrared (PIR), and light sensors work in concert to detect if a person is in the bathroom. While we think the final “observer unit” is rather cool looking, we’re sure unsuspecting visitors to the office may be wondering why a two eyed robot is staring at them on the throne.

The display side of the system was easy. The entire system communicates with the venerable nRF24L01+ radio modules, so the display just needed a radio module, an arduino, and a way of displaying bathroom status. Two LED matrices took care of that issue.

We really like this hack. Not only is it a great use of technology to solve a common problem, but it’s also an open source system. BORAT’s source code is available on [kigster’s] github.

Want to know more about BORAT? Kigster is answering questions over on his thread in the Arduino subreddit.

Mooltipass Installation Process Is Now Dead Simple

In a few weeks the Hackaday community offline password keeper will reach a crowdfunding platform. This is a necessary step as only a high production volume will allow our $80 early bird perk target. We’ll therefore need you to spread the word.

Thanks to the Chromium development team, a few days ago the Mooltipass installation process became as simple as installing our app & extension. As you may remember, our device is enumerated as composite HID proprietary / HID standard keyboard. This makes it completely driverless for all operating systems and enables standalone operation as the Mooltipass can type logins and passwords selected through its user interface. Management communications are therefore done through the Mooltipass HID proprietary interface, which Chrome 38 now natively supports through its chrome.hid API. The simpler our installation process is, the more likely the final users will appreciate the fruit of our hard labor.

As our last post mentioned there’s still plenty of space for future contributors to implement new functionalities. Our future crowdfunding campaign will allow us to find javascript developers for the remaining app & extensions tasks and also implement other browsers support. Want to stay tuned of the Mooltipass launch date? Subscribe to our official Google Group!