512 LED Cube (again)

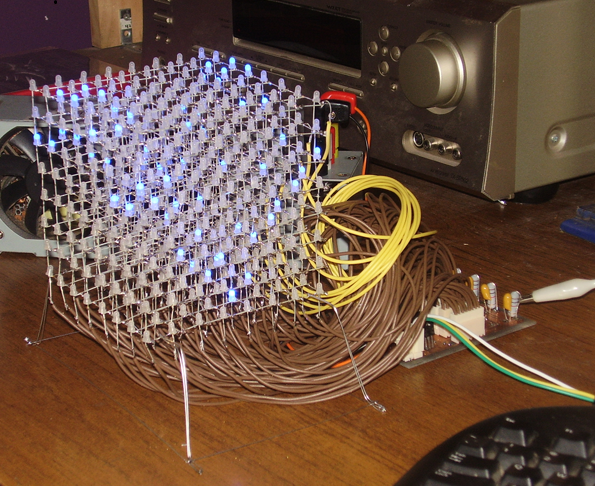
We’ve seen LED cubes before, but [nick] upped the ante with his 8x8x8 LED cube that uses only three pins on his microcontroller.

Previous LED cubes we’ve covered drove the LEDs with shift registers and latches, but [nick] used STP16CP LED sink drivers to reduce the component count. The STP16CP can control 16 LEDs each, can be cascaded off of each other, and can operate up to 30Mhz. With a component like this, you’re limited by your microcontroller and not your patience or soldering skills.

While he was waiting for his LEDs to arrive in the mail, [nick] decided he would get a head start on the animation code by plunging into MATLAB. After getting an idea of what would look good on the cube, [nick] wrote the code on his PC to send commands to the arduino controlling the sink drivers. To wrap up the project, [nick] put the cube on a very attractive wooden box stuffed with the electronics. All tolled, a very efficient and elegant build.

Continue reading “512 LED Cube (again)”

Automatic Dog Dish Filler Never Goes Dry

automatic_water_dish

[Avatar-X] has a Siberian Husky that gets a lot of exercise throughout the day, and as you would imagine, drinks a ton of water as well. We all suffer from memory lapses at one time or another, and while he is normally good about keeping the bowl filled, he occasionally forgets. He has tried a handful of various auto-filling dog dishes, but none of them seemed to work all that well, and they often rapidly built up healthy bacterial colonies.

With the help of some friends, he rigged up an automatic water dish filler, that ensures his pup always has a sufficient supply of water. He tapped into his kitchen water supply with a standard refrigerator hookup kit, and ran some tubing up into his cabinets, where he placed a garden irrigation valve. The valve is controlled using an Arduino which senses the bowl’s water level using a pair of wires.

The system looks like it works pretty well if the video embedded below is any indicator. [Avatar-X] provides code and schematics for the water control circuit on his site, free to anyone looking to build a similar system for their pets.

If you are interested in learning more about automating some of your pet’s care, be sure to check out these hacks we featured in the past.

Continue reading “Automatic Dog Dish Filler Never Goes Dry”

Reviving A Broken HSDPA Modem With A Bit Of Clever Investigation

hsdpa_modem

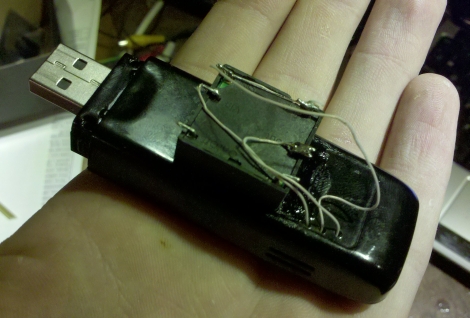
Hack-a-Day forum member [Necromant] was recently working on a router when he made a terrible mistake. He connected the wrong power brick to the router, causing a 2.5v over-voltage. The router itself was just fine, as it contained a good stepdown converter, but the HSDPA modem connected to the router’s USB port was not so lucky. It seems that the USB host is powered directly from the router’s power supply without any conversion – this meant his modem got a nice 7.5v zap when he used the wrong plug.

He assumed the modem was dead, so he figured there was no harm in disassembling it. He examined the modem’s circuit board and found that when plugged in, the onboard stepdown converter supplied 0 volts to the rest of the PCB. He couldn’t find any documentation for the converter online, so he employed a little bit of trial and error clever investigation to determine what sort of voltage the stepdown provided before being cooked.

After a bit of testing with his home-built low dropout regulator, he determined that the damaged stepdown provided 3.3v to the rest of the modem (that’s a 4.2v over-voltage for those of you who are keeping track). He added a linear voltage regulator to the board in place of the old stepdown, which worked for about 15 seconds before overheating.

In the end, he decided to add a pretty hefty 3.3v stepdown converter to the modem, throwing aesthetics to the curb. The result is one ugly, but quite functional HSDPA modem.

Speech Recognition Geocache: Se Habla Español

Instructables user [jorgegunn] has put a unique spin on a recent geocache build by incorporating speech recognition and requiring that the “finder” knows the secret password to access the loot contained within. Although we won’t spoil the fun here, the techie spirit of the build was further bolstered by choosing a password fitting for any trekkie.

Despite utilizing an off-the-shelf speech recognition circuit kit, the majority of this hack was accomplished using parts available at local electronics and hardware stores. [jorgegunn] went to great lengths to make this hack accessible to any amateur hobbyist  and even includes links to relevant tutorials, schematics, and online parts vendors where applicable.

The actual speech recognition is accomplished with an Images Scientific Instruments model SR-06 circuit kit, capable of recognizing up to 40 different predefined words across multiple languages. Any time a correct match occurs, a value corresponding to the memory slot for that word is displayed on a pair of 7-segment displays. A separate decoder circuit based on a 74LS373 D-Type Latch and 4028 IC Decoder CMOS determines if the value being displayed constitutes a valid response and then drives a solenoid via a Darlington transistor in order to release the latching mechanism. Once opened, the device is simply pushed closed again to await its next finder- we are guessing that finding it might actually be the easiest part as judged by its size!

Although the real-world battery life has not yet been determined, a single coin cell for memory retention and a 9V battery used to drive the circuit and for latch release lasted through a full month of testing without any issues. Battery life could be extended almost indefinitely with a simple solar cell and rechargeable battery setup, but this would also obviously increase the likelihood of vandalism and/or theft.

We can imagine many different applications for such a device as-is including automated door lock  mechanisms and even access control to things such as the controls on a computer case.  It should also be fairly easy to increase the security by stringing multiple words together into a password or by instituting a “time out” period after a certain number of incorrect guesses.

Let us know of any other applications or build variations in the comments below and make sure to see how it all came together in the short videos after the break.

Continue reading “Speech Recognition Geocache: Se Habla Español”

Direct To PCB Resist Printing Requires Minimal Additional Components

epson_inkjet

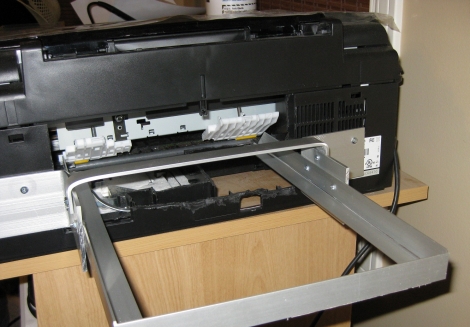
Printing PCBs using the toner transfer method works pretty well, but there are some downsides, such as incomplete trace transfers and the like. HackHut user [rucalgary] decided to go the inkjet route instead, and picked up an Epson printer on clearance at his local electronics shop. This method is not new by any means, but his printer conversion is one of the simplest we’ve seen as it does not rely on any additional sensors to function.

Once he got home, he tore the printer down immediately, removing the paper input and output trays as well as the scanner bed. After all of the extraneous parts were removed, he got to work raising up the printer head, as well as the printer head rest mechanism. He mentions that the latter component is absolutely crucial to proper functionality down the line. Once the print head and its associated components were relocated, he added a pair of aluminum rails for feeding his print tray into the machine.

With everything complete, he filled up a spare cartridge with ink (he says that MISPRO yellow works best) and ran some test boards through. He is quite pleased with how things turned out, and is more than happy to give you a quick tour of his completed printer via the video below.

Continue reading “Direct To PCB Resist Printing Requires Minimal Additional Components”

DIY Camera Dolly Frees Up Your Hands To Take Care Of The Important Stuff

diy_camera_dolly

Documenting your build process can sometimes be an incredible pain, as it’s quite difficult to take pictures or video while you are in the middle of soldering. Professionals who demonstrate things on TV for a living have the benefit of a camera crew and special rigs to catch the action from every angle – the rest of us don’t have that luxury.

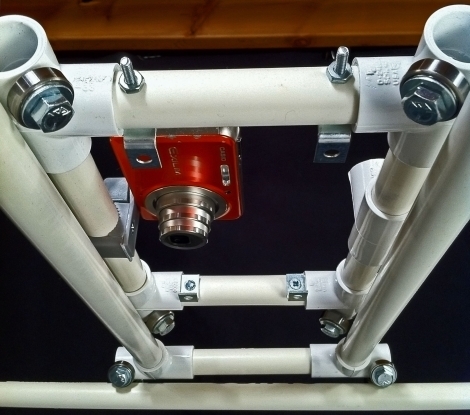
[Steve] felt the same frustrations as many of us do, and decided to do something about it. He built a movable camera dolly that can be suspended from the ceiling above his work surface for less than $30. The bulk of his camera dolly is built from PVC piping, with assorted bolts and washers holding things together. Skateboard bearings were used as rollers to provide smooth 2-axis motion for the entire rig, then he hung the entire apparatus from the ceiling joists over his workspace.

According to [Steve], the build process seems relatively easy and should take no more than an hour or so, and it can support pretty much any full-size DSLR camera you can find.

Stick around for a quick video tour of his camera dolly build.

[via Make]

Continue reading “DIY Camera Dolly Frees Up Your Hands To Take Care Of The Important Stuff”

Seeed Looks For Help Developing An Open Source Radiation Detector

Seeed Studios, makers of the Seeeduino and fabricators of small-run PCB orders have put out a call to help develop an open source radiation detector. Will it be of any help to people in the area of Japan that is at risk? We really can’t say. But if you can lend some expertise with this, it can’t hurt. We’ve already seen a simple dosimeter project but this one sounds like it’s more on the level of a DIY Geiger counter. We know it’s possible, but the hacked together unit we saw back in 2007 had very little documentation and used parts that may be hard to come by.

The specific information needed is what type of sensor to use, what supporting circuits should be included, and what method is best to calibrate each unit. There’s a discussion going in the comment thread of that post which should be interesting to read even if you think you don’t have anything to add.

[Thanks Michael]