Solar Charger For Occupy Boston

As soon as the team at Revolt Labs heard Occupy Wall Street was coming to Boston, they decided to pick up their soldering irons in support of the throngs of protestors. They came up with a Solar charging USB box to keep those cell phones and digital cameras charged.

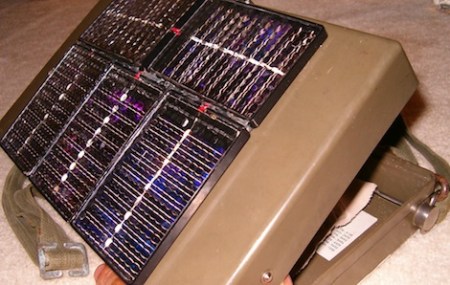
The case came direct from an Army surplus store. Originally, the box was used by the Dutch military to test the air for poison gas and signal when it was safe to remove a gas mask – hopefully not a portent of things to come.

On top of the box is five solar panels that output two watts each. A bit of breadboard holds a 7805 voltage regulator, a few caps and a diode. This regulated output goes to a USB hub and provides power for recharging.

For a cheap and easy project for our brothers without arms, we couldn’t think of a better project for the Occupy Boston tent city. Of course heating units will be needed at the Occupy protests this winter, but at least now the protesters have the means to power their communications equipment.


update: Once again, this has devolved into political argument and name calling. We, as hackaday, really couldn’t care less which party you are for or what your political beliefs are. We want to talk about the project, in this case a portable solar charger. We go to other sites to argue politics. Maybe you should try here.

Build A Binary Wall Clock For Just A Few Bucks

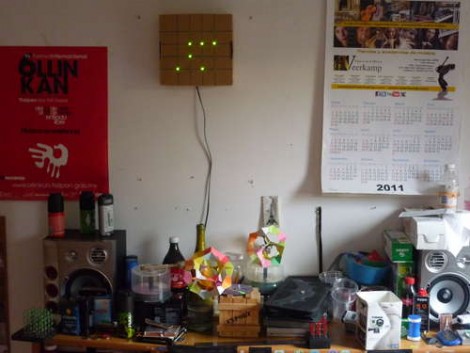
The weekend is almost here and if you’re looking for an afternoon project consider building your own binary wall clock. [Emihackr97] built the one you see above using parts on hand, but even if you put in an order for everything, it won’t cost you much.

He used a cardboard box as the housing for the clock, marking a grid for the LEDs on the face and drilling holes to house them. Two columns for hours and another two for minutes let the clock display 24-hour time with alternate firmware for 12 hour time. Since there are two buttons – one to set hours, the other to set minutes – a little coding would make it possible to select between the two either by clicking both buttons at once, or holding down one button.

[Emihackr97] is driving the display with an ATmega48, which is a pin-compatible replacement for the ATmega168/328. Those chips are the type most commonly found on Arduino boards an indeed this project is running the Arduino bootloader, but uses an ISP programmer and breadboarded circuit to keep the costs low. There are plenty of pins to drive the 13 LEDs directly, making the soldering quick and painless. Check out a demo clip after the break.

If you’re successful at this build and get the itch for something with more style, there’s a ton of ways to spice up the look of a binary clock.

Continue reading “Build A Binary Wall Clock For Just A Few Bucks”

Non-invasive AC Power Adapter For Exercise Equipment

We often look at battery-operated hardware and shake our heads at the wastefulness of throwing away disposable batteries. There are some devices that minimize the waste, like those TV remotes that seem to never need new cells. But the C cells that [Quinn Dunki] kept replacing in her elliptical trainer were only lasting about three months at a time. The manufacturer hadn’t cared enough to build a power jack into the machine, so she built her own AC adapter without modifying the stock hardware.

The first thing she did was to patch in a couple of wires between two of the batteries. This let her measure the current consumption, which topped out at around 200mA. This is good news because that’s easily sourced with a cheap linear regulator. Out of the junk box came a 12V/1A wall wart transformer, which just leaves the need for a fuse and some capacitors to finish out a voltage regulator circuit.

Since [Quinn] didn’t want to permanently alter the exerciser, she came up with a way that it could take the same physical space as the batteries. Two long stand-offs are used as prongs to interface the spring terminals in the battery compartment. They attach to a piece of protoboard which hosts the rest of the circuitry. Now she just needs to remember to unplug this from the wall after each session and she’ll be in business.

Hackers Age 14-18 Can Compete To Put Their Project Into Space

If you’re between the ages of 14 and 18, or have a child who is, here’s a chance to put a project into space. NASA is partnering with YouTube, Lenovo, and a few other entities for a contest that challenges participants to dream up low-gravity experiments. You can enter as an individual or in teams of up to three people, and may put forth up to three experiment ideas for judging. Getting in on the first round is as easy as recording and uploading a video. You’ll need to state a scientific question or principle you want to test, a hypothesis of what can be learned, and a method for testing it.

As with most of the projects we encounter, the seminal idea is always the toughest part. And since the folks here at Hackaday are too old to enter, we thought we’d propose throwing around some ideas in the comments to get the ball rolling (the contest FAQ says it’s okay to get help from others so we’re not ruining it for everyone). We’ll go first.

It looks like experiments can be Biology or Physics related, and can’t use hazardous chemicals, weapons, or anything sharp. We’d love to see some tests that measure how well electronic sensors work in the microgravity. For instance, can you use a gyroscope sensor reliably in micro-gravity? What about an electronic compass; does it always point toward earth? What about robotic propulsion? We’d love to see a minature ROV swimming through the air like a water-bourne vessel would on earth.

Your turn. Leave a comment to let us know what you’d do if you could enter. Oh, and we’ve also embedded the contest promo video after the break.

Continue reading “Hackers Age 14-18 Can Compete To Put Their Project Into Space”

An Autonomous Minivan For Busy Parents

Although minivans are a staple of moms and dads that drive their kids to school, soccer practice, and the like, this vehicle imagines a time when maybe they won’t even have to. Autonomous cars have been in development for some time, but the video after the break gives a nice close-up view of how this particular vehicle was built and some of the testing that went into it.

Of particular interest was the external luggage pod modified to hold vehicle electronics. Everything is nicely laid out with wire duct to keep it neat. Those in the manufacturing industry might notice several other off-the-shelf components including an area scanner at 0:24 and extruded aluminum framing at 0:45. The apparent “E-stop” button on the passenger side comes from industry as well and may make the rider feel a bit more safe!
[youtube http://www.youtube.com/watch?v=1o04r1tuKJo&w=470&h=315%5D

If this wasn’t interesting enough, check out this autonomous car by Google that has already driven from San Francisco to Los Angeles!

Candied LEDs Are A Light, Tasty Treat

rock_candy_diffused_leds

[Emily Daniels] recently snagged a free iPad in the Instructables “Play with your food challenge” with an interesting way to work with LEDs. Growing up, most kids attempted to make, or at least have seen rock candy be produced. [Emily] thought it would be interesting to mix LEDs with the stuff to see what she could come up with, and her candied LEDs are the result.

The process is pretty straightforward, and involves mixing up a batch of supersaturated sugar syrup in which LEDs are suspended. The LEDs act as a nucleation point for the crystal formation, growing a nice solid coating of sugar after a couple weeks’ time. After some cleaning up, the LEDs can be connected to a coin cell battery or similar, as you would normally do. The sugar acts as a diffusing medium for the LEDs, giving them a nice soft beam pattern.

Obviously you likely wouldn’t want to use these for any long-term electronics project, but it’s a fun activity for the kids, and it could be a good way to incorporate electronics into baked goods.

Brewing Up Some Quantum Dots

We’re taking a field trip from the backyard, garage, and basement hacking in order to look in on what research scientists are up to these days. A group from the Johns Hopkins Institute for NanoBioTechnology has been manufacturing quantum dots for use in the medical field. Made up of Cadmium Selenide, this is a nanomaterial that you can think of as individual crystals of the smallest size possible. Quantum dots have many uses. Here, [Charli Dvoracek] takes the recently manufactured dots and activates them with antibodies capable of targeting cancer cells. Once mixed with a biological sample, the dots embed themselves in the walls of the cancer, allowing the researchers to find those cells thanks to the phosphorescent properties of the dots.

The video after the breaks walks us through the various steps involved in growing these dots. [Charli] has the benefit of a fully outfitted lab, using tools like an argon-filled glove box to protect her from harmful off-gases. You’re not likely have this sort of thing in your home laboratory, but as we’ve seen before, you can make some of your own equipment, and produce interesting chemicals with simple processes. If you’re someone who already tinkers with chemistry experiments we want to hear about your exploits so please drop us a tip about what you’re up to.

Continue reading “Brewing Up Some Quantum Dots”