Pulse Oximeter From LM324, LED, And Photodiode

This pulse oximeter is so simple and cheap to build it’s almost criminal. The most obvious way to monitor the output of the sensor is to use an oscilloscope. The poor-man’s stand-in for that is a sound card, which is what [Scott Harden] demonstrates in his write-up.

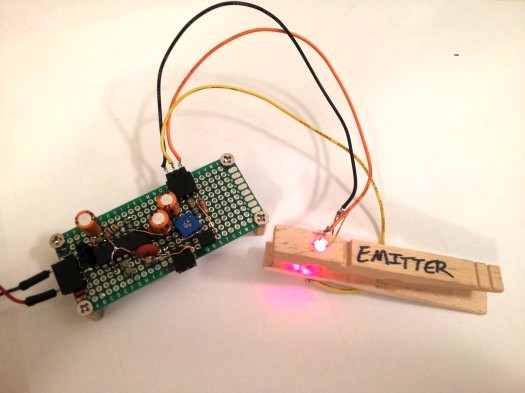
It uses a concept we’ve seen a few times before. The light from an LED shines through your finger and is measured on the other side by a phototransistor. It’s that light grey plastic thing you see on a patient’s finger when they’re in the hospital. [Scott] went with a common wooden clothes pin as a way to mount and align the sensor with your finger. It is monitored by the simplest of circuits which uses just one chip: an LM324 op-amp. There are three basic stages which he explains well in the video after the jump. The incoming signal is decoupled before being fed to the first amplifier stage. From there it is fed to an adjustable low-pass filter to help eliminate 60Hz noise from AC power in the room. The last stage amplifies the signal again while using another low-pass filter in parallel.

Continue reading “Pulse Oximeter From LM324, LED, And Photodiode”

Living Night Light With Glowing Algae

I may sound like I’m being over enthusiastic in this video. I’m not. Everyone who has seen this thinks it is simply amazing.

My father, an ex navy man, has told me stories of glowing water since I was little.  Being a person who was obsessed with all things that light up, this always stuck with me. I saw a headline one day that someone was making an algae-light. Sadly when I clicked on it, the algae was just there to create oxygen. It was a cool idea, but not what I was hoping for.

That slight disappointment drove me to create a night light using glowing algae. The process could be extremely simple.

1. Buy Algae.

2. set up light for algae (it needs a 12 hour light cycle and putting it in a window sill would kill it due to heat). It needs bulbs labelled 6500k or higher.

3. shake algae at night (it only lights up when agitated, and when it is on its “night” cycle).

I really wanted to add more to this project though, so I decided to put the algae in a klein bottle and build a custom base for it that would allow me to move a BB around inside the bottle using magnets. This would in turn, hopefully, agitate the algae and make it light up.

Continue reading “Living Night Light With Glowing Algae”

Semi-automatic Pick And Place Machine

semi-automatic-pick-and-place

This is a fascinating take on building your own pick and place machine. It does an amazing job of automating the hardest parts of hand assembly, while relying on human dexterity to achieve the hardest parts of automation. It’s a semiautomatic pick and place machine driven by an Arduino and controlled by an Android tablet.

The machine is built in two parts. The portion in the upper left feeds components from reels and is fully automated. The portion on the lower right consists of a padded arm-rest which slides smoothly along two axes. A mechanical arm with multiple articulations is attached to the end, culminating in a tip connector for some vacuum tweezers. Right handers are the only ones who will find this convenient, but oh well. The clip after the break shows it in action. The assembly technician first selects the component from an icon on the Android tablet. The reel machine then dispenses that part, which is picked up by the vacuum tweezers using the left hand to switch the vacuum on and off again. If the part orientation needs to be rotated it can done using the jog wheel on the Android app. It smooth, quick, and best of all, clever!

Continue reading “Semi-automatic Pick And Place Machine”

Hidden Servo Automates Slat-style Window Blinds

slat-blind-automation

[Home Awesomation] has been working on automating his slat-style window blinds. His focus has been on adjusting the angle of the slats, not on completely retracting the shades. Since the slat angle adjustment requires little torque a servo motor turns out to be just perfect for the job. The good news is that the existing blinds in his house have room in the top enclosure to completely hide his add-on hardware.

The image above is a screenshot from the demo which you can watch after the break. The top enclosure for the blinds is just shown at the top of the frame. Here [HA] is demonstrating a few different control designs which he has been trying out. You can see what looks like a Molex connector with some type of component attached to it. That’s an IR motion sensor and he’s really happy with its performance. He feels the same way about the black momentary push switch sticking down next to the power cable. But his DIY solution that works quite well is the pull string attached to a flexible piece of metal. When that metal bends enough to touch a stationary conductor it completes the circuit, telling the Arduino to start driving the servo.

The main idea behind the project is to poll a temperature sensor, closing the blind automatically to help keep the place cool during the day. We figure if he’s already using a microcontroller to drive the project he might as well throw a cheap Bluetooth in module there and make it controllable with a smart phone.

Continue reading “Hidden Servo Automates Slat-style Window Blinds”