ARMing A Breadboard — Everyone Should Program An ARM

I’m always a little surprised that we don’t see more ARM-based projects. Of course, we do see some, but the volume isn’t what I’d expect given that low-level ARM chips are cheap, capable, low power, and readily available. Having a 32-bit processor with lots of memory running at 40 or 50 MIPS is a game changer compared to, say, a traditional Arduino (and, yes, the Arduino Due and Zero are ARM-based, so you can still stay with Arduino, if that’s what you want).

A few things might inhibit an Arduino, AVR, or PIC user from making the leap. For one thing, most ARM chips use 3.3V I/O instead of the traditional 5V levels (there are exceptions, like the Kinetis E). There was a time when the toolchain was difficult to set up, although this is largely not a problem anymore. But perhaps the largest hurdle is that most of the chips are surface mount devices.

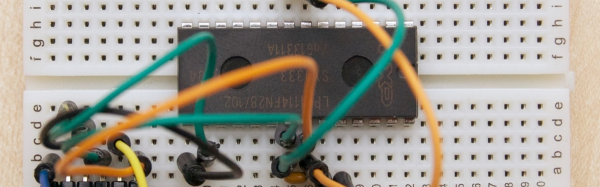
Of course, builders today are getting pretty used to surface mount devices and you can also get evaluation boards pretty cheaply, too. But in some situations–for example, in classrooms–it is very attractive to have a chip that is directly mountable on a common breadboard. Even if you don’t mind using a development board, you may want to use the IC directly in a final version of a project and some people still prefer working with through hole components.

The 28 Pin Solution

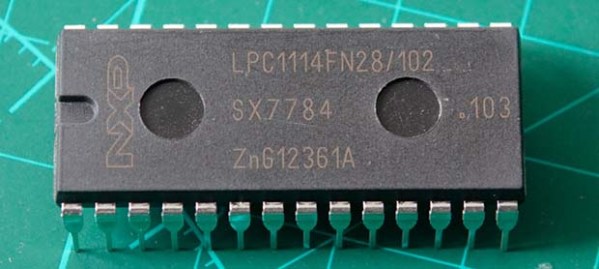
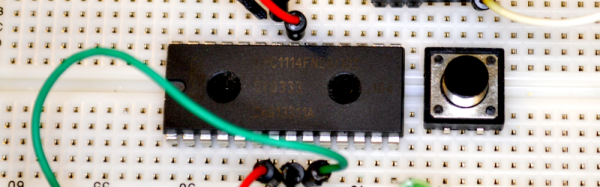
One solution that addresses most, if not all, of these concerns is the LPC1114FN28 processor. Unlike most other ARM processors, this one comes in a 28 pin DIP package and works great on a breadboard. It does require 3.3V, but it is 5V tolerant on digital inputs (and, of course, a 3.3V output is usually fine for driving a 5V input). The chip will work with mbed or other ARM tools and after prototyping, you can always move to a surface mount device for production, if you like. Even if you are buying just one, you should be able to find the device for under $6.

Continue reading “ARMing A Breadboard — Everyone Should Program An ARM”

Go Forth On A Breadboard

Forth isn’t a shiny new programming language, but it has a staunch following because it is lightweight and elegant. The brainchild of [Chuck Moore], the language is deceptively simple. Words are character sequences delimited by spaces. In its simplest form, Forth knows a few basic words including–and this is the key–a word to define other words.

[Jean-Claude Wippler] likes to experiment with physical computing and he found a Forth image ready-made for the LPC1114. Why is that interesting? The LPC1114 is one of the few (or maybe the only) modern ARM processor in a breadboard-friendly DIP package. Since [Jean-Claude] had a chip sitting around, he had a Forth system up in no time. All he needed was a breadboard and a 3.3V serial connector. The chip has its own bootloader and the The Mecrisp-Stellaris Forth he used has over 300 words as well as the ability, of course, to add more.

Continue reading “Go Forth On A Breadboard”

Hackaday Links: December 1, 2013

hackaday-links-chain

Since our ‘ol buddy [Caleb] left Hackaday for EE Times, he’s been very busy. One of his latest projects is doing Antique Electronics Autopsies. This time around it’s a 1953 Heathkit Grid Dip Meter. It’s a beautiful piece of engineering with Point to Point wiring and metal gears.

We love microcontroller breakout boards, and so does [Tim] apparently. He built a breadboard friendly breakout for the NXP LPC812. It’s an ARM Cortex M0+ with 16kb of Flash and 4kb of SRAM. The entire breakout board is smaller than the through-hole DIP LPC1114. When are we going to see these on Tindie, [Tim]? Here’s the Git with the board files. You can also pick up a board at OSH Park – $3.30 for a set of three.

What do you do when you have the perfect idea for a Kickstarter, but don’t have the funds for the perfect sales pitch? The obvious solution is to start an Indiegogo campaign to raise funds for your Kickstarter. Unfortunately, this campaign has already been successfully funded, so it’s already too late to get in on the ground floor. Relevant xkcd.

We’ve seen this DIY cell phone before but now it’s just about ready for production. [David] at the MIT Media Lab has been working on a bare-bones, ATMega & GSM module phone for a while now, and now you can grab the firmware and board files. Make your own cell phone!

Here comes Hanukkah, so drink your gin and tonica. Here’s a pedal powered menorahica so put on your yarmulke, it’s time to celebrate Hanukkah.

Breadboarding With A ARM Microcontroller

NXP’s LPC1114 ARM microcontroller is in a class all of it’s own. ARM microcontrollers are a dime a dozen, but this fabulous chip is the only one that’s housed in a hacker and breadboard friendly PDIP package. However, breadboard setups usually won’t have the luxuries of a true development platform such as flashing the part, single stepping through the code, and examining memory. [Steve] found an interesting solution to this problem that involves a Dremel and hacking up even more hardware.

[Steve] found a few LPC1769 dev boards that include a debugger and a way to program these chips. Simply by hacking off the programmer and debugger portion of this dev board with a Dremel tool, [Steve] had an easy to use interface for his breadboardable ARM.

After connecting the power rails to his breadboarded chip, [Steve] connected his programmer up and set up a gcc toolchain. For about $25, he has a breadboard friendly ARM microcontroller with full debugging capabilities.

This isn’t the first time we’ve seen a few people play with this DIP28 ARM chip; someone even milled this 600 mil chip down to 300 mils for even easier prototyping. Still, this is the best and cheapest way we’ve seen yet to turn this ARM into a proper prototyping platform.

Turning A 600 Mil Chip To 300 Mil

We’ve seen a few builds featuring NXP’s LPC1114 microcontroller before. This chip – the only breadboard friendly ARM microcontroller available – comes in a ‘still a little too large for prototyping’ 600 mil, 28 pin package. We won’t hazard a guess why NXP chose this rather large package, but the good news is it’s possible to shave this chip down to the more common 300 mil, 28-pin package used by AVRs and PICs.

In the video tutorial of this procedure, the chip is first taped down to a desktop CNC mill. 150 mil on each side of the die are removed, exposing the very cool-looking pattern of leads coming out of the chip. This isn’t enough area to solder, so the chip had to be further milled to expose some of the internal wiring.

After soldering everything to a set of pins, the new 300 mil package is covered in epoxy putty, milled down again into a nice cube shape and painted. Yes, the modified chip does work, and no, we can’t figure out why NXP chose a 600 mil package for this microcontroller over the far more common 300 mil chip.

Video after the break. Tip ‘o the hat to [Ian] for sending this one in.

Continue reading “Turning A 600 Mil Chip To 300 Mil”

Tiny Atari 810 Disk Drive Upgrade

Everything gets smaller as technology improves. [Rossum] reduced the space needed for an Atari 810 disk drive by building this tiny replacement. Of course it doesn’t use floppy disks, but takes a microSD card instead. And it doesn’t stand in the place of one floppy drive, but can emulate up to eight different drives. The best part is that [Rossum] went to the trouble of designing an enclosure and having it fabricated via 3D printing in order to look just like a doll house version of the original hardware. It uses an LPC1114 ARM Cortex-M0 microprocessor to translate data transmissions to and from the Atari hardware, storing it on the 8 GB card.

As usual, you’ll soon find the schematic, board artwork, and code up on his git repository soon.