PS/2 Keyboard For Raspberry Pi

A lot of people can bake a cake. Sort of. Most of us can bake a cake if we have a cake mix. Making a cake from scratch is a different proposition. Sure, you know it is possible, but in real life, most of us just get a box of cake mix. The Raspberry Pi isn’t a cake (or even a pie), but you could make the same observation about it. You know the Raspberry Pi is just an ARM computer, you could program it without running an available operating system, but realistically you won’t. This is what makes it fun to watch those that are taking on this challenge.

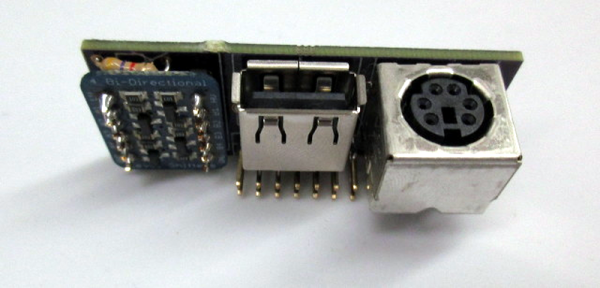
[Deater] is writing his own Pi operating system and he faced a daunting problem: keyboard input. Usually, you plug a USB keyboard into the Pi (or a hub connected to the Pi). But this only works because of the Linux USB stack and drivers exist. That’s a lot of code to get working just to get simple keyboard input working for testing and debugging. That’s why [Deater] created a PS/2 keyboard interface for the Pi.

Even if you aren’t writing your own OS, you might find it useful to use a PS/2 keyboard to free up a USB port, or maybe you want to connect that beautiful Model-M keyboard without a USB adapter. The PS/2 keyboard uses a relatively simple clock and data protocol that is well-understood. The only real issue is converting the 5V PS/2 signals to 3.3V for the Pi (and vice versa, of course).

Continue reading “PS/2 Keyboard For Raspberry Pi”

3D Printing Metal From Rust

It seems backwards, but engineers from Northwestern University have made 3D printing metal easier (and eventually cheaper) by adding extra production steps to the procedure. (Paper available in PDF).

Laser sintering works by laying down a thin layer of metal powder and then hitting it with a strong enough laser to sinter the particles together. (Sintering sticks the grains together without getting the metal hot enough to melt it.) The rapid local heating and cooling required to build up 3D objects expands and cools the metal, and can result in stresses inside the resulting object.

The Northwestern team still lays down layers of powder, but glues the layers together with a quick-drying polymer instead of fusing them with a laser. Once the full model is printed, they then sinter it in one piece in an oven.

anewwaytopri_tn
3D-printed copper lattice. Credit: Ramille Shah and David Dunand

The advantages of adding this extra step are higher printing speed — squirting the liquid out of syringe heads can be faster than fusing metal particles with a laser — and increased structural integrity because the whole model is heated and cooled at one time. A fringe benefit is that the model is still a bit flexible before firing, opening up possibilities for printing a flat model and then bending it into shape before sintering.

And if that weren’t enough, the team figured that they’d add a third step to the procedure to allow it to be used with rust (iron oxide) as the starting powder. They print the rust and polymer model, then un-rust the iron using hydrogen, and then fire it as before. Why rust? Do you know anything cheaper to use as a raw material?

What do you think? The basic idea may even be DIYable — glue metal particles together and heat them up enough to stick. Not in my microwave oven, though. We’d love to see a more energy-efficient 3D metal printer.

Thanks to [Joe] for the tip!