
[Niklas Roy] has always wanted to try out thermal imaging and saw his opportunity when he received one of those handheld IR thermometers as a gift. But not content with just pointing it at different spots and looking at the temperatures on the LCD display, he decided to use it as the basis for a scanning, thermal imaging system that would display a heat map of a chosen location on his laptop.
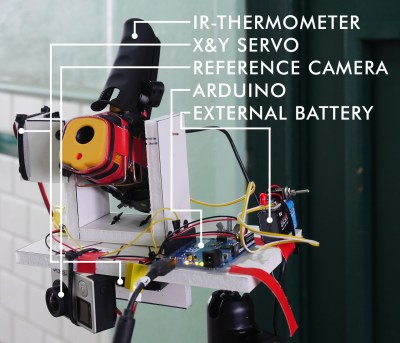
He still wanted to to be able to use the IR thermometer as normal at a later date so cutting it open was not an option. Instead he firmly mounted a webcam to it pointing at the LCD display. He then wrote software on his laptop to process the resulting image and figure out what temperature was being displayed.
Once he got that working, he next put the thermometer on a platform with servos connected to an Arduino for slowly rotating it in the horizontal and vertical directions, also under control of the software on his laptop. Each time the thermometer measures the temperature of a spot, the software decodes the temperature on the LCD display and then tells the Arduino to use the servos to point the thermometer at the next spot to be measured. Each measurement takes a little time, so scanning an entire location as 70×44 spots takes around a half hour. But the end result is a heat map drawn on the laptop, done by a device that is low-tech. [Editor’s Snark: Because attaching a webcam and processing the images is “low-tech” these days.] He can overlay the heat map on a normal photo to see at a glance where the hot spots are.
The software he wrote is available on GitHub and the video below shows it in action. We’ve got to admit, it’s pretty awesome to watch. You can even see the heat map being filled in one measurement at a time.
[Niklas] is somewhat of a regular here on Hackaday and his projects span an impressive range of creative ideas. Check out his massive music construction machine, or his RC beer crate delivery robot, or his supersized DIY pinball machine. Whatever you do [Niklas], keep those creative juices flowing!


Pretty cool!
That depends on the color mapping.
Why not read the pins from the LCD or straight from the Sensor to the Arduino cheaper computing power 1 less camera.
Didn’t want to open it up.
If you did want to make one from parts you can get the sensor for about $5.
Possible future hack addition: many of the IR thermometers, at least the cheapies from Harbor Freight, have serial out pads.
http://www.exisle.net/mb/index.php?/topic/66532-fun-with-cen-tech-ir-thermometers/
Seems like you could improve the perception of speed by making a low-res/big step pass at the scene and then interpolating. Would probably take marginally longer to get the full resolution, but would give a usable image quickly. Brainfart prevents me from recalling proper term – early web used interpolated gifs, pov-ray has a mosaic rendering mode, that kind of thing.
What you mean is progressive image loading.
https://en.wikipedia.org/wiki/Adam7_algorithm
The black and decker IR thermometer I have uses a color shift light to show warmer or cooler areas. I thought about just recording that for a similar effect.
No time, but this is proof of concept for what I wanted to do. Nice job.
Nice idea & well carried off.
Occurs a variant of this applicable to fire-fighters on the
sides of their support tender to drive ahead scanning for hot spots etc.
Did a search of several patent variants, all covered it seems…
Realise I didnt clarify, for forest/bush so called ‘wild’ fires where embers
carried by wind sometimes far afield so an autonomous method augments
the fire fighters site awareness etc…
For low res images, I like the Panasonic Grid-eye: http://www.digikey.com/product-detail/en/panasonic-electronic-components/AMG8833/P19002CT-ND/5825306
He could interpolate the values to get better resolution, or continue to use it as a scanner.
MLX90614 Is the cheapest IR sensor you can buy on ali, but probable need some kind of ir transparent lens http://s.click.aliexpress.com/e/f66URFE
Heh, looks like a disk defrag tool.