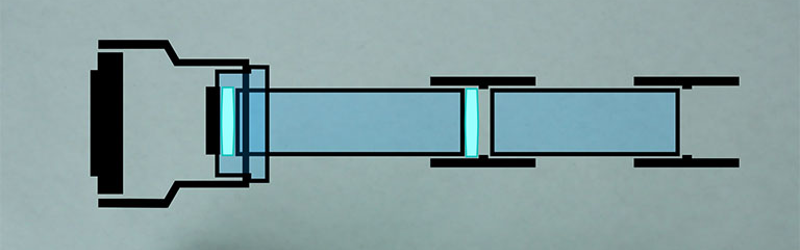
Microscopes are a great way to see the mysteries of the universe hidden at the smaller scale. When they were first developed, scientists had to rely on illustration to convey their findings through the lens. Thankfully we can now rely on photography to help us out instead. Many microscopes come with a special port — often called a trinocular port — for mounting a camera. Using this, [Brian] developed a DSLR mount for his microscope using a hacker staple: PVC pipe.
 The virtues of PVC pipe are many and varied. It’s readily available in all manner of shapes and sizes, and there’s a wide variety of couplers, adapters, solvents and glues to go with it. Best of all, you can heat it to a point where it becomes soft and pliable, allowing one to get a custom fit where necessary. [Brian] demonstrates this in using a heat gun to warm up a reducer to friction fit the DSLR lens mount. Beyond that, the mount uses a pair of lenses sourced from jeweller’s loupes to bring the image into focus on the camera’s sensor, mounted tidily inside the PVC couplers.
PVC’s a great way to quickly and easily put a project together — so much so that there are fittings available specifically for using PVC to build stuff. Video below the break.


Cool, but why is the magnification so low? I used to be able to see way more detail with my cheap microscope I had as a kid.
Not only that, but the image is small, blurry, and has color fringes.
The image quality is probably due to the single element plastic loupe lenses used.
The lenses are not the best quality, and the two lenses probably aren’t completely parallel which is causing some distortion.
It is a 7X-40X microscope for inspection.
Is this a hack fail? The tube is way too long, and I get better photos from my Nikon d810 and a macro lens
agreed tube too long, focus is bad, picture is grainy and distorted and field of view seems minuscule.proper coupling would be lensless and about 10-15 cm in length . if you want a better field of view you need lenses but again the lenses used here were clearly of inferior quality or just misused.
the d810 should give better pictures, in fairness it doesnt say much that it takes better pictures, it probably takes better pictures than many actual professional digital microscopes at the same (low) magnification.
they are used as primary sensors for astrophotography on a professional level as well.
How high can a DSLR bounce when a PVC press fit fails?
How High
https://www.youtube.com/watch?v=B5h2xRYmANk
Isn’t PVC super toxic when heated ?
Chlorinated plastics as PVC and Nylon have strong bonds and are therefore tough and chemical resistant but don’t burn them as it forms Dioxin which fills your lungs with water. It takes a lot however and a small flame from it burning a few seconds before you blow it out wont kill you. Simply heating it to form it is not dangerous at all.
Sorry to be the party pooper but this is really crappy. First: DSLRs are especially unsuited for microscopes due to the vibrations their mirror and shutter induce. No professional microscope maker would sell a camera with mechanical shutter. It just doesn’t work. The camera pixels are a few micrometers, very easy to have that much blur by slight movement.
Second problem: the whole thing is wayyyyyyyyyyyyyyyyy to long and unstable. It’s clumsy to use, prone to be knocked over, in the process ruining the adapter or the microscope and the DSLR. It is also super sensitive to vibrations again.
Failed design. So sad.
The proper setup for a trino looks like this, as there is ample light: put a regular eyepiece into the third tube. This corrects all the optical distortions of the objective lens. Then glue a regular cheapo webcam including the lens onto the eyepiece. Boom, top corrected, cheap, leightweight setup.
as someone who takes scientific pictures from a DSLR on a daily basis i can tell you you are dead wrong. vibration is a non issue since the RIGHT tube length for such a setup is about 10cm high WITHOUT any crappy lenses. you are right that this is a fail not a win ( for oh so many reasons) and you are right that no microscope maker will sell you a DSLR that costs max 1k when they can sell you a crappy lab cam with software for 70k …money makes the rules for the most part. only reason to go for a lab camera nowadays is if you need the light sensitivity or speed (electronic shutter) of a ccd sensor like in fluorescence applications.
“put a regular eyepiece into the third tube. This corrects all the optical distortions of the objective lens.” in what reality? seriously no offense but you have no clue. the current state of the art is that the objectives are almost perfect (flatness/geometric and color aberration) and the rest error needs to be calibrated if your application requires that precision (hint: almost noone does/needs this) the eyepiece is definitely the crappier lens by comparison and again you don’t need any optical element to couple a cam to a microscope.
That’s just wrong. You are talking about infinity corrected systems after the tube lens in normal microscopes. Cheap stereo microscopes aren’t infinity corrected. The remaining abberations behind the lens can also be by design and have nothing to do with the inability to correct them in the lens or old engineering. It might just be easier to correct them later (e.g. by the tube lens), for example the objective can be overcorrected so that after the tube lens the image is also free from tube lens abberations.
The makers don’t sell cheapo cameras for big bucks, just not true. These cams usually are cooled, have big sensors etc.
Of course you can somehow throw your DSLR to your microscope and take pictures, but you always battle mechanical shutter artifacts if it doesn’t have an electronic shutter. Especially in this free floating arm setup.
OK your right i was a bit to hasty about the lens distortion business and your right i was referring to infinity corrected systems mea cupla. BUT you can make perfect pictures with a DSLR on any kind of optical instrument. the vibration and mechanical shutter artifact doesn’t hold true anymore. maybe 10 years ago i would have agreed but we are working with DSLR for now more than 5 years without a hitch. newer DSLR have the option to retract the mirror to minimize vibration and you have so much light in such a system that you can allow “slow” shutter speed mitigating the potential drawbacks completely.
5 years ago when we switched camera i took the old lab camera apart and found a 150$ firewire camera module from china inside so yeah big makers DO put cheapo module in a big plastic case with their brand on it and sell it for HUGE bucks that is a reality. but usually they want to sell you a complete bundle with software so you also pay for the software development. unfortunately c-mount is the de facto standard for those cameras which also mean the sensor will always be relatively small (else you would need some more optical elements to correct the field of view).
you can buy cooled cams but by far the majority is still uncooled.
you will also notice that top of the line lab cameras are currently hovering at about 12 mpix whereas even a entry level DSLR will be around 18-20 mpix
In before: “you shouldn’t use PVC, it will explode at some point!”
Wait… this isn’t a spud gun? Never mind.
Kinda sad to see people tearing this down for no other reason other than it not being 110% perfect amazing optical grade super magic wonderful fantastic. At the end of the day, the project worked for them and got them results they wanted for the right price. They never claimed it was the MOST 1337est BEST DSLR MOUNT EVAR!!!!!! and I think a lot of these comments are unnecessarily harsh. Feel free to send in your own complete DIY DSLR mounts.
I’m sorry you feel that way and i can understand it to some extend but the simple fact that he almost certainly made it worse by using lenses in the first place suggests to me that he didn’t do his homework so yeah sure I’m gonna criticize. you can buy a USB digital microscopes for 20$ from eBay that produce similar pictures. pretty sure his BOM is going to be more than 20$.
I agree, the quality isn’t the best but it does work. For me it was just a fun experiment, and I had all the parts on hand (except some a couple of the PVC fittings) so why not try building something I could use?
I tried creating a mount without using any additional optics as you suggest, but it didn’t work. This approach you suggest works well enough for a mount that goes over the eyepiece, which has an additional lens that magnifies the image further. The trinocular port does not have such a lens, so additional optics are needed.
i understand that optomechanical couplings can be a headache. i know it from experience especially when you have to deal with old non standard equipment but from the video and the picture it looks to me like your trinocular head has a c-mount as output in which case all you need is a 7$ adapter (or probably less from eBay) (https://www.amazon.com/Fotodiox-Lens-Mount-Adapter-C-Mount/dp/B003EAY5S6/ref=pd_lpo_421_lp_img_4?_encoding=UTF8&psc=1&refRID=RKVC6FWH776PFPJG84FE) or a 0$ diy version where you just drill a hole in a sensor cap. with this knowledge in mind pardon me for not understanding why you build this complicated and relatively speaking expensive contraption. but kudos to you for making in work anyway.
I wasn’t aware those existed, but I am not sure if it would work with my setup or not. The trinocular port threads onto the microscope and the tube at the top where the camera would connect is 23mm. The mount AmScope sells fits inside the tube part. It looks like that c-mount adapter is female threaded.
I tore it down not because it wasn’t 110%, but rather less than 10%
Honestly, the samples proved are lower resolution than just using a regular DSLR and single lens, heck, hand hold the lends in reverse and you get 110% better that’s this build. This build shouldn’t even be on hack a day, it’s a work in the hard way to do something wrong.
Yes it’s a hack, but so is me cutting a match in half and saying look, I now have a match and kindling. Or hey hack a day, I used the other pair in my cat 5 cable, now I can connect two computers.
There needs to be at least a positive benifiet to the hack, and on this one I can guarantee you holding his standard lens backwards without microscope would have yielded better results than posted
I look for to his next version for the other microscope he has, we have a similar one here and my kids currently have to hold a web cam over the eye piece to to do a capture. Having a solid camera mount for a 20 M pixel camera, that you can swap on/off easily would be great.
I think that would without any additional optics, since you’d basically be using the lens of the eyepiece as your camera’s lens. You could try using a bellows-style extension tube to get it focused, instead of having to monkey around with different lengths of PVC pipe.
I have a Skylight (http://www.skylightscope.com/), which is, unfortunately, no longer being sold. It’s not that complex a design, though.
if you want to photograph your PCB using an ordinary camera that doesn’t allow to focus properly at close distance, then you can (in most cases) use a simple/cheap eye loupe magnifier. One with a magnification of 5 or 10 could be sufficient to photograph your PCB problems for further documentation.
A simple piece of PVC fixing the loupe to the front of your camera of (only a few centimeters long) will do the trick. I used it quite a lot until I bought a cheap USB camera microscope (pen type).
As in every project (especially with this (I presume) it is easy to loose focus of the goal and over engineering can bring the entire project into danger of failure. On the other end… if a setup gives you the results you want, then what’s the problem.
I would say this is a fail… here is why:
You can attach an approx µFT sized CMOS sensor directly to the trinocular port (without any lens inbetween) and get almost a full frame illumination. If you you bigger sensors like APS-C or Fullframe, you can use a reduction lens (0.3 or 0.5x), see here http://www.krebsmicro.com/pdf/trinoc_a3.pdf
If you attach it directly the focal plane is about 6-7cm above the trinocular port.
So I designed and printed an Adapter with µFT mount and attached the camera to the port. I got almost the full sensor illuminated.
Without a lens the optical quality is much better.
Here is my Design with sample images: http://www.thingiverse.com/thing:1675849
Little correction. A Reduction lens is only needed for smaller sensors (e.g. 1/2.5″). For bigger sensors you can use e lens with magnification > 1.
This article inspired me to learn how to use the Intel Play QX3 USB microscope on my Linux machine.
Basically, I installed v4l2ucp and Cheese, and it is working!
The ‘x’ mean ‘times’, stop saying ‘7 ex’ and say ‘7 times’ dammit.
That stuff is always annoying me.
Related question: Do teachers in primary school also says ‘How much is four ex seven Timmy?’ Or do they still use ‘times’?