Press Button, Receive Hackspace WiFi Code

When you are running a hackspace, network security presents a particular problem. All your users will expect a wireless network, but given the people your space will attract, some of them are inevitably going to be curious enough to push at its edges. Simply plugging in a home WiFi router isn’t going to cut it.

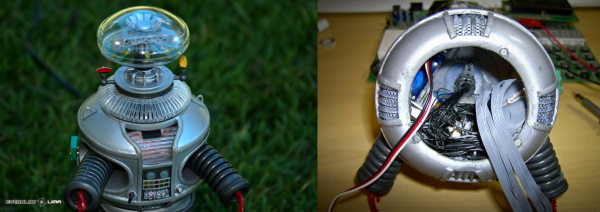
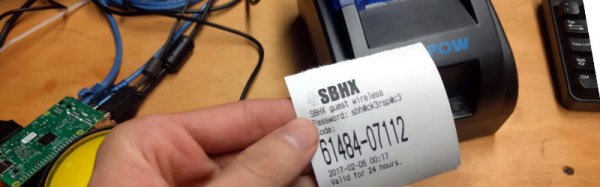
At Santa Barbara Hackerspace they use Unifi access points on their wireless network, and their guest network has a system of single-use codes to grant a user 24-hour access. The system has the ability to print a full sheet of codes that can be cut individually, but it’s inconvenient and messy. So the enterprising hackspace members have used a Raspberry Pi and a receipt printer to deliver a single code on-demand at the press of a button.

The hardware is simple enough, just a pull-up and a button to a GPIO on the Pi. Meanwhile the software side of the equation has a component on both client and server. At the server end is a Python script that accesses the Unifi MongoDB database and extracts a single code, while at the client end is another Python script that reacts to a button press by calling the server script and printing the result.  It’s a simple arrangement that was put together in an evening, but it’s an effective solution to their one-time WiFi access needs.

It’s a temptation as a hackspace to view all of your problems as solvable in one go with the One Piece Of Software To Rule Them All, and as a result some spaces spend a lot of time trying to hack another space’s effort to fit their needs or even to write their own. But in reality it is the small things like this one that make things work for members, and in a hackspace that’s important.

Does your space have any quick and simple projects that have automated a hackspace process? Let us know in the comments.

Thanks [Swiss] for the tip.

Huge Interactive Crossword

Give kids some responsible and challenging tasks, and you’d be surprised at the results. The “Anything Goes” exhibit at the National Museum in Warsaw was aimed as a museological and educational experiment. A group of 69 children aged 6–14 was divided into teams responsible for preparing the main temporary exhibition at the museum. Over six months, they worked on preparing the exhibition during weekly four-hour meetings. They prepared scripts, provided ideas for multimedia presentations, and curated almost 300 works for display. One of those was [Robert Mordzon]’s Giant Interactive Crossword.

The build is in two parts. The letter tiles, which have embedded RFID tags, obviously look like the easiest part of the build. The table, looking at the video (after the break), probably needed a lot more effort and labour. It is built in two halves to make construction easier. There are a 130 boxes that need to be filled in with the right letters to complete the crossword. Each box contains a bunch of electronics consisting of an Arduino Nano, a RFID Reader and a bunch of sixteen WS2812B LEDs, all assembled on a custom PCB. Do the math, and you’ll figure out that there’s 2080 LEDs, each capable of sipping 60 mA at full brightness. That’s a total current requirement of almost 125 amps at 5 V. Add in all the Arduino’s, and [Robert] needed a beefy 750 W of power, supplied via four switch mode power supplies.

Each Arduino Nano is a slave on the I²C bus. The I²C master is an Arduino Mega 2560, which in turn communicates with a computer over serial. When a box is empty, the LEDs are dim, when a wrong letter is placed, they turn Red, and when the right letter is placed, they turn Green. If a word gets completed, a special word animation is played. This information is also passed on to the computer, which then projects an animation related to the word on a giant wall screen. Upon the crossword getting completed, the table erupts in to a sound (via the computer) and light “disco” show and also reveals the main motto of this section of the exhibit – “Playing the Hero”.

Continue reading “Huge Interactive Crossword”

A Guide For Building Rubber Dome Keyboards

Let’s talk about computer keyboards for a second. The worst keyboards in the world are the cheap ‘rubber dome’ keyboards shipped with every Dell, HP, and whatever OEM your company has a purchasing agreement with. These ‘rubber dome’ keyboards use a resistive touchpad to activate a circuit, and the springiness of the key comes from a flexible rubber membrane. Mechanical keyboards are far superior to these rubber dome switches, using real leaf springs and bits of metal for the click clack happiness that is the sole respite of a soul-crushing existence. MX blues get bonus points for annoying your coworkers.

Mechanical key switches like the Cherry MX, Gateron, or whatever Razer is using aren’t the be-all, end-all mechanical keyswitch. History repeats, horseshoe theory exists, and for the best mechanical keyswitch you need to go back to rubber domes. Torpre switches are surprisingly similar to the crappy keyboards shipped out by OEMs, but these switches have actual springs, turning your key presses into letters through a capacitive touchpad. Is this a superior switch? Well, a keyboard with Torpre switches costs more than a keyboard with Cherry MX switches, so yeah, it’s a better switch.

It seems everyone is building their own mechanical keyboards these days, and the recipe is always the same: get a few dozen Cherry MX (or clone) switches, build a PCB, grab a Teensy 2, and use the tmk keyboard firmware. There’s not much to it. DIY Torpre boards are rare because of the considerations of building a capacitive switching PCB, but now there’s a DIY guide to making the perfect rubber dome keyboard.

[tomsmalley] put together this guide after reviewing a few amazing projects scattered around the web. Over on Deskthority, [attheicearcade] is building a custom, sculpted, split Torpre board and a split Happy Hacking Keyboard. These are projects worthy of a typing god, but so far there has been no real beginner’s guide for interfacing with these weird capacitive switches.

As far as circuitry goes on these capacitive boards, the PCB is the thing. Each key has a pair of semi-circular pads on the PCB to serve as plates on a capacitor. These pads are connected to a microcontroller through an analog mux, with a little opamp magic thrown into the mix.

With a relatively decent guide to the hardware, [tomsmalley] has also been working on his own firmware for capacitive switches. Shockingly, this firmware is compatible with the Teensy 3.0, which will provide enough horsepower to read a bunch of analog values and spit out USB.

Mechanical keyboards are great, and we really like to see all these hardware creators pushing the state of the art. You can only see so many custom sculpted keycaps or DIY MX boards, though, and we’re really eager to see where the efforts to create a custom Torpre board take us. If you’re building one of these fantastic keyboards, send it in on the tip line.

PVC Submersible ROV

[mark.brubaker.1] and his crew decided to make a submersible for a school project using PVC pipes as a frame. It has two motors on the back to provide forward thrust and steering as well as a horizontal mounted motor in the middle of the PVC chassis to provide up and down thrust. They used regular motors which they waterproofed by inserting them inside a case full of plumbers wax. We’re not sure how long this will hold at the bottom of the ocean, but it works fine for a school project in the pool. Here’s the instructions on how to make one.

The build is completely analog, the controller is a board with three switches which individually control the different motors. So if you want to turn left, you fired up the right motor. For right you do the opposite and fire up the left motor. Up and down, well, you get the picture. If you have a swimming pool, lake or some water body nearby and you’re looking for a weekend project with your kids, this is a great tip. It’s not an Arduino controlled robot fish, but it’s a first step in that direction; you can later on use the frame to improve on the design and add some electronics.

Continue reading “PVC Submersible ROV”

Microscope DSLR Mount Using PVC & Heat

Microscopes are a great way to see the mysteries of the universe hidden at the smaller scale. When they were first developed, scientists had to rely on illustration to convey their findings through the lens. Thankfully we can  now rely on photography to help us out instead. Many microscopes come with a special port — often called a trinocular port — for mounting a camera. Using this, [Brian] developed a DSLR mount for his microscope using a hacker staple: PVC pipe.

squareThe virtues of PVC pipe are many and varied. It’s readily available in all manner of shapes and sizes, and there’s a wide variety of couplers, adapters, solvents and glues to go with it. Best of all, you can heat it to a point where it becomes soft and pliable, allowing one to get a custom fit where necessary. [Brian] demonstrates this in using a heat gun to warm up a reducer to friction fit the DSLR lens mount. Beyond that, the mount uses a pair of lenses sourced from jeweller’s loupes to bring the image into focus on the camera’s sensor, mounted tidily inside the PVC couplers.

PVC’s a great way to quickly and easily put a project together — so much so that there are fittings available specifically for using PVC to build stuff. Video below the break.

Continue reading “Microscope DSLR Mount Using PVC & Heat”

Acoustic Mirrors: How To Find Planes Without RADAR

A lot of science museums and parks feature something called an acoustic mirror. The one at Houston’s Discovery Green park is called the listening vessels. [Doug Hollis] created two acoustic mirrors 70 feet apart, pointing at each other. If you stand or sit near one of the vessels, you can hear a whisper from someone near the other vessel. The limestone installations (see right) are concave and focus sound like a parabolic mirror will focus light.

mirrorJust a science curiosity, right? Maybe today, but not always. The story of these devices runs through World War II and is an object lesson in how new technology requires new ways of thinking about things.

Continue reading “Acoustic Mirrors: How To Find Planes Without RADAR”

Danger, Will Robinson: Sweet B9 Build

3If you’ve ever seen “Lost in Space” in Portuguese, you’d definitely recognize the phrases that [Everaldo]’s B9 robot reads off of the SD card inside its belly. If not, you can check out the video below and learn such important phrases as “Warning! Alien approaching.” or “The planet’s breaking up” (we presume). Or head over to [Everaldo]’s website and check out the great model build log. And while you’re there, check out his model TRS80 too.)

There’s a lot of solid model-building going on here, but hidden inside the pretty exterior is some good old-fashioned hacking. Once the audio was stored on the SD card, [Everaldo] simply soldered it straight into the project. There’s also an IR daughterboard that drives the robot, while blinky lights and servo motors bring it to life. We want one for our desk!

If you haven’t made an IR-remote-based project, you really should. It’s still among the most hackable of methods to transmit data to or from a microcontroller, while making use of one of those superfluous IR remotes you have kicking around the house. If you’re short on inspiration, and not a model-builder, check out this Hacklet dedicated to IR, or our favorite smart-home(r) device of all time.

Are you thinking what we’re thinking? This would make an excellent entry in the Hackaday Sci-Fi contest which is accepting entries through March 6th.

Continue reading “Danger, Will Robinson: Sweet B9 Build”