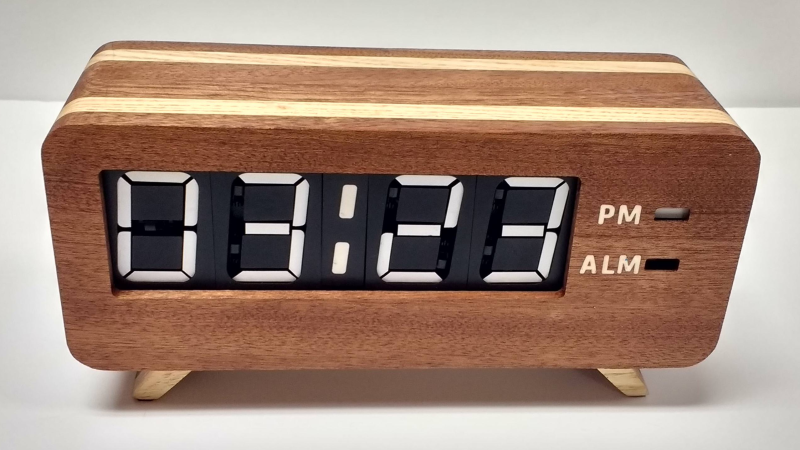
Earlier this year, we mentioned in a Hackaday Links article that [Spencer Hamblin] was in the process of building a seven-segment flip clock. Well, it’s finally finished, and it looks great!
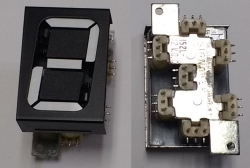
Vintage seven segment digits make up the display. These digits work the same way that flip-dot displays work – current through each segment’s coil creates a magnetic field which causes the segment to flip over. Current in the other direction creates the opposite magnetic field and flips the segment the other way. On these digits, there are three connections on the coils. The middle one is power and the other two are used to enable and disable the segment – ie., flip it one way or the other. To save on pins on the microcontroller, [Spencer] connected all the middle coil pins together on a digit. Each coil can be powered using a single pin on the microcontroller. Similarly, the segments for each digit are connected together as well, so one pin on the micro controls the same segment on each of the digits. The microcontroller in question is the AVR ATMega48.
There are two parts of the clock face left to do: AM/PM and whether the alarm is set or not. [Spencer] used a fifth digit, slightly offset, for those – the top and middle segments are used.
For the housing of the clock, [Spencer] used layers of offsetting colored wood. The wood (sapele and ash) were CNC cut and aligned. The back plate, also made from wood, holds buttons for setting the time and alarm, as well as some LEDs for what [Spencer] calls the “daylight alarm.” A capacitive sensor on the top of the unit (inside the wooden case) is used to turn the alarm off.
The result, after sanding and shellacing, looks amazing. [Spencer] nailed the art-deco look he was going for. There are plenty of pictures and the circuit designs, schematics and code are on [Spencer]’s Hackaday.io page, and you can find the Hackaday links post here. This is a complete log of a project we mentioned earlier on Hackaday, here, but there are other mechanical flip display clock projects, such as this DIY mechanical flip seven-segment prototype, or, you could create your own (really big) clock using this Lego mechanical seven-segment display.
via Reddit.


This looks amazing
+1
Great to see such dedication towards designing a clock like this. Also makes one want to have a CNC machine or at least a router for wood/aluminium working…
Do you have a 3d printer? If so check out the Mostly Printed CNC (MPCNC). https://www.v1engineering.com/
When can I buy it at IKEA?
Would this idea work for led 7 segment displays as well. Pull one MCU pin low and set any of 8 pins high. Could address quite a few 7 Sega this way is think
Yes it would. In fact, that’s commonly done for multi-digit 7-segment displays. The a-segment pins on all digits are connected to one MCU pin, the b-segment pins on all digits are connected to another MCU pin, and so on for all seven segments (the segment drive signals.) Then each digit’s common pin is connected to its own MCU pin (the digit select signals.) By scanning through the digit select pins and setting the segment pins you drive n digits using only n + 7 pins.
Of course external circuity allows for drive arrangements with fewer MCU pins. For instance, if you use a binary decoder chip and you can drive n digits using ceil(log2(n)) + 7 pins. With a simple (but long) shift register with output enable you could conceivably get it down to two or possibly even one MCU pin.
Sure, you just have to be careful with MCU’s sink/source pin capabilities. I don’t think it’s worth since MAX7219 appeared, SPI-like driver for 64 LED segments is quite a nice feature in a single chip.
Ahh ok, thank you for the replies. I’ve been in the habit of pairing 595s with 7 segs since I got into electronics just to save the extra gpio pins “just in case”. But I can see this being useful if running out of pins isn’t a concern
That looks amazing! I need some of those digits (or, even better, the dot-matrix type).
@HaD: shellacing => shellacking
Here are some digits the same as you see here…
https://tinyurl.com/sw94dw8k
I have some 7 segment flip digits that I need to look at one of these days. I also have 2 of the big bus type flip dot displays. They have not been turned on in decades and still have the last thing that was sent to the display on them. Very cool technology.
>”On these digits, there are three connections on the coils. The middle one is power and the other two are used to enable and disable the segment – ie., flip it one way or the other.”
It’s a center tapped coil. If the power draw is small enough such that you can drive it off the MCU pins directly, or you have a tri-state buffer in between, you can use the two outer pins and simply flip the polarity of the driving pulse. Depending on the exact construction, you might need a pair of diodes to make it work, but nevertheless it is possible to drive the segment using only two wires.
That’s useful, because you can connect one end of all segment coils together, then drive the individual segment lines, and cycle the common wire through 1-0-HighZ. Whatever segment at 1 gets set when the pulse is 0, and whatever segment at 0 gets reset when the pulse is 1, and finally when the buffer/MCU goes to high impedance the power stops flowing.
This way, you need one “strobe” line per 7-segment digit, and 7 control lines for each of the segments, shared between the digits.
Sadly with these displays needed to much power to be able to drive directly from the MCU. To switch reliably they need 12V for 20mS. It works down to about 9v at 15mS but once in a while they won’t flip. Driving the two outer pins would have worked and been better in some ways. Almost every other flip displays I’ve seen is non center-taped which makes the driver I designed useless except for the one clock.
Absolutely gorgeous. Looks like a high-end commercial product.
Looks great! Obvious question, where can one buy the digits? Looking on google, smallest size I could find was 100mm.
Needs a piece of glass in front of the digits to keep the dust out.
It’s a beautiful piece of work, but I wouldn’t call it “art deco”. It looks rather like something you would have seen in an expensive hotel during my 1970s childhood.
To be honesty I’m not terribly sure of the proper name for the style I sued either. Looking on line art deco is the most similar style I’ve found. If you’r aware of a style that fits it better I’d love to hear it.
Looks good no matter what you call it. I’m no expert but I’d have said “mid-century modern” before “art deco”.
This gorgeous. One change I’d make is to incorporate an esp8266 to get the time over wifi. For the cost of a few dollars in parts, any new clock should set itself and alway be accurate.
Very nicely done. The issue found after point-to-point wiring must have been discouraging, but persevering with the adapter PCB and ribbon harness really cemented this project’s position as masterful design art.
This clock looks amazing. Keep building cool stuff! I’m definitely interested in seeing what you come up with in a few years for the next version.
I need some of those digits too.
or where can buy this digits?
Very thunk’s
Morris
I interest your Items — Seven-Segment Flip Clock Display Finally Finished
Could you sold me?
If yes. How much money clock+ shipping cost shipping?
Thank you for your help
Morris