34C3: Hacking The Nintendo Switch

There’s a natural order to the world of game console hacking: every time a manufacturer releases a new game console they work in security measures that prevent the end user from running anything but commercially released games, and in turn every hacker worth his or her salt tries to break through. The end goal, despite what the manufacturers may have you believe, is not to run “bootleg” games, but rather to enable what is colloquially referred to as “homebrew”. That is to say, enabling the novel concept of actually running software of your choice on the hardware you paid for.

At 34C3, noted console hackers [Plutoo], [Derrek], and [Naehrwert] have demonstrated unsigned code running on Nintendo’s latest and greatest and while they are keeping the actual exploit to themselves for now, they’ve promised that a platform for launching homebrew is coming shortly for those who are on firmware version 3.0.0. From the sound of it, after 9 months on the market, Switch owners will finally have complete access to the hardware they purchased.

The key to running the team’s own code was through a WebKit exploit that was already months old by the time the Switch was released. Loading up an arbitrary webpage was the tricky part, as the Switch generally uses its web browser for accessing official sources (like the online game store). But hidden away in the help menus of Tetris, the developers helpfully put a link to their website which the Switch will dutifully open if you select it. From there it’s just a matter of network redirection to get the Switch loading a webpage from your computer rather than the Internet.

It’s easier to ask for forgiveness than permission.

But as the more security-minded of our readers may have guessed already, that just gets you into the browser’s sandbox. The team now had to figure out a way to break out and get full control of the hardware. Through a series of clever hacks the team was able to learn more about the Switch’s internal layout and operating system, slowly working their way up the ladder.

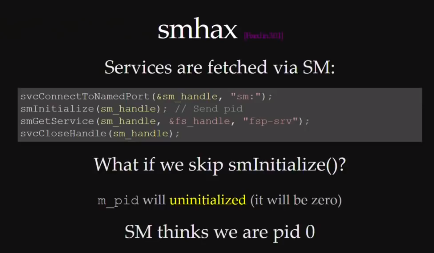
A particularly interesting hack was used to get around a part of the Switch’s OS that is designed to check which services code is allowed to access. It turns out that if code doesn’t provide this function with its own process ID (PID), the system defaults to PID 0 because the variable is not initialized. In other words, if you don’t ask the operating system which functions you have access to, you will get access to them all. This is a classic programming mistake, and a developer at Nintendo HQ is likely getting a very stern talking to right about now.

But not everything was so easy. When trying to get access to the boot loader, the team sniffed the eMMC bus and timed the commands to determine when it was checking the encryption keys. They were then able to assemble a “glitcher” which fiddled with the CPU’s power using FPGA controlled MOFSETs during this critical time in an attempt to confuse the system.

The rabbit hole is pretty deep on this one, so we’d recommend you set aside an hour to watch the entire presentation to see the long road it took to go from a browser bug to running their first complete demo. It’s as much a testament to the skill of  [Plutoo], [Derrek], and [Naehrwert] as it is the lengths at which Nintendo went to keep people out.

We’ve seen other attempts at reverse engineering Nintendo’s hardware, but by the looks of it, the Switch has put up a much harder fight than previous console generations. Makes you wonder what tricks Nintendo will have up their sleeves for the next generation.

Continue reading “34C3: Hacking The Nintendo Switch”

Arduino Trivia Box Is A Gift Unto Itself

There’s something about impressing strangers on the Internet that brings out the best in us. Honestly, we wouldn’t be able to run this site otherwise. A perfect example of this phenomenon is the annual Reddit Secret Santa, where users are challenged to come up with thoughtful gifts for somebody they’ve never even met before.

For his entry into this yearly demonstration of creativity, [Harrison Pace] wanted to do something that showcased his improving electronic skills while also providing something entertaining to the recipient. So he came up with a box of goodies which is unlocked by the successful completion of a built-in trivia game tailored around their interests. If this is how he treats strangers, we can’t wait to see what he does for his friends.

Hardware packed into the lid so the box itself remains empty.

There’s quite a bit of hardware hidden under the hood of this bedazzled gift box. The primary functions of the box are handled by an Arduino Nano; which runs the trivia game and provides user interaction via a 16×2 LCD, three push buttons, and a buzzer. Once the trivia game is complete, a servo is used to unlock the box and allow the recipient access to the physical gifts.

But that’s not the only trick this box has hidden inside. Once the main trivia game is complete, a ESP8266 kicks into action and advertises an access point the user can connect to. This starts the second level of challenges and gifts, which includes a code breaking challenge and gifted software licenses.

The project wasn’t all smooth sailing though. [Harrison] admits that his skills are still developing, and there were a few lessons learned during this project he is unlikely to forget in the future. Some Magic Smoke managed to escape when he connected his 5V Arduino directly to the 3.3V ESP8266, but at least it was a fairly cheap mistake and he had spares on hand to get the project completed anyway.

This project is reminiscent of reverse geocache boxes which only open when moved to a certain location, but the trivia aspect makes it perfect even for those of us who don’t want to put pants on just to receive our Internet gifts.

Continue reading “Arduino Trivia Box Is A Gift Unto Itself”

34C3: Fitbit Sniffing And Firmware Hacking

If you walked into a gym and asked to sniff exercise equipment you would get some mighty strange looks. If you tell hackers you’ve sniffed a Fitbit, you might be asked to give a presentation. [Jiska] and [DanielAW] were not only able to sniff Bluetooth data from a run-of-the-mill Fitbit fitness tracker, they were also able to connect to the hardware with data lines using test points etched right on the board. Their Fitbit sniffing talk at 34C3 can be seen after the break. We appreciate their warning that opening a Fitbit will undoubtedly void your warranty since Fitbits don’t fare so well after the sealed case is cracked. It’s all in the name of science.

There’s some interesting background on how Fitbit generally work. For instance, the Fitbit pairs with your phone which needs to be validated with the cloud server. But once the cloud server sends back authentication credentials they will never change because they’re bound to to the device ID of the Fitbit. This process is vulnerable to replay attacks.

Data begin sent between the Fitbit and the phone can be encrypted, but there is a live mode that sends the data as plain text. The implementation seemed to be security by obscurity as a new Bluetooth handle is used for this mode. This technique prevents the need to send every encrypted packet to the server for decryption (which would be for every heartbeat packet). So far the fix for this has been the ability to disable live mode. If you have your own Fitbit to play with, sniffing live mode would be a fun place to start.

The hardware side of this hack begins by completely removing the PCB from the rubber case. The board is running an STM32 and the team wanted to get deep access by enabling GDB. Unfortunately, the debug pins were only enabled during reset and the stock firmware disables them at startup (as it should). The workaround was to rewrite the firmware so that the necessary GPIO remain active and there’s an interesting approach here. You may remember [Daniel Wegemer] from the Nexmon project that reverse engineered the Nexus 5 WiFi. He leveraged the binary patching he used on Nexmon to patch the Fitbit firmware to enable debugging support. Sneaky!

For more about 34C3 we have a cheatsheet of the first day and for more about Fitbit security, check out this WAV file.

Continue reading “34C3: Fitbit Sniffing And Firmware Hacking”

Seven-Segment Flip Clock Display Finally Finished

Earlier this year, we mentioned in a Hackaday Links article that [Spencer Hamblin] was in the process of building a seven-segment flip clock. Well, it’s finally finished, and it looks great!

Vintage seven segment digits make up the display. These digits work the same way that flip-dot displays work – current through each segment’s coil creates a magnetic field which causes the segment to flip over. Current in the other direction creates the opposite magnetic field and flips the segment the other way. On these digits, there are three connections on the coils. The middle one is power and the other two are used to enable and disable the segment – ie., flip it one way or the other. To save on pins on the microcontroller, [Spencer] connected all the middle coil pins together on a digit. Each coil can be powered using a single pin on the microcontroller. Similarly, the segments for each digit are connected together as well, so one pin on the micro controls the same segment on each of the digits. The microcontroller in question is the AVR ATMega48.

There are two parts of the clock face left to do: AM/PM and whether the alarm is set or not. [Spencer] used a fifth digit, slightly offset, for those – the top and middle segments are used.

For the housing of the clock, [Spencer] used layers of offsetting colored wood. The wood (sapele and ash) were CNC cut and aligned. The back plate, also made from wood, holds buttons for setting the time and alarm, as well as some LEDs for what [Spencer] calls the “daylight alarm.” A capacitive sensor on the top of the unit (inside the wooden case) is used to turn the alarm off.

The result, after sanding and shellacing, looks amazing. [Spencer] nailed the art-deco look he was going for. There are plenty of pictures and the circuit designs, schematics and code are on [Spencer]’s Hackaday.io page, and you can find the Hackaday links post here. This is a complete log of a project we mentioned earlier on Hackaday, here, but there are other mechanical flip display clock projects, such as this DIY mechanical flip seven-segment prototype, or, you could create your own (really big) clock using this Lego mechanical seven-segment display.

via Reddit.

[Ken Shirriff] Becomes A Core Memory Repairman (Again)

Lately, [Ken Shirriff] has been on some of the most incredible hardware adventures. In his most recent undertaking we find [Ken] elbow-deep in the core memory of a 50-year-old machine, the IBM 1401. The computer wasn’t shut down before mains power was cut, and it has refused to boot ever since. The culprit is in the core memory support circuitry, and thanks to [Ken’s] wonderful storytelling we can travel along with him to repair an IBM 1401.

From a hardware standpoint core memory makes us giddy. It’s a grid of wires with ferrite toroids at every intersection. Bits can be set or cleared based on how electricity is applied to the intersecting wires. [Al Williams] walked through some of the core memory history last year and we enjoyed hearing [Pamela Liou] recount the story of how textile workers consulted on the fabrication of core memory for the Apollo missions during her OHWS Talk in October. But giddiness aside, core memory has pretty much gone the way of the dodo having been displaced by technologies that take up exponentially less space.

Bad inductor (green housing has been dissolved away)

We chuckle at [Ken’s] mention of the core memory capacity for the IBM 1401. It has 4000 characters of memory built-in (with another 12,000 in an expansion box) and he goes on to detail that these are 6-bit characters on a machine that operates in decimal and not binary (hence 4k instead of the base-2 friendly 4096).

You may remember his work a few years back to repair core memory on the same model. The Museum has two 1401’s, which turned out to be a huge help in trouble-shooting this. After tracing out the control lines, the repair team began swapping cards between the working and non-working machines. They were able to bring it back online — establishing one of the green inductors was bad — only to be struck with a second fault in the power supply.

Get this, [Ken] comments that “the whole computer is pre-silicon”. When working through the PSU, some suspect transistors were replaced with germanium power transistors. Those may have been a red-herring, as a penciled-in fuse on the original schematics turned out to be the linchpin of the PSU repair. Buried deep in the assembly, replacing the designed-to-fail part let the ancient beast awake once more.

Machines of this quality were heavily documented, and the schematics make this type of trouble-shooting a lot more manageable. But it’s still as much an art as it is skill. Make sure to give [Ken’s] article a read, and look around at the other repair jobs he’s documented — keeping these machines in service is becoming wizard-level work and we love being able to follow along.

Retrotechtacular: 1950s Televisions Were Beasts

Television has been around for a long time, but what we point to and call a TV these days is a completely different object from what consumers first fell in love with. This video of RCA factory tours from the 1950s drives home how foreign the old designs are to modern eyes.

Right from the start the apparent chaos of the circuitry is mindboggling, with some components on circuit boards but many being wired point-to-point. The narrator even makes comments on the “new technique for making electrical connections” that uses a wire wrapping gun. The claim is that this is cleaner, faster, and neater than soldering. ([Bil Herd] might agree.) Not all of the methods are lost in today’s manufacturing though. The hand-stuffing and wave soldering of PCBs is still used on lower-cost goods, and frequently with power supplies (at least the ones where space isn’t at a premium).

It’s no surprise when talking about 60+ year-old-designs that these were tube televisions. But this goes beyond the Cathode Ray Tube (CRT) that generates the picture. They are using vacuum tubes, and a good portion of the video delves into the manufacture and testing of them. You’ll get a glimpse of this at 3:20, but what you really want to see is the automated testing machine at 4:30. Each tube travels along a specialized conveyor where the testing goes so far as to give a  few automated whacks from corks on the ends of actuators. As the tube gauntlet progresses, we see the “aging” process (around 6:00) when each tube is run at 3-4 times the rated filament voltages. Wild!

There’s a segment detailing the manufacture of the CRT tubes as well, although these color tubes don’t seem to be for the model of TV being followed during the rest of the films. At about 7:07 they call them “Color Kinescopes”, an early name for RCA’s CRT technology.

During the factory tours we get the overwhelming feeling that this manufacturing is more related to automotive than modern electronic. These were the days when televisions (and radios) were more like pieces of furniture, and seeing the hulking chassis transported by hanging conveyors is just one part of it. The enclosure plant is churning out legions of identical wooden consoles. This begins at 11:55 and the automation shown is very similar to what we’d expect to see today. It seems woodworking efficiency was already a solved problem in the ’50s.

Continue reading “Retrotechtacular: 1950s Televisions Were Beasts”

Take The Coin Cell Challenge This Weekend!

The year is drawing to a close, and we have a weekend project for you to while away the remaining hours. Take the Coin Cell Challenge!

The point of the challenge is to do something interesting with a coin cell. That’s it! It’s a challenge that can be as simple or as involved as you want. Low power is where it’s at these days, so if you’ve never used the hardware sleep modes in your favorite microcontroller, that would make an excellent challenge entry. Show us what you’re able to do with short wake periods, and talk about when and why that wake happens. Or go a completely different route and build your own cell!

[Ben Krasnow] makes the most of a tiny power source
The top twenty entries will each receive a $100 Tindie credit so they can score some excellent gear. Three top winners in some special areas who will each be awarded a $500 cash prize. We’re looking for something interesting that demonstrates longest life (Lifetime Award), something that burns through that coin cell as if it’s going out of style (Supernova Award), and something that fills us with disbelief (Heavy Lifting Award) because it shouldn’t be possible with “just a coin cell”.

One of our biggest inspirations for this contest was [Ben Krasnow] who managed to squeeze enough juice out of a miniscule coin cell to power his Flashing Light Prize entry, only because he reduced internal resistance by heating the cell with an air gun (here’s the Hackaday coverage of that project). And [Elliot Williams] wrote a great guide on what kind of juice you can expect to get out of a cell. Take these to heart and do something interesting this weekend. Enter now!