
I finally had my own house. It was a repossession, and I bought it for a song. What was supposed to be a quick remodel quickly turned into the removal of most of the drywall in the house. There was a silver lining on this cloud of drywall dust and loose insulation. Rather than constantly retro-fitting cabling and gadgets in as needed, I could install everything ahead of time. A blank canvas, when the size of a house, can overwhelm a hacker. I’ve spent hours thinking through the infrastructure of my house, and many times I’ve wished for a guide written from a hacker’s perspective. This is that guide, or at least the start of it.
What do you want your smart house to do? And what do you want to be able to do in your smart house? For example, I wanted to be able to upgrade my cheap 120 V welder to a beefier 240 V model, so adding a 240 V plug in the garage was a must. As a bonus, that same 240 V circuit could be used for charging an electric car, if ever one is parked there.
“Ethernet everywhere” was my mantra. Try to imagine everywhere you might want to plug in a desktop, a laptop, an access point, or even a VoIP phone. I decided I wanted at least two Ethernet drops to each room, and tried to imagine the furniture layout in order to put them in convenient places.
The problem is that not everything uses Ethernet. I wanted temperature sensors, magnetic switches on the doors– Oh, and tie into the HVAC control, and maybe a webcam or a motion detector. Add in LEDs and relays for controlling lights, and it becomes obvious that a better solution is needed.
Pi Boxes
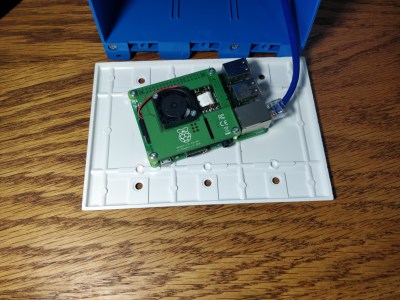
I’ve always been fond of the Raspberry Pi– It has USB, GPIO, and i2c, among other interfaces. An Instructable by [peter_3d] gave me the burst of inspiration I needed. A 3-gang electric box is the perfect size for a Raspberry pi. The newest version of the Pi, the Pi 3 b+ has support for a PoE hat, which we’ve recently covered.
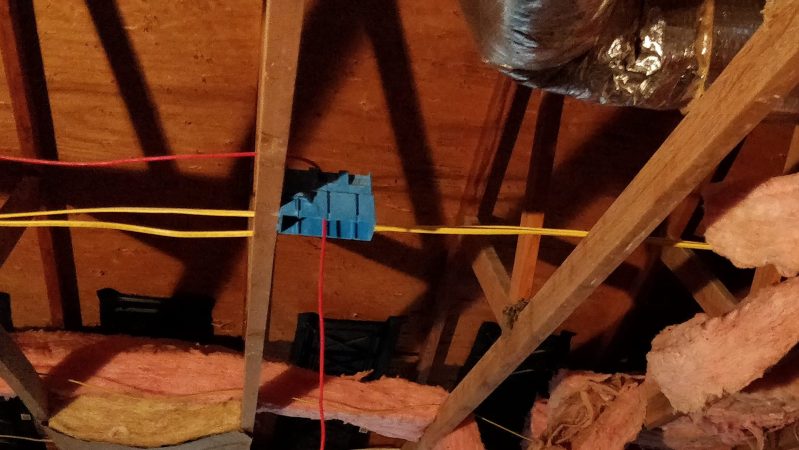
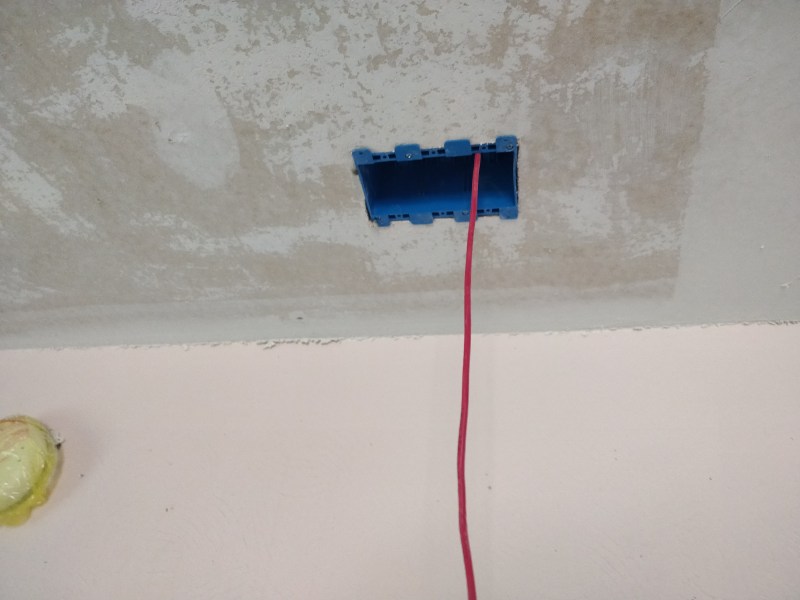
In each room of the house, I’ve mounted an electric box in the ceiling, as well as on the wall of the central hallway. To each box, a single Ethernet cable runs back to a central point in the room destined to be my home office. Each Pi will sit on a 3-wide blank plate. From each of these points, I can eventually mount a thermal and humidity sensor, a webcam, a motion detector, or any number of other sensors. The unit in the hallway wall will get the full touchscreen treatment.
 A smart, PoE capable switch will power this web, and a flask instance providing a RESTful interface will allow pulling the data back to a central controller, as well as pushing commands back to the nodes. [Matt Richardson] was part of the inspiration, and has a very good primer on the subject. A central web interface can then track temperatures, control the heater and air conditioner, and monitor doors opening and closing.
 One of my longstanding complaints about the Raspberry Pi is that power instability kills SD cards. Starting with version 3, the Pi supports booting over a network without an SD card. Rather than running to each device for maintenance (fsck the sdcard), all the file-systems can live on a central server, and are mounted over NFS. There is enough to the process of setting up PXE boot for the Raspberry Pi, it deserves a dedicated article.
I have further plans for my house, and the Raspberry Pi is an excellent platform to expand upon in the future. Next time, we’ll talk more about structured cabling, security cameras, and whatever else you want to hear about. Let me know below!


After having done this several time for large renovations (300+ person theater, 20,000ft^2 maker space, typical home) over the last 30 years I have one word for you:
conduit
The physical infrastructure may change (from VGA to DVI to HDMI, ethernet over coax to 10baseT on cat3 to 1GbaseT on cat6, to 10G on fiber, telephone on twisted pair to VoIP, rs232 and sensors on twisted pair to ethernet, who knows what else) but the paths don’t change so often. Leave yourself the option to change the wire in the location. The conduit approach will cost more the first time. But the hours of frustration clawing through fiberglass insulation avoided will make your older self thank you.
Any electrician worth their salt would say the same.
And make sure the bends and couplings are as smooth as possible.
Absolutely. I didn’t end up going that route, but you’ve made a good case for it.
And make sufficently large conduits! The day you’ll ned to add another 75 ohm coaxial cable or a bunch of mains wires, you’ll appreciate…
Besises I think that counduits in EU are mandatory for new buildings or when an heavy renovation is made. This is interesting when the building is not in reinforced concrete bud has load-bearing walls in stones and bricks…
Probably different countries, different regulations. I´ve grown up with conduits being the norm, from the oldest situation where wire was protected with lead, then the use of iron tubes, then later the pvc ones with the correct couplings, and now that horrible @#$ that are those flexible, easy to bend and easy to smash plastic tubes.
I’ll second that… take what you think you need, then go two sizes larger.
I’m grateful to the folks who built my garage that they put in at least 3/4″ conduit in the trench… let’s me put in 6 gauge wire for a 70 amp 240v run when I got the electric car… (only use ~50 amps for the evse circuit, but it’s an upgrade from the 20 amp 120v that was run originally).
I do wish they’d gone for an inch and a quarter, but it was built in the 60’s and they probably wouldn’t have guessed that there would ever be a need for a 100+ amps run to a garage to charge electric cars…
Here in Europe (or at least all parts of Europe that I have visited) absolutely every wire that goes into a wall goes through a conduit. Perhaps because we have mostly brick walls instead of dry walls. But it’s always surprising to see unprotected wires everywhere in these articles.
North american “cardboard” house with unprotected wires… what can go wrong ?
rodents, floods, burglars opening they way through the walls, do I forget anything ?
Burglars coming in through the walls is a new one. They usually break the door down or smash a window like your burglars do. American built stick homes using drywall isn’t that fragile, and rodents getting into the wall space is usually due to exterior holes in the siding not being closed up. If the house is built correctly, drywall built homes are sturdy enough. Sure, they aren’t brick. Fire can be a problem with interior walls, but code requires firestops in the exterior walls, which is just a horizontal 2×4 mounted about 3/4 up inside the wall to show down the spread of fire. Once it hits the roof, it’s all over. Brick homes fall down too. It really comes down to the quality of the materials and the detail put in by the builder.
Under a “2×4” I understand a wooden board. So you use wood (a fuel) as firestop?
In my part of Europe (Czechia – Slovakia is the same btw) the mains cables goes straight into wall most of the time. Data / Telco goes into conduits i think mostly because licensed electricians don’t do this stuff often / different guys do mains and different telco so the mains guys lay down mains wires straight into walls and empty conduits for low voltage stuff and than somebody else comes and lays down low voltage cables into prepared conduits. Depends.
It is different building to building – i saw CAT5 straight in the wall (brick) right next to power lines – 0 f***s given. Also wired security systems. What is probably really uncommon is 75ohm coax straight in the wall.
There actually was era with mandatory conduits for mains cables in the walls – when cloth insulation was used – this can still be seen in very old buildings.
Just to agree with conduit and comment about the many different ways to route it.
You don’t necessarily have to think “everywhere there’s a wire, there should be conduit around it.” Rather, you have to think more topologically. Network topology, that is. Think of each outlet as a leaf node, and then imagine how you would bring several leaf nodes together to a common space (like the basement or attic, or a central closet), then think of how you’d join things within those spaces, and finally where’d you like the central junction (root node) to be.
For instance, you might imagine running conduit straight down each wall to the basement. In the basement, assuming there are walls, you’d want to set up some horizontal runs to a central junction point. You might do the same in the attic, then also set up a conduit between the basement and attic junction points.
In the attic, you need to make sure your conduit ends will be accessible once it’s fully insulated. This is especially important where the roof angle is low, since accessing the top of an outer wall can be very difficult in such cases.
Finally, make sure to put pull strings everywhere, and always pull new strings in with new cables.
Conduit is very useful, and of course is the optimum protection… but that’s a lot of effort and expense for house-hacking. In the renovations of our elderly house, I just ran bare cat6 from a central switch in the basement to single boxes in each major room. If you take care with the routing, and staple the wire to studs. it’s decently protected. A cat takes care of the rodent issues.
Ethernet’s just fine for me. The next major upgrade will be glass fibre… and the next homeowner can tackle that.
Ethernet cables needn’t be used as such. I’ve put tons into the walls of our place and they carry all sorts of signals. Audio, video, often over special “media converters” rather than ethernet, like when low latency is required, or when ethernet would be overcomplicating things. Never regretted any one of those cables, even though connecting the outlets was a bit tedious to do :-)
Yep, and we’ll get to that in a later article. I suppose you could say that the idea is to use the Raspberry Pis as flexible media converters for i2c, gpio, and USB.
Just as long as one’s clear to future owners about such non-standard usage.
If we ever move out, we’d take all the little gadgets with us, leaving only the numbered rj45 sockets and a patch panel. As a new owner, I’d be pretty happy to find such a thing :-)
One of the problems of making a smart house using your own technology is that a future owner wouldn’t know what to do it it were to fail in any way. I just accept the fact that a future owner will probably rip out any hardware that I have installed. If you look historically at centralized control systems from the sixties or seventies, they are usually taken out leaving the wiring in the wall but unused. I have wiring for a central sound system that may never be used. I put in coax that may never be used and the network wiring is CAT5 and not CAT5e so it is somewhat speed limited but usable. That is why a combination of conduit to the most likely required access locations plus Wifi or similar wireless networking is probably the way to go.
This is one area that I have thought of a lot.
I have gotten extra equipment to replace all most everything.
And the boards that I have made up I always made a second or even a 3rd one up.
I wish that I new how to post pictures here..
At least YOU can use a smart house with your own technology for as long as you want. Which may not be the case if you use somebody else computers (Cloud) to control your house. If the cloud owner decides to shut it down or take high fees then you can not do anything about it.
I agree, the Ethernet cable can be used also to carry power and an RS232 from an Arduino, which then can go into a central Raspberry Pi. Such a solution would be considerable cheaper than spreading RPis plus PoE shield in every outlet. Even better would be to use ESP8266, which is super cheap, and talks directly into the network, through wifi.
I’ve seen very few cases here on HaD where the Raspberry Pi is actually used to its full potential; most of the times that I’ve seen it in use, is just because it is easier to use something you know than finding the right tool. Is is a bit like buying a tractor to cut the grass on the front lawn; yes, it does the job, but it costs quite a lot more than a mower, which can do the same job, and it is also smaller.
One of the advantages of a Pi is its flexibility. I’m hoping to dig further into this in the future, but there are some uses I have in mind that an Arduino just can’t touch. A baby monitor, for example. The Pi has the camera port, and an on-board gpu that can do image processing.
It’s cool too see all the different ways people think of to set up a system like this. Inspiring that thought process and collaboration is exactly what we’re trying to accomplish.
An ESP32 is powerful enough to support a camera. I believe Seeed even has an ESP32 board with a camera for around $10. It is about the same price as a Pi ZeroW but it doesn’t need a SD card and includes the camera. The software may be simpler but I haven’t tried it. I would expect to stream the video to something like a central Pi where any image processing could be done for several cameras.
There are very few cases where I load my automobile to its maximum load capacity, but that does not mean my choice of automobile is inappropriate. I;m not wasting the potential of my pants if I don’t have their pockets filled to capacity as I walk around. Do you actually use all of the tools on your pocket tool? Pragmatism is always the order of the day, if you have a problem to be solved, and you can solve with a quick trip to Microcenter to pick up a Raspberry Pi, then why not? What’s cheaper than a Raspberry Pi? You are really just quibbling, how much time are you spending on your project, what is your time worth? If you are measuring time spent and money invested, it wins straight up.
There are other factors that you take into account when you buy a car, and most of them are irrational, such as looks, ego, etc, but he real fact is that a car is likely to get filled up from time to time, while an RPi, once it is in the wall and performing its task, it is most likely to remain mostly unused for the rest of its existence.
When you look at the cost of an RPi 3B plus the PoE shield and SD card, and you add to that the time to set it up, before you can even start of the code, I think that you might want to revisit you statement, especially when you compare it to a $3 NodeMCU board that is ready to code.
I have nothing against Raspberry Pi, on the contrary, it is an extremely powerful platform that is relatively cheap, and easy to work with, especially when you compare it to the likes of OrangePI or BananaPi, but the fact is that the arduino community is just as big, and you can just copy and paste some code together in the same way that you do with a Raspberry Pi.
This is not a playground argument on who’s dad is the strongest, it is simply a discussion where we share thoughts on how an Home automation system can be built. I personally run most of the sensors in my home with an ESP8266 that uses MQTT to communicate to a central RaspberryPi. I also have the entrance touch panel run by a Raspberry Pi, and that really makes the processor work.
When it comes to real time applications, where timing is critical, the raspberry Pi has some real issues, and that is where a micro controller shines, as it doesn’t have a multitasking OS in the background to distract it all of the time.
If you put some effort in learning a new platform, I have saved myself a lot of money, and space by using the smaller ESP boards, which I have already used to buy more materials to use on additional hacking projects that will be left half finished on the shelf.
1) always run more wire than you think you need. Cheap to do before the walls get closed up. I second the use of conduit
2) re: One of my longstanding complaints about the Raspberry Pi is that power instability kills SD cards. This is a longstanding problem with *nix having delicate file systems, nothing specific to the Pi. On *nix I always boot from ssd or equivalent. But they make it like magic to accomplish ????
Copper is still pretty pricey. Might explain part of the move towards low-voltage lighting that LEDs facilitate.*
*Well that and not needing an expensive electrician.
LEDs won’t save you copper, really. Even at a low voltage, LED area lighting will still pull considerable current.
LED or not it is still easier to run 14 Gauge Romex and just step down the voltage at the fixture. Last thing you want is to run 12 or 24 DC a long distance and only get a couple of volts at the EOL. Had a guy complain to me that some other company ran CAT5e all around the house for LED lighting then the home owner finished it by using some 12 volt power supply. One room was getting half a volt. Needless to say I over quoted him just not to deal with that job.
“Needing” an electrician for mains voltage is a question. Do you know how to work with 230V or not? When I do it for myself I don’t ask anybody about it and nobody asks me about it, I just do it. Of course I would not do it it commercially, as I am no officially licensed electrician.
That’s a bit strong. The new pi3 b+ only needs a bootable external drive of any kind (including spinning disk).
Most earlier models you have to follow a pretty simple procedure you can find all over the ‘net including a few youtube channels (Explaining Computers is one good one). I found a couple 3’s that just did it without me doing anything.
However, I’m cutting back on the number of pies I use – due to that issue, updates with systemd or pulse audio breaking things, painful power use and so on. The one IO thing they do better than alternatives is the camera.
Note, while it’s not so pretty, I’ve already been building on my “LAN of things” for years now, and it helps automate my solar system, my water system, and take data on those and weather for my off-grid homestead. Pi is a good choice for some things, but for others something from the ESP family might be better due to power and size. I found a pi most useful for database and web serving, to consolidate data and control from arduino slaves of various kinds. Saves power, and on solar, you pinch the amp hours till they squeal. I’ve not tried the open source voice recog stuff yet, as most of what I want to do is easy from a web page/cgi (mariadb, gnuplot, perl, nginx).
I’ve not documented this stuff up to Hackaday standards, just well enough to remember what I did, and even then I’m a little behind writing it down, but if you code for arduino and for linux…it’s definitely not magic.
Just remember that star trek episode that contained a line like “the alien has taken over the computer and now the elevators, life support, and food replicators are not working” (actually it was worse than that). Make sure you can override a crashed thing. Ask people in Europe who lost control of Alexa and slaves this morning.
Here’s a little documentation on what I have so far: http://www.coultersmithing.com/forums/viewforum.php?f=59
Hope it helps someone.
Use plastic conduit with slow 90s. Much easier to work with than metal conduit. Get yourself some yellow 77 as well. If the runs are short leave a pull string inside. If they are longer then get a fish tape. The problem with pull strings is they tend to wrap themselves around the cables already inside the conduit. If you think you have enough cables in the conduit, add a couple more. Cable is cheap and a pain pulling in after the fact. Pull them all in at once is way easier.
Receptacles in the ceilings for LED nightlights in the hallways, bathrooms and the kitchen. We did this when we built our house 20 years ago and have not regretted it. Second switch next to the light switch for a ceiling fan…didn’t do this for the dining room chandelier and sure enough, 10 years later swapped the chandelier for a ceiling fan. Think about the path from the kitchen sink to your bedroom and install 2-way switches as needed so that you don’t have to backtrack to turn off lights after you take your nightly meds and go to bed.
I’ve thought about rgb led lighting. Any recommendations on specific products or other tips?
I’d recommend the analog RGBW LED strip that adafruit carries. Comes in a 12v version, super easy to control with MOSFETs and the CRI on the white is nice. Also comes in warm white and cool white versions.
RGBW strips are also available cheaply on Ebay etc. but may not be as good quality. As I usually need more white light than RGBW strips give, so when I can, I use RGB strips for color and a separate 5630 white light strip for white light. I usually only run strips at a maximum of 80% of full output as many of the strips seem to fail, probably due to heat, when run for long periods at full power. As the 5630 strips give a lot of light at full power they can be run at low power and still give out plenty of light.
I have Z-wave light dimmers in my house and these require a neutral wire. My lighting is controlled by a raspberryPi .
I put 10,000 feet of CAT5 and coax in my house when I built it 25 years ago. Lookin back it probably wasn’t worth the effort as the outlets never seem to be where I want them now. I now use secured Wifi for most data communications. The important thing in the USA is to ensure all switches have a neutral line in the box so that electronic controls can be added later. Probably a better solution would have been to run conduit, with a pull wire, to a convenient point near a power outlet in each room and then add wire as needed. Within the room, signals could then be sent using Wifi or even infrared, to a “control point” in the room. The control points could then either use Wifi or hard wire to talk to a central controller. The interesting thing is that nowadays it is easier to communicate using Wifi than hard wire. Ethernet is expensive for small micro controllers and RS485, while good for control signals, is usually poorly supported by the software (e.g. MQTT over RS485 is some work to implement).
Our new (to us) house built in 2001 has coax routed to 2 walls in each bedroom, and family room, they all go back to a single panel in the basement.
What can I use all those coax cables for now? ;)
You can still run 10/100 over coax, right? :P
I only remember 10MBit, if you still get the old ISA cards and supporting mainboards.
EoC or MOCA.
There was an old hackaday article where the antenna of a wifi router was replaced with coax cable, with another wifi router on the other end of the cable. IIRC the guy was extending his network and couldn’t install any LAN cables, but had leftover coax installed in his house.
Anyone have a link to this? Five minutes of Google yielded no results for me
Why not. RG58 has about 1 dB/m attenuation at 2,5GHz, so up to 80m or something this should work.
Coax for Sat-tV (75 ohm) or the oldfashioned network cable (RG58)?
Use the Coax cable for lower current stuff. The thick isolation especially of RG58 is quite voltage withstanding, but the copper clad steel core has much higher resistance than normal copper mains wire. They foam dielectric of Sat-TV cable can have lower withstanding voltage insulation .
Ran 6,000 feet of Cat5e and coax when I built my house. Each room had two outlet boxes located near the corners on opposite sides of the room. Each run consisted of two cat 5e plus two coax. Home run to the basement where I installed a 19 inch cabinet right next to the electrical panel. Having them on either side of the walls near the corners worked out really well. This way there was never a long run to an outlet. Mounted a monitor for the security cameras above the fridge in the cabinet nobody uses. Also put a lcd tv there. Cut the center panels out of the doors. Actually had the cabinet built to it extended out to the front of the fridge. Whole system worked great. Then I sold the house……
Innerduct!
If you plan on having your job inspected to comply with the 2008 NEC or newer, you should isolate your low voltage from your high voltage. In other words, in areas where you have ethernet cables going to your boxes containing high voltage, you should instead have the cables going to their own boxes. The idea here is to minimize the potential to accidently energize your smart home cables with enough voltage to kill somebody.
You should also make sure to run low voltage wires in their own conduit, separate from high voltage wires. This is recommended not only to reduce the possibility of energizing a low voltage wire with high voltage, but also to avoid inducing 60 hertz noise into your low voltage wires.
Correct, it’s important to keep Ethernet out of high voltage boxes. I’m using PoE for exactly this reason
I’ve never seen a real world issue from Ethernet crossing over power cables, though it’s best not to run them parallel too closely together.
The NEC doesn’t care about interference but safety. The NEC doesn’t want the mains shorting to low voltage wiring with lower insulation resistance. Once into the low voltage cable the mains can zap all kinds of stuff which may be you, or cause a fire.
I use to prewire houses and we always ran Coax and CAT5/6 in their own Bay. You could run them in the same bay but it needs it’s own box. Only time we ever used Conduit was if the customer wanted to mount their TV and have the wires hidden or when a Projector was going up. Once in a while we would bury Conduit if there was a detached garage that the customer wanted TV, Networking, Audio and Security.
Since I went onto the Tech side the builder we contract for all the time wants everything up much higher then HVAC and Electrical. Went to check out a house that was prewired the other day and there were J-Hooks everywhere. Looked more commercial then residential.
Current NEC version actually allows the mixing of different voltage cables as long as the insulation class is the same for both. This is probably more so used for line voltage lighting with 0-10V lighting. I wouldn’t recommend mixing power and comm cabling and would try to keep at least 12” and cross at right angles.
Personally, I would not put a raspberry pi in a small space with no airflow. They’re not known for cool operation. They also have powering issues. The Poe hat, as reviewed by eevblog has some issues too, with heat and supplying power. You’d want to make sure your Poe switch can power cycle individual ports so you can remotely reboot crashed pi’s.
Does the pi even have a watchdog timer?
It does. http://www.switchdoc.com/2014/11/reliable-projects-using-internal-watchdog-timer-raspberry-pi/
I have yet to get a proper webcam stream at high resolution out of a pi, even the 3b
Would love to see a proper way to do this outside of the raspi camera
https://elinux.org/RPi-Cam-Web-Interface
Works pretty well for me as a baby monitor. There are a bunch of alternatives, and if I wanted to, I’m sure I could find something better, but I get around 35fps in the camera’s max resolution, streaming over WiFi on a Pi3 (also have a couple of Pi0W’s running the same thing for security cams, but they don’t always stream as smoothly, perhaps due to the slower processor, or perhaps a less reliable WiFi signal – doesn’t matter because they save motion-detected video and upload it to a NAS) which is plenty for the purpose, and more importantly, the latency is in the ms rather than seconds (no use watching a silky-smooth stream of the baby sleeping if it’s lagging by half a minute and the kid’s actually wide awake).
As for the OP, I’m very interested to see how this pans out – this is something I’ve wanted to do for a long time, but never had the right circumstances (we bought and moved into our house a month before the baby arrived, so a refurb was out of the question).
You really REALLY need to think about the heat that the Pis will be exposed to.
Electronics generally does not like temperatures over 95 ambient.
You might look into putting tiny muffin fans on the boxes and make sure you have heat syncs on all the Pis.
You’re absolutely right, this could be a huge issue. The PoE hat has a small fan built into it. I’ve thought about how to expose that fan to fresh air flow, like cutting slots in the blank plate. The good thing is that the Pi 3 has a temperature sensor built into the SoC, so I can easily monitor how hot they’re getting, and add cooling as needed.
If you use large enough conduits, you can blow air through them to help keep things cool, though that can create issues to be dealt with. You can also use metal cover plates touching the heatsinks to dissipate the heat.
Unless teeny fans have improved substantially over the years; your sanity might be improved by seeing if you can go passive. Unless there are volume constraints I’m not seeing you could give the rPi a bit solid chunk of boring, but overqualified and mounted for convection, finned aluminum extrusion to bleed heat into.
Reasonably cheap to purchase, cheaper if you can locate stash of the CPU coolers that were designed to deal with a ~100w Prescott if given forced air and can convect rPI-level loads (the ones that suit now-antique proprietary desktops are cheaper than the ones that use standard mounts; my main experience is with Dells, they put some surprisingly solid chunks of finned extrusion into their oddball proprietary CPU coolers in the P4 Optiplex era.
Only specialized equipment even takes 95°. You need industrial or automotive grade chips. Most “commercial” rated chips are only 0° to 70°
C or F?
Had a few net cables run in my existing house around 2001. That lasted for a few years. Now it’s all wireless. Even my ‘cable’ TV is wireless. Before you run all those wires consider the current state of wireless and where it will be 5 to 10 years from now when you finally get to the point of actually using the wire.
In a perfect world, one’s wife always agrees with you, no one is trying to hack your internet connected computer, the car never runs out of gas, and wireless always works. … but, alas…. It is good advice to encourage people to run a wire when practical and resort to wireless only when necessary. Also: (Wired & Fiber Bandwidth) >> (Wireless Bandwidth), especially when there are many devices. …and most wireless security protocols like WPA2 are hack-able so it is best to give wireless devices their own quarantined network and run a VPN if you are concerned about security. Yup, I got the old tin-foil hat on right now. :-) I’m afraid of not being paranoid.
Yes. Use a wired solution for stationary equipment whenever possible.
One thing that I would HIGHLY recommend is using high CRI lighting. Matt over at DIY Perks has a series of videos using 95+CRI 12v LED strips which only cost ~$30 for a 5m strip. The first couple of videos in this list really show the difference spending the extra cash to get good lighting can make. I am looking into adopting his ‘YouTube Studio Lights’ enclosure to light up my living room, using quarter-circle diffusers where the wall meets the ceiling, controlled by an ESP8266, to make setting the light levels easier.
Another idea is to place dim red LED strips at floor level in the halls. That will allow people to get to the bathroom/etc. without wrecking their night vision. Those cheap microwave-based motion detectors would allow automatic lighting.
I’ve been using red LEDs in lamps since the first little one is born, still am with #2. Doesn’t wake you, or baby up. Only problem is I’m still blinded by the light grabbing a bottle out of the fridge. An echo dot and z-wave remote are quite handy for switching stuff on/off with baby in one hand and bottle in the other.
fridge light needs a timer for bright day-time running and dim red light at night to preserve night vision? :-) (or sensor based?)
An excellent plan. I’ve been considering mounting them on the baseboards to making going to the bathroom at night a little less ‘interesting’.
What about a separate DC grid? I’m living with 230V (Europe) and if I was in your position I would add a low-voltage grid at, say, 48V. AC-DC converters are bigger than DC-DC converters and the 48V keeps the losses fairly low. also, by having a single large converter from AC to DC will minimize losses. Another good thing would be a cleaner power supply for all your lab equipment.
Am I missing something with this approach?
I recommend you check out ECS (Event Control System) by Omnipotence Software (www.omnipotencesoftware.com). It’s a home & industrial automation software, and it will run on the Pi. It can be a lot of fun!!!
You should check out the SuperHouseTV youtube channel for some great ideas about smart house topology, wiring, arduinos with PoE shields, etc.
Jonathan. Any chance of buying one of your 7 inch pi mounts? I don’t have a 3d printer.Thanks. Glenn.
The guy that wrote that instructable uploaded them to thingiverse. There are a couple services that will ship prints from thingiverse. https://www.thingiverse.com/thing:2749782/apps/print/#apps
I hope you’ll make an article about properly securing your installation, it’s painful to see the number of unprotected MQTT / HomeAssistant servers popping up on Shodan because someone followed a basic “rPi as a domotic gateway” tutorial without understanding the implications.
“Starting with version 3, the Pi supports booting over a network without an SD card.”
This is SO worth repeating, especially for infrastructure. I need to try this out. This could knock $10 off each deployment throughout the house and make distributing upgrades more straightforward. Way cool if you ask me. :-)
Stay tuned, we’ll be looking at how to set up PXE pretty soon.