It’s hard to pass up another lesson in good machine design brought to us by [Mark Rehorst]. This time, [Mark] combats the relentless forces of bed deformation due to thermal expansion.
Did you think your printer stayed the same size when it heated up? Well, think again! According to [Mark’s] calculations, when heated, the bed can expand by as much as half a millimeter in the x/y direction. While x/y deformation seems like something we can ignore, that’s not always true. If our bed is rigidly fixed in place, then that change in dimension will only result in a warped bed as it tries to make space for itself.
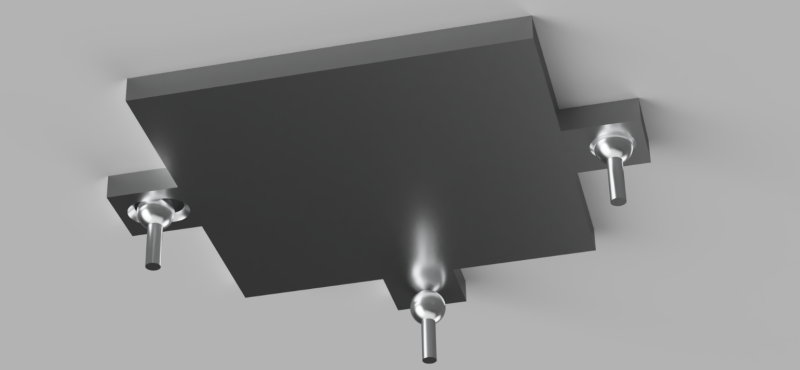
Don’t give up yet though. As sinister as this problem may seem, [Mark] introduces a classic-but-well-implemented solution: and adjustable kinematic coupling. The kinematic coupling holds the bed at the minimum number of points to keep it rigid while exposing thumbscrews to dial in a level bed. What’s special about this technique is that the coupling holds the bed perfectly rigid whilst allowing it to thermally expand!
This is the beauty of “exact constraint” design. Parts are held together only by the minimum number of points needed to guarantee a specific relationship. Here that relationship is coplanarity between the the nozzle’s x/y plane and the bed. Even when the bed expands this relationship holds. Now that is magic.
With such a flood of 3D printed parts on the market, building a printer has never been easier! Nevertheless, it’s easy to pin ourselves into a corner re-tuning a poor design that skips a foundation on the base principles. If you’re curious about more of these principles behind 3D printer design, check out [Mark’s] thorough walkthrough on the CoreXY design.


It’s always interesting to watch the masking tape on the bed which is all wrinkled while cold go right back to being perfectly flat when the machine reaches its target temperature.
Interesting info, cool to see this problem being mentioned here!
Thanks for posting.
Its an interesting exercise but not really necessary to go to such extremes.
Or maybe its something to do with scaling the printer up to much larger print volumes.
Anybody that has used a 3d printer with a heated bed should know that all levelling/trammelling and nozzle heights should be done with the bed and hot end at working temperature. As both the bed and nozzle/hot end will expand and contract at different rates proportional to temperature.
I have a rigid bed and have no problems with deformation. There’s enough lateral movement in the mounts to allow expansion. In other words I dont over tighten the bolts. I have a glass mirror tile clipped on top of a heated bed thats mounted at the 4 corners by bolts, that are easily adjusted, to an aluminium plate. I dont use self levelling and only need to check the nozzle height and level the bed when i change nozzles or filament if it needs a different working temperature.
It takes just a few moments to set the machine up for the print.
This works within my common temperature ranges. Bed between room temperature and 110degC and nozzle between 190 and 260degC depending on filament being used.
I could have pla with an unheated bed for one print and next print could be nylon at anything up to 260 for the nozzle and a bed temp of over 100degC. The expansion in the nozzle height and bed is very different between those two extremes so must be taken account of by checking/adjusting the bed and nozzle height.
What is “extreme” to one person is called “doing it right” to another. I strive to make my printers as reliable as possible, which means eliminating as many of the potential failure modes as possible. One of the major causes of failure is prints coming off the bed, so I looked at every aspect of that including print surface material, bed plate material, heater, and finally the mounting/leveling system.
After looking at and trying different ways to mount the bed plate, making numerous bad designs, and weighing the pros and cons, I came up with this kinematic mount. The kinematic bed mount was neither difficult nor expensive to implement, though the way I did it requires a milling machine. There are other ways to make it work that don’t require a mill. The reference screw head sits in a chamfered hole, but it’s really not necessary to chamfer it- you can simply drill a hole in the plate that is too small for the head of the screw to pass through. If you don’t want to buy the spherical head screws, you can put acorn nuts on the ends of the screws and adjust them from below the bed. The pitch screw sits in a chamfered slot. You can attach an object with a rectangular slot in it to the bottom of the bed plate instead of milling a slot into the plate. The slot doesn’t have to be long- the bed only expands by about 0.6 mm.
I heat the bed when I print PLA (which is almost never). The bed and heater block temperature differences between PLA and ABS is about 30C. The vertical dimension of the 8 mm thick bed changes about 6 um over that temperature difference. The heater block also undergoes a similar change, so worst case is <20 um change in the relative positions between the bed and nozzle when I switch between PLA and ABS. I have found that to be inconsequential when printing in 200 um layers, so I don't need to make any adjustments to the Z=0 position when I switch materials. Maybe you wouldn't have to adjust the Z=0 switch when you change materials if you heat the bed when printing PLA.
I haven't tried to measure it, but I'd bet that +/- 20 um is beyond the precision of most Z=0 switches including the one in my printer. If you set the Z=0 position when everything is heated to PLA print temperature, the nozzle and bed will move a little closer together when you raise the temperatures to print ABS or nylon and the prints should stick to the bed without adjusting the Z=0 switch.
If you're having trouble keeping prints stuck to the bed, maybe you should try PEI instead of a glass print surface. PEI's intimate contact with the bed plate (when taped down) guarantees more even surface temperature, and for some reason, most molten plastics love to stick to heated PEI.
Not had adhesion problems for a long time.
I use kapton tape mostly or what ever is appropriate for the filament im using.
plain glass for filaments like ninjaflex. The fiddliest is nylon and ive ended up with dilute pva on top of kapton.
I have a few glass plates that i can swap in and out as needed with what ever is needed on the surface.
No one bed material is the magic solution for all filaments.
I set my nozzle gap to 0.1mm with a metal feeler gauge, thats consistent across the mirror tile and my finest layer height is 0.06mm.
That gap is consistent between each homing cycle so the switch is more than accurate enough.
Most things i print are at 0.2mm layer height with a first layer at least 0.1mm.
But it depends on the nozzle size as well as i use between 0.2mm and 0.6mm nozzles.
“No one bed material is the magic solution for all filaments.”
But PEI is pretty darn close. My only problems are that PETG sticks too well to it, and I have to remove with a razor blade sometimes. I can’t think of how a surface could be better for PLA. (Haven’t tried nylon, so no comment.)
I printed with PLA and ABS on Kapton for years, and it’s good. (Also PLA straight on glass.) I like PEI much better.
Is there a reason that you went with Kelvin’s 1-2-3 coupling, instead of Maxwell’s classic 2-2-2? There was a whole historical argument about this. The socketed ball, in the 1-2-3, becomes the datum point during thermal expansion, to the extent it can even cause rotation of the bed. Whereas in Maxwell’s, the center of the vee’s (the center of the bed) stays center.
Happy to see the science of exact constraint in practice. Mass was falling parabolically before Newton calculated why; the things we build are described by exact constraint, to nanometer kinematic precision, whether we recognize it or not.
I used the 1-2-3 coupling because milling slots at accurate 120 degree angles is a lot trickier to do, at least with the machinery I have available. The 1-2-3 coupling requires only one slot in line with the reference hole and parallel to the axis on the milling machine making it very, very easy to produce.
We tend to print at tightly regulated temperatures, and as long as the bed is leveled and zeroed at print temperature, what it does when it cools off doesn’t matter. When it’s heated to the same temperature again it will return to the set level and zero dimensions/positions. I leveled and zeroed the bed at PLA print temperatures (bed and extruder). If I print ABS at 20-30C higher temperatures, the bed plate expands vertically a tiny amount relative to the PLA settings (<1 um/mm of bed thickness), and since the roll screw is in contact with the underside of the plate and the pitch and reference screws are in contact within the plate, the roll adjuster side of the bed might end up two or three microns higher than the center of the plate where the reference and pitch screws are located. This "problem" can be solved by milling the bed plate ear where the roll adjuster screw touches the plate to match the depth at which the reference and pitch adjusters touch the plate inside their hole/slot. The reality is that a micron or two variation isn't going to matter when you're printing a 200 um first layer, and that has proven to be the case. That tiny error is just noise compared to variations in the PEI print surface flatness.
I guess it all comes down to how many angels can dance on the tip of an extruder nozzle…
Clever, I like it!