Using 3D printed forms to bend sheet metal isn’t exactly new. We’ve seen several people create custom dies for their brakes, and the results have shown the concept has merit for small-scale production. But that’s usually where the process ends. A bend here or there is one thing, but the ability to form a complex shape with them has always seemed like asking too much. But judging by his recent experiments, [Shane Wighton] is very close to changing that perception.
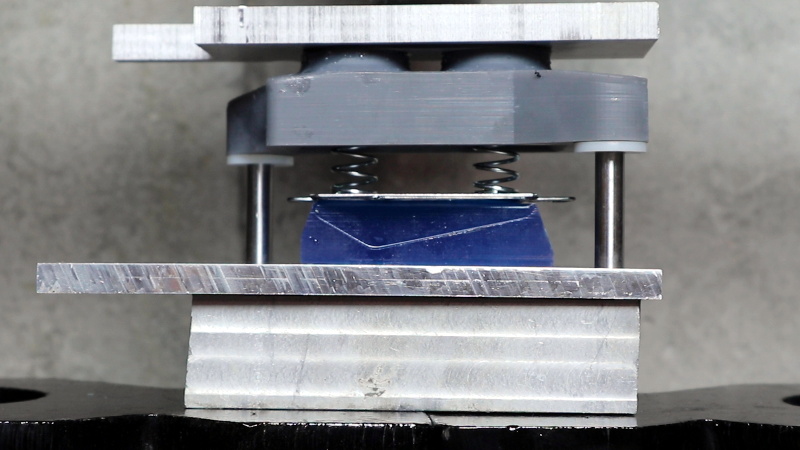
 The process at work here is, relatively speaking, pretty simple. You print out the upper and lower die, put a piece of sheet metal between them, and then smash them together with a hydraulic press. If everything works correctly, and your CAD skills hold true, the metal will take the desired shape.
Of course, that’s vastly oversimplifying things. As [Shane] explains in the video after the break, there are many nuances to forming sheet metal like this that need to be taken into account, and iteration and experimentation are basically unavoidable. So it’s a good thing you can rapidly redesign and reprint the dies.
Which isn’t to say that the dies themselves didn’t come with their own unique set of challenges. The first ones shattered under the pressure, and it took a few design revisions and eventually a switch to a stronger resin before [Shane] got a set of dies that could form the desired piece. Even still, he’s had a lot of trouble getting the printed parts to survive multiple uses. But he’s confident with some more refinements he could get a repeatable process going, and thinks ultimately producing runs of up to 100 parts on a set of printed dies isn’t out of the question.
Logically, it would seem plastic isn’t an ideal choice for punching and shaping metal. Frankly, it’s not. But if you’re doing in-house manufacturing, the ability to produce complex tooling quickly and easily can help make up for any downsides it might have.


Lessons learned? Use machined dies which can be made in 15 minutes. OK. Thanks for the tip.
In this case the machined die was easy to make. The interesting thing about 3D printing and why I’m pursuing this project is that with the right design it opens up the door to much more complicated tools that would be very time consuming or even impossible to make. Also most people don’t have a CNC mill :)
someone had to try it. I suspect if you wanted to do more than one you could probably come up with a 3d printed system that would work with some more effort.
This application may be a bit of a stretch, but I have had a lot of success using 3d printed dies to form complex brass PCB shields. It saves money over outsourcing and it is easier to ship the flat patterns rather than a fully bent part which in many cases can be fragile.
At work we use a 3d printed die for an unusual ground shield part with 16 long spring fingers that make contact with the inside of a cylinder. This die has formed over 500 parts and still isn’t worn out.
Can you share any examples? This sounds like it could be very useful.
I probably can’t show the part we make at work, but I could show the process on a different part. It is similar to what this guy did in his video. 1) model the sheet metal part in CAD (Fusion 360 is best for hobbyists), I make my shields 0.01″ thick which is a good trade off between strength and ease of bending/cutting. 2) model a lower die that forms the shape of the under side of the part 3) model some sort of clamp to hold the flat pattern in proper alignment with the lower die so it doesn’t shift as you bend it. 4) model an upper die that presses against the lower die and forms the bent shape.
With 3d printing you can make very elaborate parts, if you can’t bend in one press operation you can make multiple die sets to do all kinds of stuff. The beauty is if it doesn’t work, just change the die design a bit and print a new one.
I understand you may not be able to share actual results, but I can sort-of imagine the process. Thanks!
A mix of nylon with a few fixture bolts fixing it to a plate in key places would probably yield good results for limited run items. A good heat treat of a print can do wonders for it’s mechanical properties, same holds true for hardened steel.
Why not use 3d printed part as a mold to make fiber or sand reinforced epoxy cast? I believe it will be MUCH stronger and allows to make several dies from one print.
https://www.youtube.com/user/garofalo42/videos
I did this once to add formed countersinks when a supplier messed up a small order. It worked well and was much more cost effective than sending them out or ordering more.
The metal bends into shape:
Plastic deformation.
The tendency for the metal to snap back a little bit:
Elastic deformation.
Sorry, I am on a metered internet connection and can not justify a 20 minute video. However, if you can make one or two parts from the die before it dies, it would seem you could than print another one up and than use something akin to lost wax casting (print in like PLA and use a kiln to burn the PLA out) and than cast the die in aluminum or an alloy. There is an aluminum/zinc/copper alloy that you can make with beer cans and pennies from different eras that is supposed to be very tough. A few more steps but once you have the stuff to do it, perhaps not that big a deal.
He is using a resin printer here. There are a number of resins designed specifically to be used in lost “wax” casting.
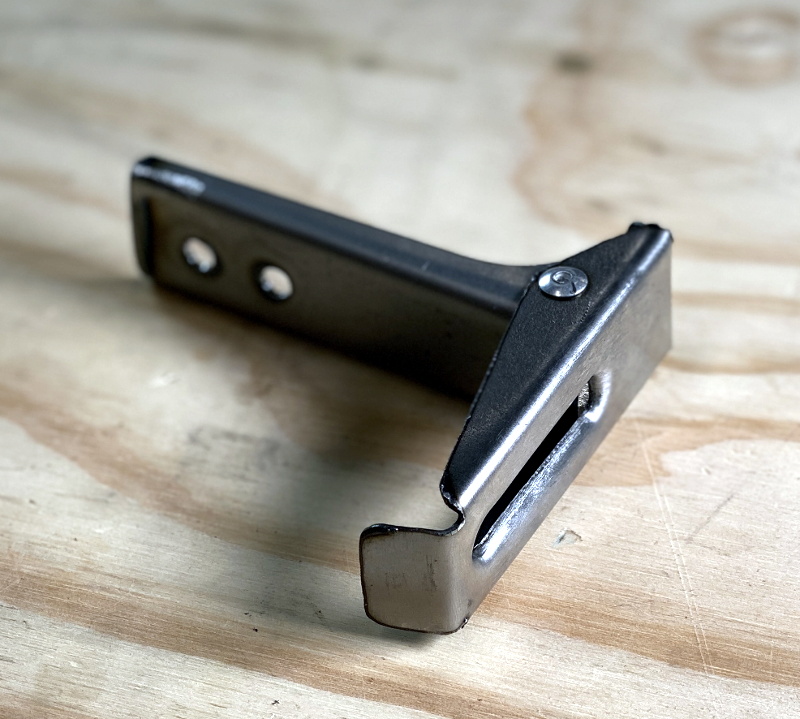
In classic hacker style, he is not working towards a production run of a particular part, but instead has an existing problem with available tools and process. The part he is replacing was originally stamped metal, and he is using the 3d prints, an air over hydraulic press, and a plasma cutter. With these, he makes a replacement blade guard for a reciprocating saw out of sheet metal not because he has to, but he wants to see if he can.
As for the alloy you mention, it reminds me of ZA12, other than the fact that ZA12 is 88% zinc, 12 % aluminum (hence, ZA12) with trace other elements. Density, strength, and surface hardness comparable to cast iron, but considerably lower melting point.
Ok.. so I get the ‘can I do this’ attitude, but he spent nearly $100 in resin prints. For a part from a $20 Harbor Freight POS Sawsall… This guy has a Plasma table, resin printer, and what looks like a 3 to 5 ton hydraulic press. Seems to me he should just go out and spend the $100 to replace it with an upgraded model for his dad… Again I applaud his problem solving skills. But dang.. exercise some common sense. I could totally be on board if he were stamping out something rare and hard to find.
Reduce, reuse, recycle, and the other Rs, repair and re-purpose. The important one here is repair. You get the “can I do this” attitude, but don’t seem to understand the value of that knowledge may be worth more than the cost, in money, of buying a new saw, and the cost, environmentally, of tossing out a nearly complete saw.
There is nothing wrong with trying to fix your stuff, and he made a cool video out of it.
I agree with you it is silly wasting that much time to salvage a $20 HF saw, but I saw it more as a proof of concept, that is could be done. I do a lot of things to prove they can be done that cost much more than procuring the finished product. I view them as learning exercises. I see this as being less silly as someone making a computer based on an obsolete chip that could be replaced by a modern micro controller. I get that it is all learning, which is good, but at least the metal forming has the option of re-creating modern parts. No doubt he went from the proof of concept with the HF sawzall to making an Uzi which is also mostly stamped metal…
For the parts pictured here I think the method using rubber as a forming tool at the top would be more effective. This method likely also spreads the load on the bottom die more evenly. See: https://hackaday.com/2017/10/20/low-budget-hydroformer-puts-the-squeeze-on-sheet-metal-parts/
Hmmm.. Maybe use very low infill… Add extra holes on the surface. then shove/press JBWeld until it oozes out. Clean the outside and wait for the JBWeld to cure?
For a real intresting take see how a soda can is made, litterally they use multiple sets of dies to continuously squeeze the metal in to the final shape and thickness.
So perhaps using the technique I mentioned with JBWeld and a progressive set of dies you could extend the life of the dies AND lower the amount of stress on the part. Granted it wouldn’t be “stamped” in one go however it would save on tooling cost.
Time and Cost are always forever in balance and competition it seems.
He’s using an SLA or DLP printer (resin). No infill for those prints. Well, there’s infill, but it’s 100% :)
Gotcha. Might be worth it just to have it hollow and fill it with a really strong 2 or 3 stage epoxy/resin. As long as any of the angles, corners, radii, and features hold correctly it might be worth having the repeatability.
A rectangular four pin die with a center plate not touching or covering pins and having the piston centered giving even pressure would work a lot better
Hi, a bit late in responding but this hack could prove very useful for me. I’m a goldsmith and using hydraulic forming to create jewelry parts is nothing new. However, the cost of creating custom dies is fairly prohibited, especially when those dies will be used once or a maximum of 7 times in my environment. Everything I make is one of a kind and I never produce more than 7 of any design, each of the 7 has something that still makes it OOAK. Obviously, the metals I’m bending are gold, silver, sterling and sometimes copper or brass. All annealed to a dead soft state. Be very interested to hear recommendations on a 3D printer and accompanying software to create the designs in. Low cost of acquisition is critical, under $1,000 ideal. Currently, I must purchase special steel rounds, that have to be hand carved or CNC’d. Hand carving is too time consuming & I don’t have a CNC. Outsourcing the dies starts at $150 and goes up from there. Then I’m left with expensive dies that maybe a one-time use. I’ve been thinking of 3D printing the dies, so I’m really interested in hearing more on this hack.
This is exactly how I ended up here! I’m a silversmith and was looking to see if resin could take the pressure of the hydraulic press to make silhouette dies for example… did you get anywhere with this? If it works it really opens up a world of possibilities!
Yay, video #2 and he improved the process. The cracking was caused by human/CAD error that gave the mold no clearance
https://youtu.be/8cNeAOpR-Ws
have you tried this with a stronger 3D printer plastic such as PETG or Nylon?