If you want to experiment with pneumatic devices, you’ll likely find yourself in need of custom inflatable bladders eventually. These can be made in arbitrary 2D shapes by using a soldering iron to fuse the edges of two plastic sheets together, but it’s obviously a pretty tedious and finicky process. Now, if only there was some widely available machine that had the ability to accurately apply heat and pressure over a large surface…
Realizing his 3D printer had all the makings of an ideal bladder fusing machine, [Koppany Horvath] recently performed some fascinating experiments to test this concept out in the real-world. Ultimately he considers the attempt to be a failure, but we think he might be being a bit too hard on himself. While he didn’t get the sheets to fuse hard enough to resist being pulled apart by hand, we think he’s definitely on the right track and would love to see more research into this approach.
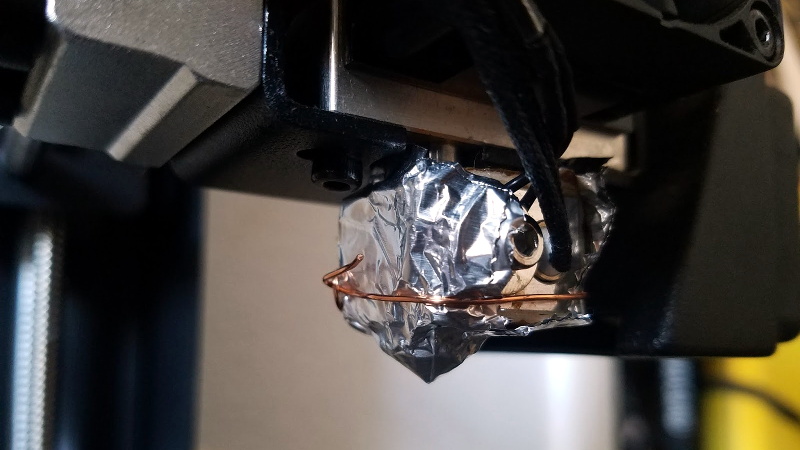
 For these early tests, [Koppany] wrapped the hotend of his Monoprice Maker Select Plus with some aluminum foil, and covered the bed with a piece of cardboard. Stretched over this were two sheets of plastic, approximately 0.5 mil in thickness. Specifically, he used pieces cut from the bags that his favorite sandwiches come in; but we imagine you could swap it out for whatever bag your takeout of choice is conveyed in, assuming it’s of a similar thickness anyway.
There were problems getting the plastic pulled tight enough, but that was mostly solved with the strategic placement of binder clips and a cardboard frame. Once everything was in place, [Koppany] wrote a Python script that commanded the printer to drag the hotend over the plastic at various speeds while simultaneously adjusting the temperature. The goal was to identify the precise combination of these variables that would fuse the sheets of plastic together without damaging them.
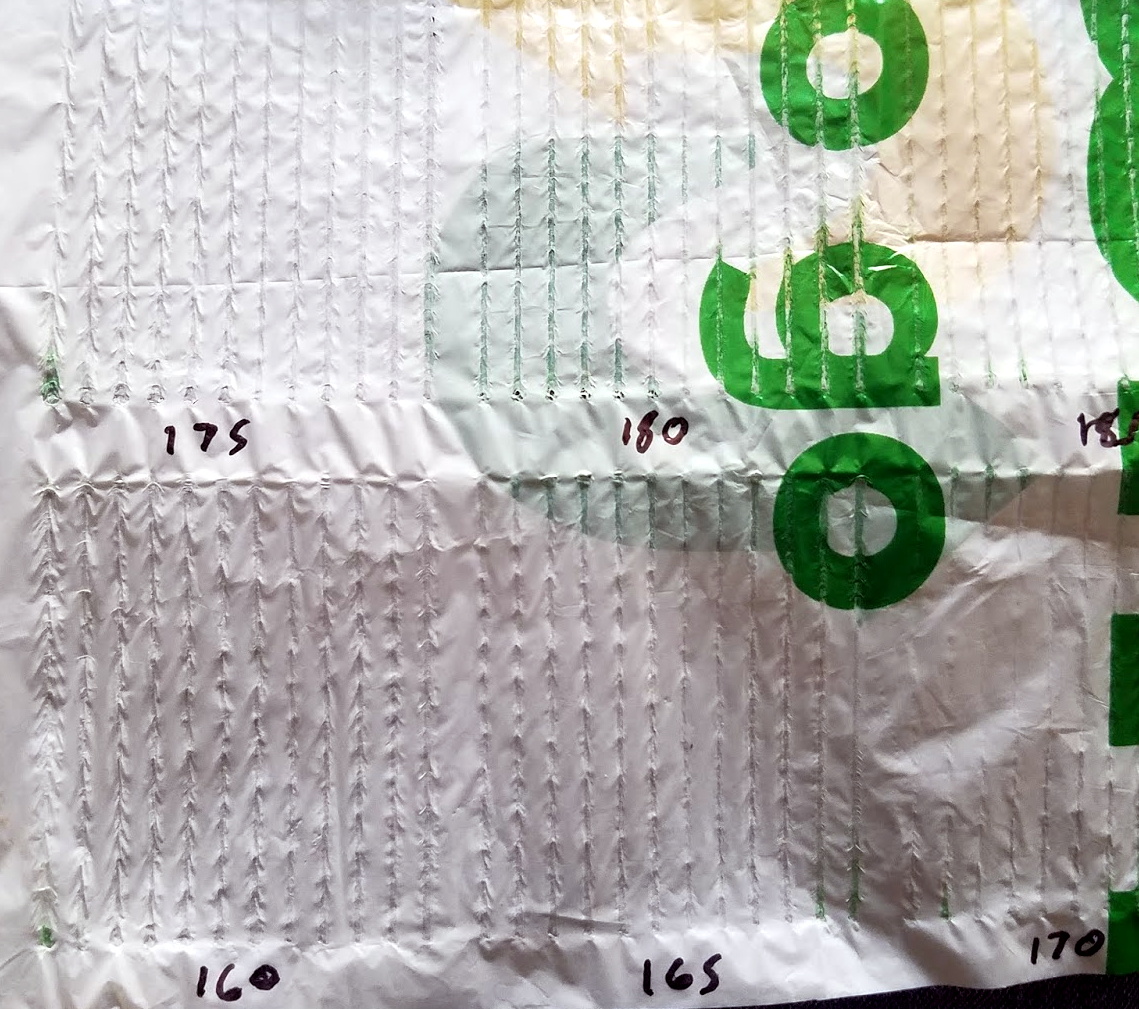
In the end, his biggest takeaway (no pun intended) was that the plastic he was using probably isn’t the ideal material for this kind of process. While he got some decent seams at around 180 °C , the thin plastic had a strong tendency towards bunching up. Though he also thinks that a convex brass probe inserted into the hotend could help, as it would smooth the plastic while applying heat.
We’ve already seen some very promising results when using LDPE film in a CO2 laser cutter, but if a entry-level 3D printer could be modified to produce similar results, it could be a real game changer for folks experimenting with soft robotics.


Maybe “dotting” the seams would give better results? (ie press, lift, move, press)
It would be easy to modify a nozzle to carry a metal roller for seams in a single direction, but making it rotate would add enough to the complexity to make building a custom machine look more sensible. (Though possibly a tiny caster, somewhat like a drag-knife could be fashioned with enough machining skill)
A tiny ball-transfer unit might work: https://uk.rs-online.com/web/p/ball-transfer-units/7431408/ though how happy it would be with being hot, and how much heat would transfer to the ball would be a big question.
I was thinking of a roller-ball style pen and then you tell us the proper name for it. I’m going to come bother you the next time I’m hunting fruitlessly on McMaster-Carr.
I know it might be changing too much from a stock configuration to be practical for frequently switching back and forth, but maybe instead of using the hotend as the heating element, maybe a coil of nichrome wire under some teflon tape, like they use for bag sealers, only just a dot instead of a line. Hook it up to the hotend’s power and it should heat up and cool off very quickly. I guess you could just use the teflon tape over the nozzle. It would probably work better than foil, or they would just use foil on bag sealers.
I like the ball transfer unit idea. I was thinking of something similar, like an all metal ball point pen, but wasn’t sure about the availability of things like that. My other thought was a ball or hemisphere ear ring soldered into an old nozzle.
Unless you just really love scripting, you could do all the control with gcode generated by Cura. Using the blocking and per model configurations, you could test various temps and speeds. You could use z-axis hopping to lift the nozzle between paths.
Just thoughts.
Wouldn’t a laser on a CNC router be the perfect tool for this? Not only can you control the intensity of the laser, but also the time-on-target and any fancy pattern the seam would require. Super tempted to try experimenting with this 😀
Hackaday recently had an article for doing this with certain fabrics.
https://hackaday.com/2020/04/27/defocused-laser-welding-fabric-proves-theres-many-ways-to-slice-it/
What’s interesting is that the bunches seem to line up. It looks like the cardboard underneath was oriented with the corrugations perpendicular to the direction of the hotend. What would this look like with the hotend traveling parallel to or even in the trough of the corrugations?
Yeah, they should add a note at the end of the talking about it…
I think that you need pressure to fuse such materials. Just making the top sheet hot will do you no good if it isn’t touching the bottom sheet.
So, chuck a soldering iron into your CNC machine.
you can weld sheets of plastic using a soldering iron and having the plastic sheets covered with “sandwich paper” or “baking paper” (brown smooth dense but thin paper used in the kitchen to bake pies) so the heating head never stick to the foil (I did some huge balloons with that technique with those sheets sold to cover the floor for painting work)
so I would test covering it with that
and I would also test with a cnc and a soldering iron (I might actually do that sometimes in the future to reproduce an “airpup” with things at hand … )
This is a good idea, I’ve done this process manually before with thicker plastic using wax paper, but it never occurred to me to use some kind of paper interface with the printer.
I might try the test again this weekend, hopefully I’ll be able to find some kind of thin paper that would be good for this. Hopefully it will take care of the skipping and sticking problem I had. Hopefully it works with such thin plastic.
A friend of mine wants to try the test with a CNC machine and a soldering iron.
What you want is sold as “Parchment paper” in the baking department. I’ve had great success making inflatables using LDPE sheet and even HDPE (milkbottle) pieces. I used an old “woodburner” I had from when I was a kid. The backing was wood scraps with the parchment paper on top and the plastic sheets sandwiched in the middle. Key was using a slow speed, but the seams that resulted were quite strong.
There are commercial hand held units which will do this. Here is one. http://aieco.com/enet/views.asp?hw_id=456
I hate to pop some balloons (pun) but the way to use air and actuate motion on the cheap is to use light vacuum to suck a wedge shaped pneumatic shut. They went this way after pouches (half of a balloon) in organs more than a century ago. The player piano really took off after they went from such lag prone bladders and such to the cuneiform pneumatic. 10 or more strokes per second with almost no slop and lag is possible. Hinge with cloth two rectangles like a book and cover the three open sides with thin airtight material (lifetime is important) and glue on to the edges of the open as-much-as-needed-for-stroke sides. Put a small stop inside to prevent the natural folding of the thin stuff from forming tight creases for better lifetime. It might be fun to make a paper roll punched with holes to make a robot with a program on the roll to get up and walk and dance using tech from a time just before Karel Copek wrote RUR.
The kind of soft robot actuators I’ve been wanting to play with are actually vacuum based, similar to what you describe.
The design I’m going for is pretty much the same as what’s described in this document: https://www.pnas.org/content/114/50/13132
Another resource I used for inspiration: https://www.researchgate.net/publication/330200833_Modeling_and_Analysis_of_a_High-Displacement_Pneumatic_Artificial_Muscle_With_Integrated_Sensing
But finding a good and cheap way to create custom sized actuators is why it would be nice to have an automated and precise way to do this out of common plastic sheet sources. I made a section of an oogoo actuator as described here once, but it took way too long to make the single section, let alone make multiple to stick together, so I scrapped this method because it’s too time consuming: https://www.instructables.com/id/Soft-Robots-Making-Robot-Air-Muscles/
It seems to me that there is something else to try. Using the right filament like welding rod in a metal weld, the hot filament should be used to heat the plastic sheets. A little filament would be left behind to help seal the weld, no dragging involved.
Use a ball point pen with the biggest ball you can find so it just rolls on the surface of the plastic. I can imagine the hot end scratching it. And maybe some high temperature melting foamy stuff underneath it