The Wanhao Duplicator CNC Heat Sealer

One custom, compliant heat exchanger, coming right up!

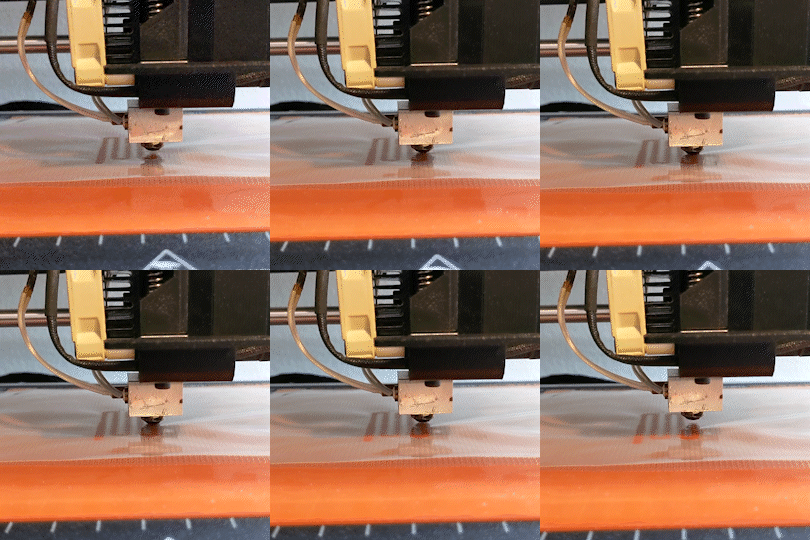
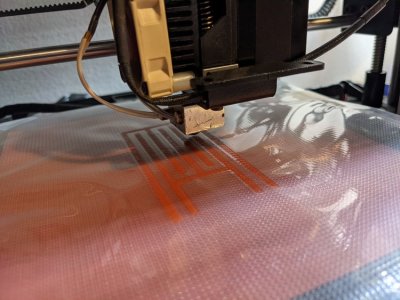
[Thane Hunt] needed to find a way to make a variety of different heat-seal patterns on a fluid heat exchanger made from polyolefin film, and didn’t want all the lead time and expense of a traditional sealing press machined from a steel plate. Pattern prototyping meant that the usual approach would not allow sufficient iteration speed and decided to take a CNC approach. Now, who can think of a common tool, capable of positioning in the X-Y plane, with a drivable Z axis and a controlled heat source? Of course, nowadays the answer is the common-or-garden FDM 3D printer. As luck would have it, [Thane] had an older machine to experiment with, so with a little bit of nozzle sanding, and a sheet of rubber on the bed, it was good to go!

Custom seal path made in Onshape

Now, heat sealing is usually done in a heated press, with a former tool, which holds the material in place and gives a flat, even seal. Obviously this CNC approach isn’t going to achieve perfect results, but for proof-of-concept, it is just fine. A sacrificial nozzle was located (but as [Thane] admits, a length of M6 would do, in a pinch) and sanded flat, and parallel to the bed, to give a 3mm diameter contact patch. A silicone rubber sheet was placed on the bed, and the polyolefin film on top. The silicone helped to hold the bottom sheet in place, and gives some Z-axis compliancy to prevent overloading the motor driver. Ideally, the printer would have been modified further to move this compliancy into the Z axis or the effector end, but that was more work. With some clever 3D modelling, Cura was manipulated to generate the desired g-code (a series of Z axis plunges along a path) and a custom heated indenter was born!

This isn’t the first such use of a 3D printer we’ve seen, here’s an earlier failure, and like everything, there’s more than one way to do it – here’s a method of making inflatable bladders with a defocused CO2 laser.

(warning! Two minutes of a 3D printer head-banging into the bed!)

Continue reading “The Wanhao Duplicator CNC Heat Sealer

Fusing Plastic Sheets With A 3D Printer (Sort Of)

If you want to experiment with pneumatic devices, you’ll likely find yourself in need of custom inflatable bladders eventually. These can be made in arbitrary 2D shapes by using a soldering iron to fuse the edges of two plastic sheets together, but it’s obviously a pretty tedious and finicky process. Now, if only there was some widely available machine that had the ability to accurately apply heat and pressure over a large surface…

Realizing his 3D printer had all the makings of an ideal bladder fusing machine, [Koppany Horvath] recently performed some fascinating experiments to test this concept out in the real-world. Ultimately he considers the attempt to be a failure, but we think he might be being a bit too hard on himself. While he didn’t get the sheets to fuse hard enough to resist being pulled apart by hand, we think he’s definitely on the right track and would love to see more research into this approach.

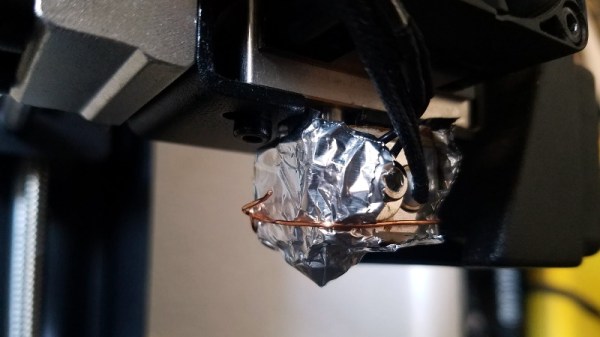
For these early tests, [Koppany] wrapped the hotend of his Monoprice Maker Select Plus with some aluminum foil, and covered the bed with a piece of cardboard. Stretched over this were two sheets of plastic, approximately 0.5 mil in thickness. Specifically, he used pieces cut from the bags that his favorite sandwiches come in; but we imagine you could swap it out for whatever bag your takeout of choice is conveyed in, assuming it’s of a similar thickness anyway.

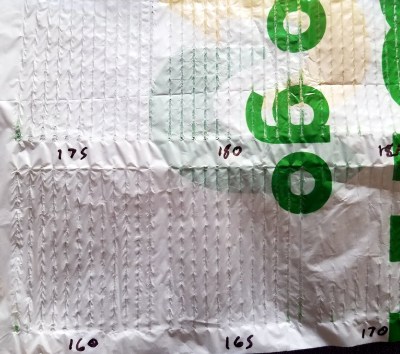
There were problems getting the plastic pulled tight enough, but that was mostly solved with the strategic placement of binder clips and a cardboard frame. Once everything was in place, [Koppany] wrote a Python script that commanded the printer to drag the hotend over the plastic at various speeds while simultaneously adjusting the temperature. The goal was to identify the precise combination of these variables that would fuse the sheets of plastic together without damaging them.

In the end, his biggest takeaway (no pun intended) was that the plastic he was using probably isn’t the ideal material for this kind of process. While he got some decent seams at around 180 °C , the thin plastic had a strong tendency towards bunching up. Though he also thinks that a convex brass probe inserted into the hotend could help, as it would smooth the plastic while applying heat.

We’ve already seen some very promising results when using LDPE film in a CO2 laser cutter, but if a entry-level 3D printer could be modified to produce similar results, it could be a real game changer for folks experimenting with soft robotics.

The Engineering Case For Fusing Your LED Strips

Modern LED strips are magical things. The WS2812 has allowed the quick and easy creation of addressable RGB installations, revolutionizing the science of cool glowy things. However, this accessibility means that it’s easy to get in over your head and make some simple mistakes that could end catastrophically. [Thomas] is here to help, outlining a common mistake made when building with LED strips that is really rather dangerous.

The problem is the combination of hardware typically used to run these LED strings. They’re quite bright and draw significant amounts of power, each pixel drawing up to 60 mA at full-white. In a string of just 10 pixels, the strip is already drawing 600 mA. For this reason, it’s common for people to choose quite hefty power supplies that can readily deliver several amps to run these installations.

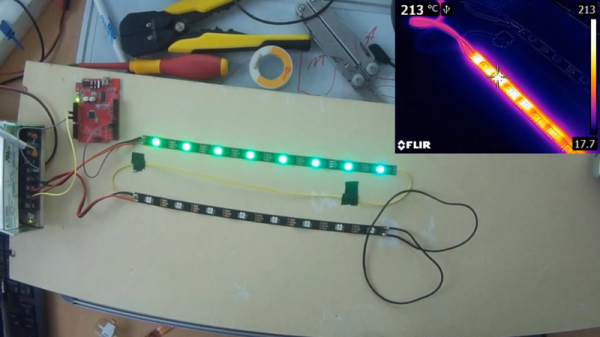
It’s here that the problem starts. Typically, wires used to hook up the LED strips are quite thin and the flex strips themselves have a significant resistance, too. This means it’s possible to short circuit an LED strip without actually tripping the overcurrent protection on something like an ATX power supply, which may be fused at well over 10 amps. With the resistance of the wires and strip acting as a current limiter, the strip can overheat to the point of catching fire while the power supply happily continues to pump in the juice. In a home workshop under careful supervision, this may be a manageable risk. In an unattended installation, things could be far worse.

Thankfully, the solution is simple. By installing an appropriately rated fuse for the number of LEDs in the circuit, the installation becomes safer, as the fuse will burn out under a short circuit condition even if the power supply is happy to supply the current. With the example of 10 LEDs drawing 600 mA, a 1 amp fuse would do just fine to protect the circuit in the event of an accidental short.

It’s a great explanation of a common yet dangerous problem, and [Thomas] backs it up by using a thermal camera to illustrate just how hot things can get in mere seconds. Armed with this knowledge, you can now safely play with LEDs instead of fire. But now that you’re feeling confident, why not check out these eyeball-searing 3 watt addressable LEDs?

Continue reading “The Engineering Case For Fusing Your LED Strips”