Piston-Powered Pellet Pusher For Peckish Pets

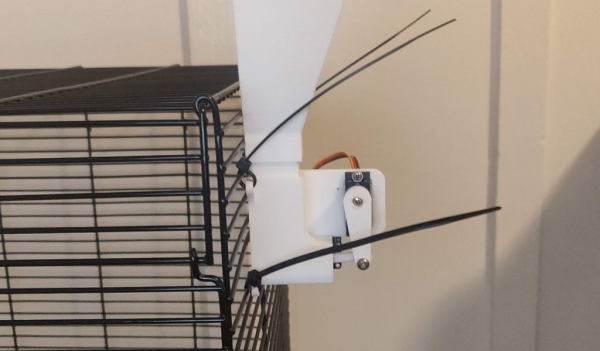
We all have our new and interesting challenges in lockdown life. If you’ve had to relocate to ride it out, the chances are good that even your challenges have challenges. Lockdown left [Kanoah]’s sister in the lurch when it came to feeding her recently-adopted pet rat, so he came up with a temporary solution to ensure that the rat never misses a meal.

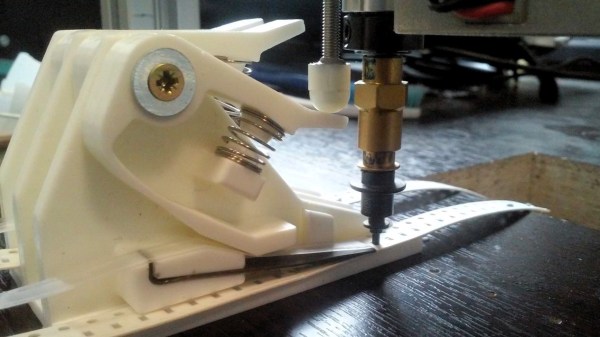
Most of the automated pet feeders we see around here use an auger to move the food. That’s all fine and good, but if you just need to move a singular mass, the screw seems like overkill. [Kanoah]’s feeder is more akin to a pellet-pushing piston. It runs on a Metro Mini, but an Arduino Nano or anything with enough I/O pins would work just fine. The microcontroller starts counting the hours as soon as it has power, and delivers pellets four times a day with a servo-driven piston arm. [Kanoah] has all the files up on Thingiverse if you need a similar solution.

There many ways of solving the problem of dry pet food delivery. Wet food is a completely different animal, but as it turns out, not impossible to automate.

Printable, Castable Feeders Simplify Pick-and-Place Component Management

It goes without saying that we love to see all the clever ways people have come up with to populate their printed circuit boards, especially the automated solutions. The idea of manually picking and placing nearly-microscopic components is reason enough to add a pick and place to the shop, but that usually leaves the problem of feeding components to the imagination of the user. And this mass-production-ready passive component feeder is a great example of that kind of imagination.

Almost every design we’ve seen for homebrew PnP component feeders have one of two things in common: they’re 3D-printed, or they’re somewhat complex. Not that those are bad things, but they do raise issues. Printing enough feeders for even a moderately large project would take forever, and the more motors and sensors a feeder has, the greater the chance of a breakdown. [dining-philosopher] solved both these problems with a simple design using only two parts, which can be resin cast. A lever arm is depressed by a plunger that’s attached to the LitePlacer tool, offset just enough so that the suction cup is lined up with the component location on the tape. A pawl in the lower arm moves forward when the tool leaves after picking up the part, engaging with the tape sprocket holes and advancing to the next component.

[dining-philosopher] didn’t attack the cover film peeling problem in his version, choosing to peel it off manually and use a weight to keep it taut and expose the next component. But in a nice example of collaboration, [Jed Smith] added an automatic film peeler to the original design. It complicates things a bit, but the peeler is powered by the advancing tape, so it’s probably worth it.

Continue reading “Printable, Castable Feeders Simplify Pick-and-Place Component Management”

Passing The Time By Reading The Time

Binary clocks are a great way to confuse your non-technical peers when they ask the time from you — not that knowing about the binary system would magically give you quick reading skills of one yourself. In that case, they’re quite a nice little puzzle, and even a good alternative to the quarantine clocks we’ve come across a lot recently, since you can simply choose not to bother trying to figure out the exact time. But with enough training, you’ll eventually get the hang of it, and you might be in need for a new temporal challenge. Well, time to level up then, and the Cryptic Wall Clock built by [tomatoskins] will definitely keep you busy with that.

Example of the clock showing 08:44:47
Diagram of the clock showing 08:44:47

If you happen to be familiar with the Mengenlehreuhr in Berlin, this one here uses the same concept, but is built in a circular shape, giving it more of a natural clock look. And if you’re not familiar with the Mengenlehreuhr (a word so nice, we had to write it twice), the way [tomatoskins]’ clock works is to construct the time in 24-hour format by lighting up several sections in the five LED rings surrounding a center dot.

Starting from the innermost ring, each section of the rings represent intervals of 5h, 1h, 5m, 1m, and 2s, with 4, 4, 11, 4, and 29 sections per ring respectively. The center dot simply adds an additional second. The idea is to multiply each lit up section by the interval it represents, and add the time together that way. So if each ring has exactly one section lit up, the time is 06:06:02 without the dot, and 06:06:03 with the dot — but you will find some more elaborate examples in his detailed write-up.

This straightforward and yet delightfully unintuitive concept will definitely keep you scratching your head a bit, though you can always go weirder with the Roman numerals palm tree clock for example. But don’t worry, [tomatoskins] has also a more classic, nonetheless fascinating approach in his repertoire.

An ESP32 Home Automation Swiss Army Knife

Thanks to the ESP8266 and the ESP32, we’ve seen an explosion in DIY home automation projects recently. When it only takes $3 and a few lines of code to bring your gadgets onto the network, that’s hardly a surprise. But hacking bare ESP modules onto devices will only get you so far. Eventually you’ll probably want to put together a slightly more mature home automation system, and that’s where things can get a little tricky.

Which is why [Alfredo] created the Maisken Homelay. This device is a one-stop-shop for your home automation needs that leverages the power of the ESP32. With the microcontroller slotted into this compact PCB, you’ll be able to trigger four relays for your high current or AC loads, and still have 8 GPIOs and the I2C bus for expansion. All while retaining compatibility with existing open source projects like Home Assistant and ESPHome.

What really sets this project apart is the attention to detail. [Alfredo] has included a HLK-PM01 power supply on the board which takes mains voltage and brings it down to 5 VDC for the ESP32, so won’t need a separate power cable. He’s also taken the time to add isolation slots to separate the potential high-voltage connected to the relays from the rest of the board, added current and thermal fuses for protection, and peppered the board with screw terminals so you can easily connect everything up.

Sure you could get a simple relay board shipped to your door for a few bucks from the usual suspects. But it’s not going to offer the kind of quality of life and safety features that the Maisken Homelay has. There’s even a 3D printed enclosure available to help tidy things up.

With some of the blatantly anti-consumer decisions big-name home automation companies have been making recently, there’s more reason than ever to roll your own smart home using open source hardware and software. It still takes more effort than buying a bunch of modules from the Big Box retailer, but projects like this one are certainly starting to blur the line between consumer and DIY.

A Transmission Line Speaker With The Design Work To Back It Up

We love the world of audiophiles here at Hackaday, mostly for the rich vein of outrageous claims over dubious audio products that it generates. We’ve made hay with audiophile silliness in the past, but what we really like above that is a high quality audio project done properly. It’s one thing to poke fun at directional oxygen free gold plated USB cables, but it’s another thing entirely to see a high quality audio project that’s backed up by sound design and theory to deliver the best possible listening. [Davide Ercolano]’s transmission line speakers are a good example, because he’s laid out in detail his design choices and methods in their creation.

Starting with the Thiele-Small parameters of his chosen driver, he simulated theĀ  enclosure using the Hornresp software. As a 3D-printed design he was able to give it paraboloid curves to the convoluted waveguide, making it a much closer approximation to an ideal waveguide than a more traditional rectangular design. In the base is a compartment for an amplifier module, with additional Bluetooth capability.

We’d be curious to know how well 3D printed plastic performs in this application when compared for example to something with more mass. However we like these speakers a lot; this is how a high quality audio project should be approached. We’ve delved into speakers more than once in the past, but if you’re looking for something really unusual then how about an electrostatic?

Books You Should Read: The Boy Who Harnessed The Wind

For many of us, our passion for electronics and science originated with curiosity about some device, a computer, radio, or even a car. The subject of this book has just such an origin. However, how many of us made this discovery and pursued this path during times of hunger or outright famine?

That’s the remarkable story of William Kamkwamba that’s told in the book, The Boy Who Harnessed the Wind. Remarkable because it culminates with his building a windmill (more correctly called a wind turbine) that powered lights in his family’s house all by the young age of fifteen. As you’ll see, it’s also the story of an unyielding thirst for knowledge in the face of famine and doubt by others.

Continue reading “Books You Should Read: The Boy Who Harnessed The Wind”

How Much Is That Plotter In The Window?

We live in a strange time indeed. People who once eschewed direct interactions with fellow humans now crave it, but to limited avail. Almost every cashier at the few stores deigned essential enough to maintain operations are sealed away behind plastic shields, with the implication that the less time one spends lingering, the better. It’s enough to turn an introvert into an extrovert, at least until the barriers are gone.

We get the idea that the need to reach out and touch someone is behind [Niklas Roy]’s “Please Leave a Message”, an interactive art installation he set up in the front window of his Berlin shop. Conveniently located on a downtown street, his shop is perfectly positioned to attract foot traffic, and his display is designed to catch the eye and perhaps crack a smile. The device consists of a large wooden easel holding the guts from an old X-Y pen plotter, an Arduino and an ESP-8266, and a couple of drivers for the plotter’s steppers. Passers-by are encouraged to scan a QR code that accesses a web page served up by the ESP-8266, where they can type in a brief message. The plotter dutifully spells it out on a scroll of paper for all to see, using a very nice font that [Niklas] designed to be both readable and easily plotted. The video below shows it in action with real people; it seems to be a crowd-pleaser.

[Niklas] has been incredibly prolific, and we’ve covered many of his interactive art installations. Just search for his name and you’ll find everything from a pressure-washer dancing waters display to a plus-sized pinball machine.

Continue reading “How Much Is That Plotter In The Window?”