a 3D-rendered image of a PCB with several knobs and buttons

Odd Inputs And Peculiar Peripherals: The LowPow ShortKeyboard Can Work On Your Desk Or Out In The Field

For some power users, the one-hundred-and-something keys on regular keyboards just aren’t enough for their everyday tasks. Macro keypads are a popular way of extending one’s input capabilities, and there are almost as many examples as there are power users. [Ulrich]’s latest project, dubbed the LowPow E-Ink ShortKeyboard, is a beautiful and meticulously documented design for a macro pad that includes several unusual features.

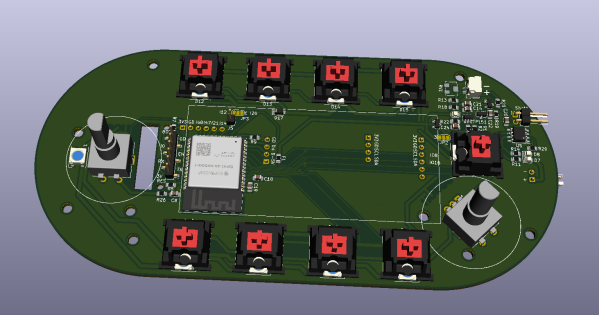
Built around an ESP32-S3 microcontroller, the ShortKeyboard features nine programmable function keys plus an analog joystick and a rotary encoder. The keys are based on Cherry MX RED types commonly seen in mechanical keyboards, illuminated from below by by miniature RGB LEDs. A big e-ink display in the middle can be used to show the function of each key.

Continue reading “Odd Inputs And Peculiar Peripherals: The LowPow ShortKeyboard Can Work On Your Desk Or Out In The Field”

An input device combining a joystick with several knnobs and buttons

Modular Multi-Input Macro Keypad Integrates Mouse And Joystick

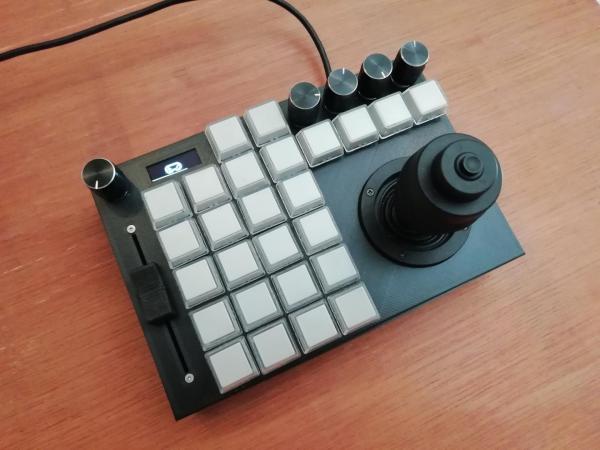
While most computer users make do with just a keyboard and mouse, power users often have multiple additional input devices. Gamers use joysticks or dedicated mice, CAD engineers have specialized gadgets for manipulating 3D objects, while graphic designers might want programmable macro buttons to automate various tasks. [Sascha Nitsch] didn’t fancy cluttering his desk with a whole bunch of input devices and therefore decided to combine as many functions as possible into the CIMDIT: a Completely Insane Multi Device Input Thingy.

The main components making up the CIMDIT are a 3-axis joystick module, which can double as a 3D CAD mouse, and a set of buttons, knobs and sliders to enable various functions. One rotary encoder is used to choose an operating mode, while four others can be used as programmable inputs. A small OLED display shows which mode is currently selected, but can also be used to display notifications from various programs.

An Arduino Pro Micro provides a USB interface to a PC and reads out the various input units. The entire design is modular, so it can be customized to any desired combination of analog and digital inputs. [Sascha] made a neat 3D printed enclosure to hold the 3-axis module along with 26 buttons, five rotary encoders and one analog slider. KiCAD files for the PCBs and the FreeCAD source for the enclosure are available under an open-source license on [Sascha]’s Git repo.

The same thing applies to the software driving the CIMDIT, though adding functionality to it might turn out to be tricky: [Sascha] had to perform some serious code optimization to fit everything into the Arduino’s 32 kB of program flash. The Git repo also includes a convenient tool to create key mappings to be programmed into the controller, saving you from having to compose a binary file by hand.

Love macro keypads? Check out these cool examples with gesture detection, an e-ink display or simply beautiful wooden keys.

Custom Num Pad Does Double Duty As Macro Pad

Why buy a num pad or a macropad when you can build something new and beautiful, open source that bad boy, and be a hero to the community? We think that should be all the justification you ever need to build instead of buy, even if you think your thing is Just Another Keypad [JAnK] as [Clewsy] claims.
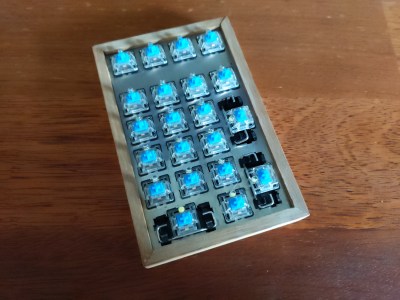
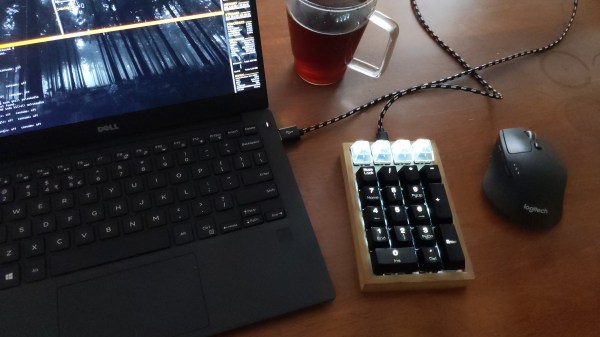
At first glance, JAnK appears to be a standard number pad with four macro keys across the top. But when you roll your own ‘board, all the keys are programmable. [Clewsy] took advantage of this by adding a second layer that’s accessible with (what else?) the Num Lock key. This switches JAnK over to 21-key macro pad mode.

[Clewsy] rolled their own PCB for this and used the venerable ATMega32u4 because of its HID and USB host capabilities. Every key is backlit, and these LEDs are driven by an MP3202 LED driver and PWM from the AVR. [Clewsy] was able to build a prototype by sawing the num pad off of a stainless steel key switch plate from another build, but eventually ordered JAnK its own custom, laser-cut, stainless steel plate. The lovely enclosure is made of spotted gum wood and an acrylic base.

Putting it all together proved to be a bit problematic. [Clewsy] soldered up the minimum viable components for testing and discovered that the ATMega’s VCC and GND pins were both shorted. This killed the AVR programmer, but not the chip itself, and [Clewsy] happened to have a spare. To add insult to injury, the Num Lock light didn’t work, but [Clewsy] was able to simply reverse the LED instead of ordering a new pile of boards. Check out the detailed write-up with code and tons of pictures over on [Clewsy]’s personal site.

One of the awesome things about this build is that [Clewsy] was able to re-use the code from macr0, which began life as a proof of concept for scanning key matrices, and retired to become a music and media controller.

This Pineapple Keyboard Is The Bomb

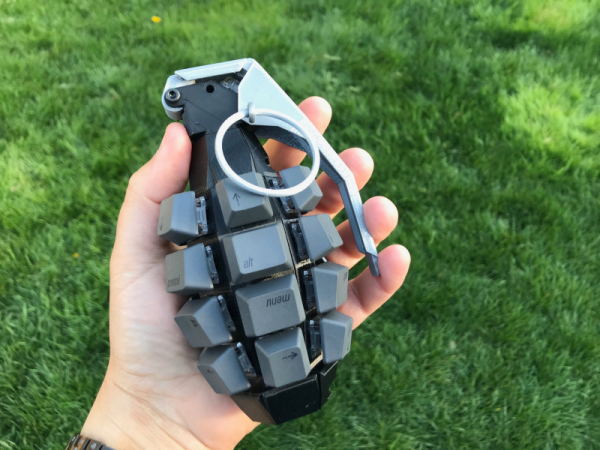
Now why didn’t we think of this? While building a dactyl manuform — a semi-ergonomic split keyboard — [dapperrogue] had the life-changing epiphany that keyboards can be any shape or size, as long as there is room for wiring and a microcontroller inside. [dapperrogue]’s first foray into the world of fictional ordnance came in the form of an F-bomb — a round macro keeb made in the classic round explosive shape and covered with function keys. Building on the explosive feedback from that, [dapperrogue] built this bomb of a pineapple keeb, the only anti-personnel factor being the clickiness of the key switches.

This groovy grenade has 25 keys total, 24 of which are in a 4×6 grid around the body. The 25th key, the best one, is hiding under the lever and you bet it can only be actuated by pulling the pin first. We love the use of the lever because it makes us think of Morse code keyers, which might be what we would use that switch for.

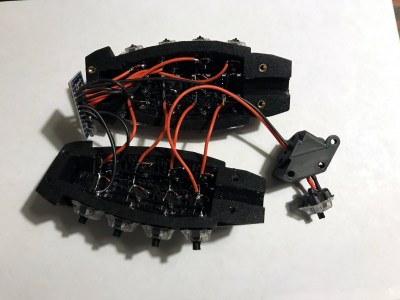
Inside is an Arduino Pro Micro running QMK and some skillful wiring. The entirely 3D-printed enclosure is in two main pieces that are connected with M3 screws, plus the top. If you want to pack one of your own, the STLs and firmware are out on GitHub. Just don’t take it to the airport.

Be sure to check out the demos after the break — in the stock firmware, every key types out a different onomatopoeic boom-type sound. Are you more of a pacifist when it comes to macro pad design? That’s understandable. We have plenty of different builds to admire.

Continue reading “This Pineapple Keyboard Is The Bomb”

3D-Printed Macro Pad Ditches The PCB With Slick Wiring Guides

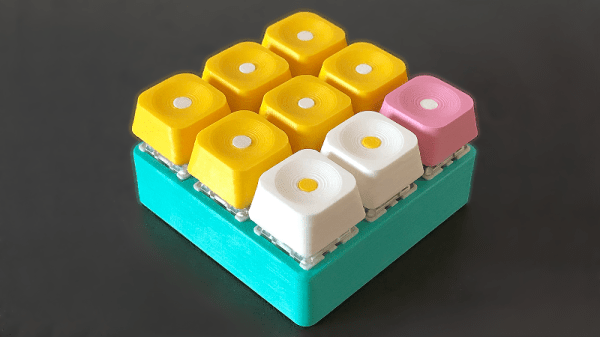
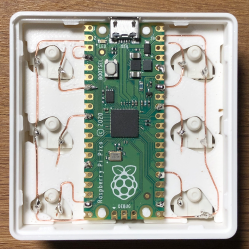
Reddit user [duzitbetter] showed off their design for a 3D-printed programmable macro keyboard that offers a different take on what can be thought of as a sort of 3D-printed PCB. The design is called the Bloko 9 and uses the Raspberry Pi PICO and some Cherry MX-style switches, which are popular in DIY keyboards.

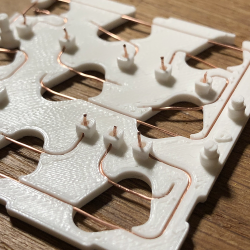
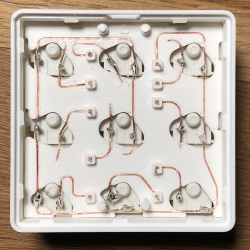
The enclosure and keycaps are all 3D printed, and what’s interesting is the way that the enclosure both holds the components in place as well as providing a kind of wire guide for all the electrical connections. The result is such that bare copper wire can be routed and soldered between leads in a layout that closely resembles the way a PCB would be routed. The pictures say it all, so take a look.

Bloko 9 is available as a paid model, and while going PCB-free thanks to 3D printing is a technique others have played with, it is very well demonstrated here and shows there is still plenty of room to innovate on the concept. DIY keyboard and macro pad design is also fertile ground for hackers; we have even seen that it’s possible to 3D print one right down to the switches themselves.