As our own Elliot Williams laid out, many people think that soldering is a key skill for electronics, but we don’t as often think about desoldering. Even if you are perfect in your technique, there’s always the chance you’ll put in a bad part or have a part fail later and it will need replacement. [Robert] has a short video showing his method for removing through-hole components and you can see it below.
This isn’t the first time we’ve seen it, of course. In fact, it is very much like using hot air, although it doesn’t require hot air, just extra solder and a regular iron. Of course, if we knew that connector was bad, we’d have been tempted to cut each pin apart and remove them one at a time. Heating a joint and then slamming your hand on the bench can work wonders.
We always think desoldering pumps are a good idea, but the electric ones tend to be anemic. The ones with the springs are usually better, but still have limitations. In the end, we’ll stick with using hot air, but if all you have is an iron, this method is worth checking out. You might also be interested in the needle method.


Amtech fluxes and Gootwick. Accept no substitutes.
100% And if you’re cheap- the used wick is great for making a buss-bar or adding current capability to an exposed trace.
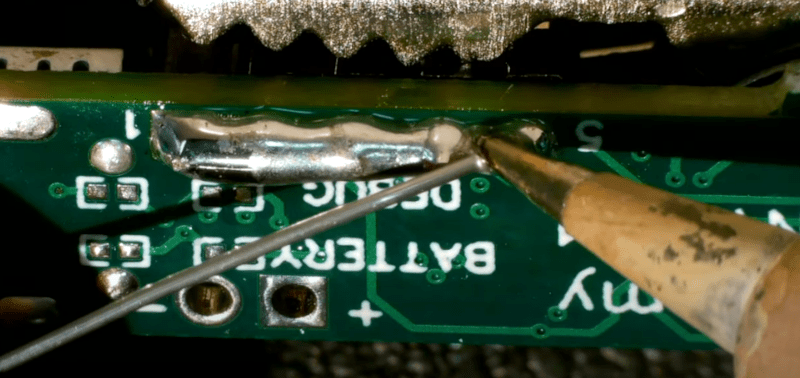
Interesting. I’ve picked up the habit of adding extra solder to joints in order to desolder stuff all by myself. Works great, too.
It also helps if the original solder was lead-free, because lead-free has a higher melting point, and the fresh solder dilutes it.
I’ve used this technique a few times, generally works well. You’ve gotta work quickly though for stuff like switches that have plastic parts directly contacting the pins or you’ll end up melting the plastic.
When I need to desolder long rows of pins (through hole connectors, ICs but SMD components work fine too), I find it difficult to keep the solder heated and to keep it in place. Because the solder is really only required for heat transfer and mass, I use a little bit of extra copper wire (2.5mm2 installation wire), fold a flat loop and “clamp” it around the pins to be desoldered. Then I saturate everything with a large amount of solder, the copper wire keeps the solder around the pins and the copper helps in transferring the heat. This way larger parts can be desoldered, although you still require a decent iron, because you still need to heat things up. And keep that iron moving. Finally, when the part comes loose, it sometimes drops out of the pcb and if not apply some tiny force. But always keep everything heated it until is completely removed.
Finally, I clear the holes using a spring loaded solder sucker desoldering pump (nothing electric), holding the PCB on it’s side, heating it from the left side, while removing the sucker tool from the right side. I find this to be less trouble some (and less costly) then using a wick.
I have a 50 watt soldering iron which seems to works fine for me. It requires some practice but not much.
For those who do use desoldering braid, here’s a tip: if the molten solder doesn’t *eagerly* wick into the braid, add flux to the braid first.
That’s a good tip that I recently came across elsewhere. I’m surprised they don’t come prefluxxed somehow.
You can buy fluxed and unfluxed desolder braid. I don’t know where you are looking, but all the big vendors have all kinds, for different applications. Just have a look at chemtronics website, they have 5 different families of braids (no-clean, rosin, lead-free, no flux,…)
My work call for a lot of desoldering for repairs. When you buy desolder wick, make sure it has RA flux. This solves the problem and allows faster, more complete wicking action.
When you say you have a 50W Iron, you mean a temperature controlled 50W max iron? If not, get a temperature controlled iron immediately. And not an “adjustable” Iron that has no feedback. (Weller had these- but I think they were generally in red, as opposed to the blue TC).
A temperature controlled iron will change your soldering life. I spent so much time with an old radio shack 25W iron, thinking I was a soldering hack.
> If not, get a temperature controlled iron immediately
Why the importance?
Not enough heat = cold solder joints. Too much heat = damaged components + de-laminated copper traces. Having even basic analog temperature control and a two or three different sized tips allows for a consistent, predictable soldering experience with greatly reduced risk of breaking something.
I had the same experience as MattAtHazmat – I started out using a cheap 15/30W iron that had a tendency to burn components, had a very short tip life, and was overall quite frustrating, like trying to drive a nail in with an oddly-shaped rock. I later upgraded to a Weller WES51, and it was a complete game changer. I use it often, and after over a decade, it still works like new, and I haven’t had to replace a single tip.
Get a soldering station that actually has BIG tips, like wide chisels and blades. That make a big difference in getting the heat in there cleanly and quickly without destroying the components or boards by overheating.
JBC is pretty good for these special soldering tips, but i guess there are other brands with a decent offering of large soldering iron tips.
^^This. Nothing sucks more than trying to remove a large component with a small iron tip. Bigger tip = better heat transfer = you don’t have to crank up the temperature to the point where the component/pcb is fried.
A heated plate underneath helps too. I had trouble removing capacitors from PCBs with heavy groundplanes until I started using one of these. If you can get the whole area up to ~60degC, the soldering iron doesn’t have to work as hard.
I’m a big fan of ChipQuick desoldering solder. It works really well for smd devices.
I also use heat-it-and-hold-it-and-wack-your-hand-hard-to-splash-the-solder-out-of-it . Works with through hole chips, solder cups on connector pins, etc.
And lastly, if I’m just stripping parts off of a PCB that is being junked, nothing like a hot-air gun.
I’ve heard ChipQuick is good, but I’ve always gotten excellent results using a good quality RA flux tin/lead solder. It lowers the melting point and speeds heat transfer. If you have lead-free boards, make sure to wick it all off and clean the flux before re-soldering. I’ve never seem problems mixing solder, but it’s best to comply with lead-free requirements where they apply.
CQ in my experience is a pain in the ass, its brittle, its messy, it requires 18 tons of flux, and for its price you can buy a hot air station, its like 10 bucks for 6 inches of the stuff.
Agrees 100%. ChipQuick is fantastic. My only complaint (and it was user error) is that I stored it on my pegboard near a halogen light, and the small coil of chipquick deformed and fell apart. It melts at a fantastically low temperature.
+10 It is amazing stuff.
I wish I had seen this a week ago. So excellent!
I’ve seen comments elsewhere on ‘plunger’ desolder suckers and electric/electronic solder suckers. The general consensus seems to be:
You get more instantaneous suck from a plunger, are much more likely to damage the board, and you need three hands (one holding the board, one the sucker and one the iron)…
The electric ones don’t provide the instantaneous vacuum, but are less likely to damage a board and come into their own when you have a large number of desolder points.
In the end it comes down to the job: save the PCB or save the component.
Save the component: hot air gun, huge blobs of solder, iron cranked all the way up, gas cooktop…
Save the PCB: cut the component off (side cutters, dremel) and clean up with wick/solder sucker.
Tried chip-quick, and found it more difficult than nearly every other method, and wasteful.
Adding solder like that also helps reduce the melt temperature if the original solder was lead-free. I have problems melting that stuff even with my regular Hakko 888 soldering iron. I suppose I could raise its temperature if I would RTFM, but it’s just easier to add fresh 63/37.
It’s also important to keep in mind that wet solder is very good at conducting heat. That’s why you’re supposed to add solder to the part, not the iron. When the part gets hot enough to melt solder, you know the joint is now hot enough. In the video it helps spread the heat in more places than just right below the tip.
But above all, being good at desoldering is all about practice. It can be fun to take an old “junk” board and try to get good parts off of it. That includes any method you can find, including a heat gun and a hot air station. Just remember to tin your tips regularly so they don’t get corroded by “old” solder.