Review: Mini AMG8833 Thermal Camera

In our ceaseless quest to bring you the best from the cheaper end of the global electronics markets, there are sometimes gadgets that we keep an eye on for a while because when they appear they’re just a little bit too pricey to consider cheap.

Today’s subject is just such a device, it’s a minimalist infra-red camera using the 8 pixel by 8 pixel Panasonic AMG8833 thermal sensor. This part has been around for a while, but even though any camera using it has orders of magnitude less performance than more accomplished models it has remained a little too expensive for a casual purchase. Indeed, these mini cameras were somewhere above £50 ($70) when they first came to our attention, but have now dropped to the point at which they can be found for somewhere over £30 ($42). Thirty quid is cheap enough for a punt on a thermal camera, so off went the order to China and the expected grey parcel duly arrived.

The interface on this camera is about as simple as it gets.

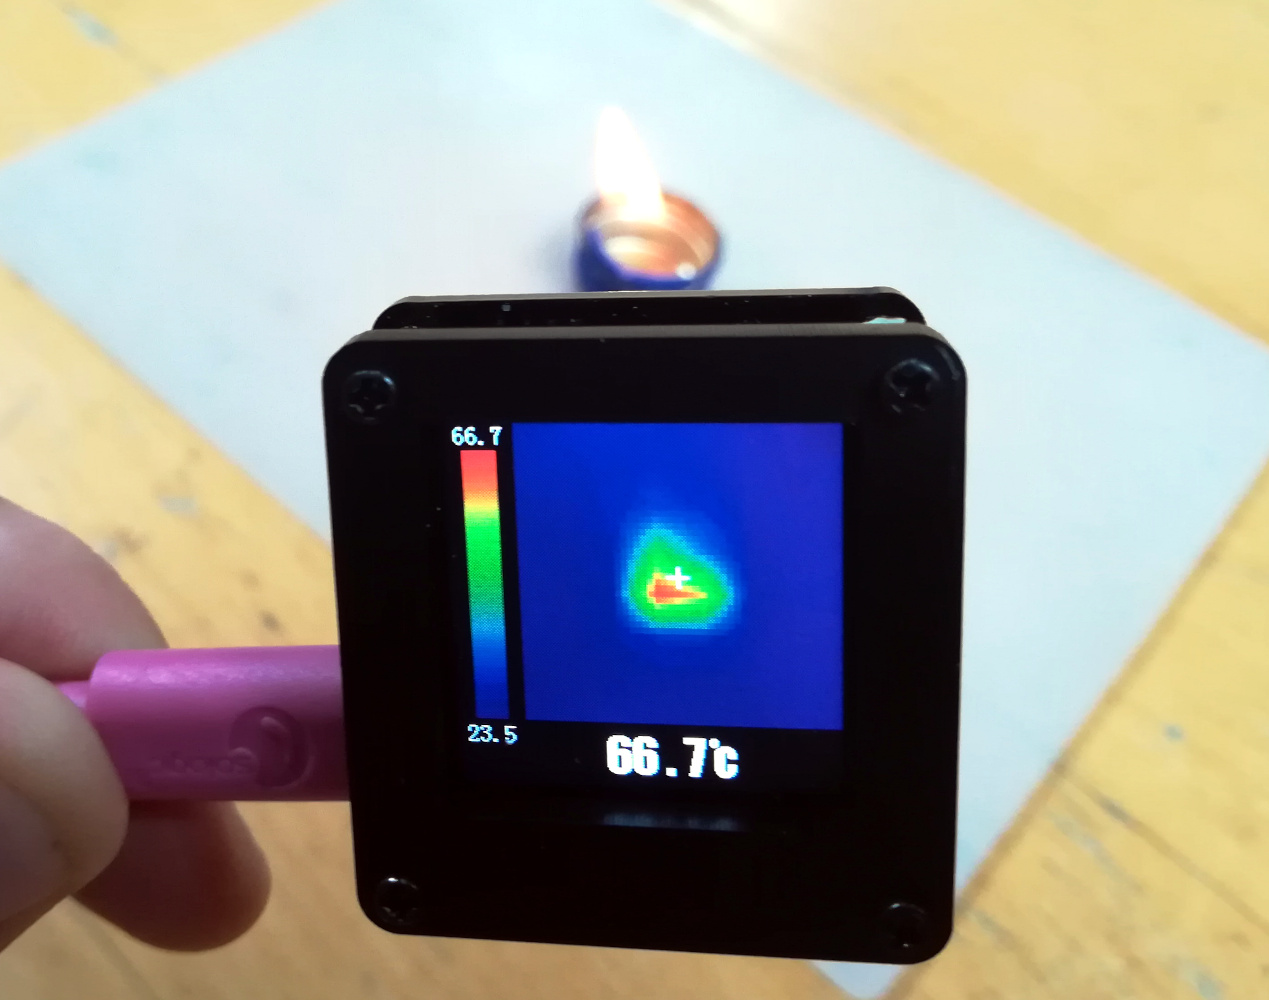
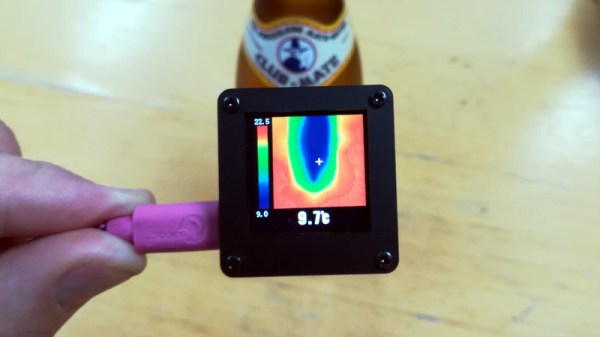
It’s a little unit, 40 mm x 35 mm x 18 mm, constructed of two laser-cut pieces of black plastic held together by brass stand-offs that hold a PCB between them, and on the front is a cut-out for the sensor while on the rear is one for the 35mm OLED display.At the side on the PCB is a micro USB socket which serves only as a power supply. It’s fair to say that this is a tiny unit.

Applying power from a USB battery bank, the screen comes up with a square colour thermal picture and a colour to temperature calibration stripe to its left. The colours adapt to the range of temperatures visible to the sensor, and there is a crosshair in the centre of the picture for which the temperature in Celsius is displayed below the picture. It’s a very straightforward and intuitive interface that requires no instruction, which is handy because the device has none. Continue reading “Review: Mini AMG8833 Thermal Camera”

Minimum Viable Quad Build Shows What Starting From Nothing Can Accomplish

While it’s great to be experienced and have a ton of specialist knowledge needed to solve a problem, there’s something liberating about coming at things from a position of ignorance. Starting at ground zero can lead you down the path less traveled, and reveal solutions that might otherwise not have presented themselves. And, if [Robin Debreuil]’s exploration of the “minimum viable quadcopter” is any example, some pretty fun failure modes too.

The minimum viable product concept is nothing new of course, being a core concept in Lean methodologies and a common practice in many different industries. The idea of building an MVP is to get something working and in the hands of users, who will then give you feedback on everything wrong with it, plus, if you’re lucky, what you got right. That feedback informs the next design, which leads to more feedback and a whole iterative process that should design the perfect widget.

In [Robin]’s case, he wanted to build a quadcopter, but didn’t know where to start. So his first version was as simple as possible: a motor with a propellor and a small LiPo battery. No chassis, no control electronics — nothing. And it worked just about as well as expected. But fixing that problem led to different designs, the process of which was fascinating — we especially liked the quad with opposing motors controlled by mercury tilt switches to sense attitude changes.

In the end, [Robin] took a more conventional tack and used a microcontroller and BetaFlight to get his popsicle stick and hot glue UAV airborne. But the decision to start with a minimum viable design and iterate from there was a powerful learning experience in tune with [Robin]’s off-beat and low-key outlook, which we’ve seen before with his use of bismuth for desoldering and his scratch-off PCBs.

Continue reading “Minimum Viable Quad Build Shows What Starting From Nothing Can Accomplish”

3D Prints Of Steel — Um — PLA, Rather

Need a steel beam? You can 3D print PLA beams that are as strong as a steel beam of equivalent weight according to [RepRap]. The Python code for FreeCAD generates a repeating structure especially well suited for belt printers that can print a beam of any length. Keep in mind, of course, given two things that weigh the same, if one is made of steel and the other PLA, the steel one will be physically smaller.

The beams are repeating tetrahedrons which are quite strong with a lot of material on the outer faces to resist bending. Each beam end has a neat block with a wiring hole and a ring of small holes that allow you to mount the beams to things or each other with 30 degree increments of rotation.

Continue reading “3D Prints Of Steel — Um — PLA, Rather”