When designing even a reasonably simple 3D-printable part, you need to account for all the supports it will require to print well. Strategic offsetting, chamfering, and filleting are firmly in our toolkits. Over time we’ve learned to dial our settings in so that, hopefully, we don’t have to fumble around with a xacto knife after the bed has cooled down. On Twitter, Chris shows off his foldable 3D print experiments (nitter) that work around the support problem by printing the part as a single piece able to fold into a block as soon as you pop it off the bed.
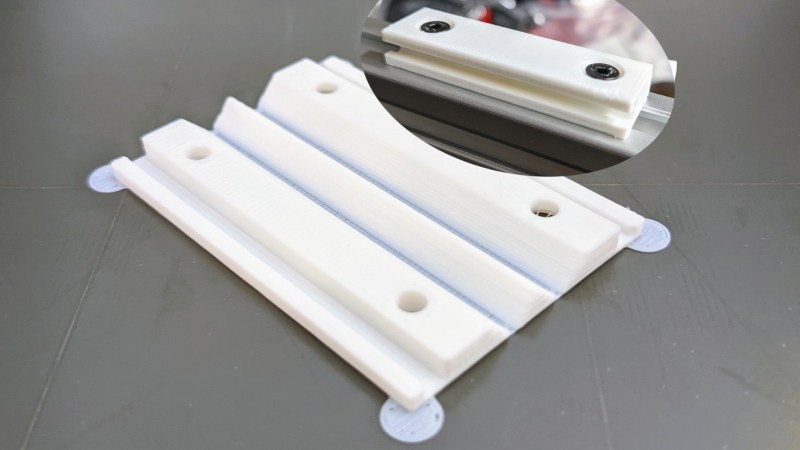
The main components of this trick seem to be the shape of the place where the print will fold, and the alignment of bottom layer lines perpendicular to the direction of the fold lines. [Chris] shows a cross-section of his FreeCad design, sharing the dimensions he has found to work best.
Of course, this is Twitter, so other hackers are making suggestions to improve the design — like this sketch of a captive wedge likely to improve alignment. As for layer line direction alignment, [Chris] admits to winging it by rotating the part in the slicer until the layer lines are oriented just right. People have been experimenting with this for some time now, and tricks like these are always a welcome addition to our toolkits. You might be wondering – what kinds of projects are such hinges useful for?
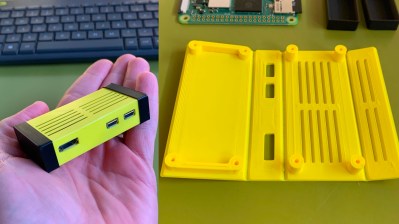 The example Chris provides is a Eurorack rail segment — due to the kind of overhangs required, you’d be inclined to print it vertically, taking a hit to the print time and introducing structural weaknesses. With this trick, you absolutely don’t have to! You can also go way further and 3D print a single-piece foldable Raspberry Pi Zero case, available on Printables, with only two extra endcaps somewhat required to hold it together.
Foldable 3D prints aren’t new, though we typically see them done with print-in-place hinges that are technically separate pieces. This trick is a radical solution to avoiding supports and any piece separation altogether. In laser cutting, we’ve known about similar techniques for a while, called a “living hinge”, but we generally haven’t extended this technique into 3D printing, save for a few manufacturing-grade techniques. Hinges like these aren’t generally meant to bend many times before they break. It’s possible to work around that, too — last time we talked about this, it was an extensive journey that combined plastic and fabric to produce incredibly small 3D printed robots!
We thank [Chaos] for sharing this with us!


That’s neat!
Since my last comment got removed despite me being respectful, lets try again?
– “1st”? Please act your age
– Please dont call yourself a full stack developer
– If you’re gonna sell WordPress sites, please keep them up to date & functional
Well you can’t edit comments here and I don’t see a “1st” in Their two-word comment so I have no idea what you’re going on about.
Comment was probably either meant in reply to a deleted comment, or a bug where the comment was posted to the wrong article (I’ve seen a similar thing crop up a few times on this site). Otherwise, I’m equally confused lol.
I believe Olivier clicked the link to Joe’s website (user names link to user’s site if they list one) and took offence to that. And I’ll admit that when I had to blog for a college class, I used my comments here for SEO help; so it used to work.
There used to be “1st” in that comment. Perhaps mods removed it when deleting the first Olivier’s rude comment in order to stop more trolls like him.
This fits the very definition of “why on earth didn’t I think of this”
Raspberry Pi Zero case STLs: https://www.printables.com/model/184727-print-flat-and-fold-case-for-raspberry-pi-zero-2-w
Well, heck. Definitely one of those “Now why didn’t I think of that?” things. Top of the toolbox this goes.
this is the same as printing 4 or 6 walls split
Now I’m curious, what’s that?
This does indeed add something useful to my toolkit. Printing a box as a sheet to be folded can eliminate a BUNCH of difficulties. Seems like this ought to work great for materials like PETG and PP, but not sure how well ABS or PLA will behave when bent 90°. Going to just have to try it with ABS, though, since that’s my favorite. Yeah, this is a real forehead-smacker.
PLA really doesn’t like this kind of flexing. even in a single layer, it tends to Craze instead of smoothly bending. You can side step that a little by applying careful heat, but then you’re back to square 1: postprocessing, with even more chances to mess up the part
I had good success with PLA and a heatgun to heat it up a bit while bending. It works without heat as well, but you get many small cracks.
You can utilize your printers heatbed with PLA, as the living hinges are down there on the plate anyway, just give it a nice boost of heat and everything folds just like charm.
Nowadays you can get better pla, or pla hydrids
, which are much much better… (Mind you they may also survive in the ecosystem for a millennium!)
Good point – that should work with ABS as well, and it will hold its folded shape when it cools.
Try hot water instead of the heat gun. Much more controlled heat.
I wonder how well splitting the bend “in half” would work then, first a 45, then a 45 with small distance between them rather than the whole 90 in one go.
In some cases (see what I did there….) it might end up a nice design feature.
It would end up something like this:
https://www.printables.com/model/1143797-double-fold-box-case-for-esp-board-or-rpi-zero-or
I don’t know if it works really good, but certainly makes a box OK.
Love me some foldables! wish more people would use this technique, you can just use a tiny bit of acetone to turn those folds in to solid connections :D
that only works with abs right?
Correct, for PLA I find superglue works great.
Superglue only gives good results with flat and smooth surfaces. A glue that can fill gaps is the better choice for most 3D prints. I’m using “UHU Hart” for PLA.
You do get Superglues that are thicker and better for gap filling, its not all the super thin stuff.
And if you have really bad fit you can mix in fillers to the glue too.
Not that I disagree as such – on the roughest 3d prints 2-part “5-min” or “instant” epoxy is probably the best choice for convince and strength. But as with all things constructed there isn’t really only one right answer.
For instance if you have access to the insides of the folds or good seams at the edges you could stir weld with some scrap filament at the joints so the entire thing is only made from one material – which may be important for some.
PLA: You might get away with dipping the print into hot / boiling water to quickly and selectively soften the thin sections to avoid fracturing (haven’t tried this myself yet, but the glass transition temperature should be indicative)
If only there was a way of getting hot molten PLA applied to something, so you could just squish it together… like a glue gun but fancier… well nevermind, I’m sure ppl in 2100 AD will have figured it out.
You mean plastic welding?
Time can certainly be spent better than yelling at random people on the internet out of sheer ignorance.
Maybe start here: “Self-folding Mini Origami Robots”
https://thenewstack.io/self-folding-mini-origami-robots-are-the-nanosurgeons-of-tomorrow/
“When it is placed on a heating element, it folds itself into shape in about a minute. This self-folding property is made possible by the precise cuts made by the laser-cutter into the structural layers”
Can try getting similar results with dual extrusion, but the trivialized version involves someone doing the folding in a heated state.
You do get 3D printing pens, essentially a tiny hot end and extruder in a pen.
Another example: https://vonkonow.com/wordpress/foldable-3d-printed-arduino-case/
I think that would work nicely for project boxes too.
I’ve been using superglue with cotton wool as a filler on my PETG prints.
I’d have thought a bit of heat would help with folding.
Hi Gareth,
just be super careful, some superglues that do not have special inhibitors can ignite together with fine cotton. At least heat up and create nasty fumes. It depends on the glue brand thou. I did test it myself and managed to start a fire. I also accidentally got a drop on my jeans and it glued itself to my skin and burned my skin, due to the heat.
Best regards from Germany!
That Pi Zero case is on Printables: https://www.printables.com/model/184727-print-flat-and-fold-case-for-raspberry-pi-zero-2-w
Luckily, its name does not begin with “Honda”.
The next step could be print direct the holding elements (screws) in an pre made or buyed housing. Like in a pelican case to screws the mainboard in place for a diy laptop.
Great method. As some people pointed out, crack of bent part is concerned when we use PLA. I think moderate heating using hair blow drier might help. Actually I use blow heating technique to curl the part in the following thing.
https://www.thingiverse.com/thing:5356334
There I learned that the thickness affects much while curling because the back side of thick part remains cool and keeps the shape, so I suppose it would be nicely bent using hot blow.
this technique mimics sheetmetal design methods. Ive been using this for a very long time in industry as sheet metal enclosures do not print very well, but using this flat technique can help a for strength. The main downside is the limit on size of object… the unfolded size is substantially larger than the OG part on the print bed, so you will need to take that into account. IF your design is completely flat, i would recommend just using a laser cutter with sheet stock (if you have one) or you can also print the blocks of material for thicker blocks shown here and glue them into a larger piece of sheet stock with the location shown with a laser mark (let me know if this makes sense). These techniques will make parts in many cases faster and with much more strength.
Lastly, i would use the hot water method over the head gun (use pan with boiling water and dip the corners quickly to soften and bend…., works great)