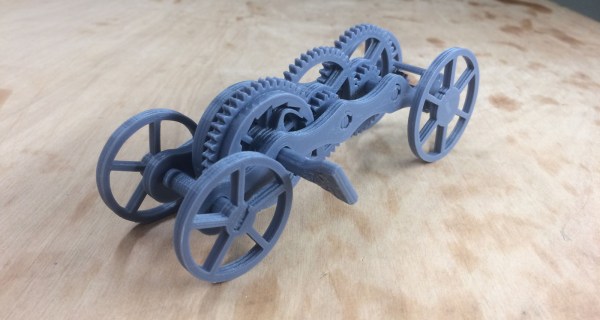
Flat-Pack Multi-Tool Has Many Dimensions

Sometimes, you just have to see whether something can be done. Such is the case with [ToolTechGeek]’s flat-pack metal multi-tool build. Can an entire multi-tool be made with only flat pieces of laser-cut metal and fasteners? It would seem so, yes. And quite nicely, too, as you’ll see in the video after the break.

[ToolTechGeek] started by designing all the parts in Inkscape, and then made a few 3D printed versions to check fitment before committing to laser-cut metal. Once they had the pieces cut, everything came together nicely except for a few tabs that connect some of the parts together. These just had to be filed down a bit.

So now, [ToolTechGeek] has a handy set of pliers, flat- and Phillips-head screwdrivers, a knife, and a bottle opener all in one place. Although the pliers don’t have teeth, they still do a fine job of removing nuts and the like. Be sure to check out the final product and see it get put to the test.

No use for such a thing? Maybe you’d prefer an NFC multi-tool.

Continue reading “Flat-Pack Multi-Tool Has Many Dimensions”

The eurorack rail piece, just printed in white plastic, not yet folded, with a folded example in the upper right corner

Bend Your Prints To Eliminate Supports

When designing even a reasonably simple 3D-printable part, you need to account for all the supports it will require to print well. Strategic offsetting, chamfering, and filleting are firmly in our toolkits. Over time we’ve learned to dial our settings in so that, hopefully, we don’t have to fumble around with a xacto knife after the bed has cooled down. On Twitter, Chris shows off his foldable 3D print experiments (nitter) that work around the support problem by printing the part as a single piece able to fold into a block as soon as you pop it off the bed.

The main components of this trick seem to be the shape of the place where the print will fold, and the alignment of bottom layer lines perpendicular to the direction of the fold lines. [Chris] shows a cross-section of his FreeCad design, sharing the dimensions he has found to work best.

Of course, this is Twitter, so other hackers are making suggestions to improve the design — like this sketch of a captive wedge likely to improve alignment. As for layer line direction alignment, [Chris] admits to winging it by rotating the part in the slicer until the layer lines are oriented just right. People have been experimenting with this for some time now, and tricks like these are always a welcome addition to our toolkits. You might be wondering – what kinds of projects are such hinges useful for?

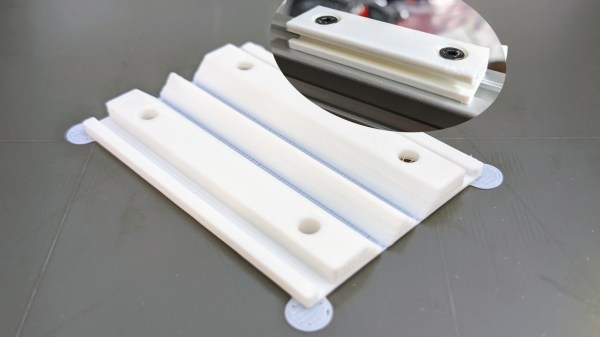
The example Chris provides is a Eurorack rail segment — due to the kind of overhangs required, you’d be inclined to print it vertically, taking a hit to the print time and introducing structural weaknesses. With this trick, you absolutely don’t have to! You can also go way further and 3D print a single-piece foldable Raspberry Pi Zero case, available on Printables, with only two extra endcaps somewhat required to hold it together.

Foldable 3D prints aren’t new, though we typically see them done with print-in-place hinges that are technically separate pieces. This trick is a radical solution to avoiding supports and any piece separation altogether. In laser cutting, we’ve known about similar techniques for a while, called a “living hinge”, but we generally haven’t extended this technique into 3D printing, save for a few manufacturing-grade techniques. Hinges like these aren’t generally meant to bend many times before they break. It’s possible to work around that, too — last time we talked about this, it was an extensive journey that combined plastic and fabric to produce incredibly small 3D printed robots!

We thank [Chaos] for sharing this with us!

Flat-Pack Pasta: Like Ikea Furniture Without The Weird Wrench

When it comes to food packaging, there’s no bigger scam than potato chip bags, right? People complain about the air (nitrogen, actually) inside, but it’s there for a reason — nitrogen pushes out oxygen, so the chips live in a state of factory-fresh dormancy until you rip open the bag and release the gas. If you want flat-pack chips, there’s always those uniformly-shaped potato slurry wafers that come in a can. But even those usually manage to have a few broken ones.

On the other hand, no one complains about the extra space in their box of fusilli — that would be silly. But seriously, successfully shipping fragile foods requires either flat packing or a lot of extra space, especially if that food comes in a myriad of fun 3D shapes like pasta does. Everybody knows that 3D pasta is superior to flat pasta because it holds sauces so much better. The pasta must be kept intact!

The great thing about pasta as a food is that it’s simple to make, and it’s more nutritious than potato chips. Because of these factors, pasta is often served in extreme situations to large groups of people, like soldiers and the involuntarily displaced. But storing large quantities of shapely pasta takes up quite a bit of space. And because of all that necessary air, much of the packaging goes to waste.

So what if you could keep your plethora of pasta in, say, a filing cabinet? A research team led by the Morphing Matter Lab at Carnegie Mellon University have created a way to make flat-pack pasta that springs to life after a few minutes in boiling water.

Continue reading “Flat-Pack Pasta: Like Ikea Furniture Without The Weird Wrench”

The Flat-Pack 3D Printed Model

For a hundred years or thereabouts, if you made something out of plastic, you used a mold. Your part would come out of the mold with sprues and flash that had to be removed. Somewhere along the way, someone realized you could use these sprues to hold parts in a frame, and a while later the plastic model was invented. Brilliant. Fast forward a few decades and you have 3D printing. There’s still plastic waste in 3D printing, but it’s in the form of wasteful supports. What if someone designed a 3D printable object like a flat-pack plastic model? That’s what you get when you make a Fully 3D-printable wind up car, just as [Brian Brocken] did. It’s his entry for the Hackaday Prize this year, and it prints out as completely flat parts that snap together into a 3D model.

This 3D model is a fairly standard wind-up car with a plastic spring, escapement, and gear train to drive the rear wheels. Mechanically, there’s nothing too interesting here apart from some nice gears and wheels designed in Fusion 360. Where this build gets serious is how everything is placed on the printer. Every part is contained in one of two frames, laid out to resemble the panels of parts in a traditional plastic model.

These frames, or sprue trees, or whatever we’re calling this technique in the land of 3D printing, form a system of supports that keep all the parts contained until this kit is ready to be assembled. It’s effectively a 3D printable gift card, flat packed for your convenience and ease of shipping. A great project, and one that proves there’s still some innovation left in the world of 3D printing.

Design And 3D Print Robots With Interactive Robogami

Internals of 3D printed “print and fold” robot. [Image source: MIT CSAIL]
Robot design traditionally separates the body geometry from the mechanics of the gait, but they both have a profound effect upon one another. What if you could play with both at once, and crank out useful prototypes cheaply using just about any old 3D printer? That’s where Interactive Robogami comes in. It’s a tool from MIT’s Computer Science and Artificial Intelligence Laboratory (CSAIL) that aims to let people design, simulate, and then build simple robots with a “3D print, then fold” approach. The idea behind the system is partly to take advantage of the rapid prototyping afforded by 3D printers, but mainly it’s to change how the design work is done.

To make a robot, the body geometry and limb design are all done and simulated in the Robogami tool, where different combinations can have a wild effect on locomotion. Once a design is chosen, the end result is a 3D printable flat pack which is then assembled into the final form with a power supply, Arduino, and servo motors.

A white paper is available online and a demonstration video is embedded below. It’s debatable whether these devices on their own qualify as “robots” since they have no sensors, but as a tool to quickly prototype robot body geometries and gaits it’s an excitingly clever idea.

Continue reading “Design And 3D Print Robots With Interactive Robogami”

Flat Pack Lamp

Flat Pack Elastic Band Lamp Is A Thing Of Beauty

[Matt] was looking for a project for his senior industrial design studio at Wentworth Institute of Technology. He ended up designing a clever lamp that can be flat packed. [Matt] started by drawing out designs on paper. He really liked the idea of combining curves with straight lines, but he wanted to translate his two-dimensional drawings into a three-dimensional shape.

zOz0ys6 - Imgur
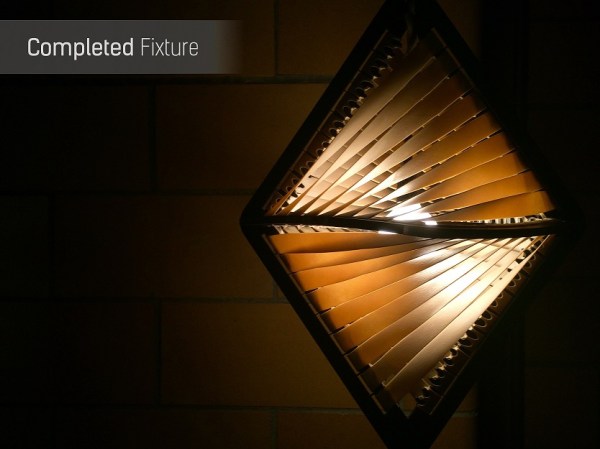
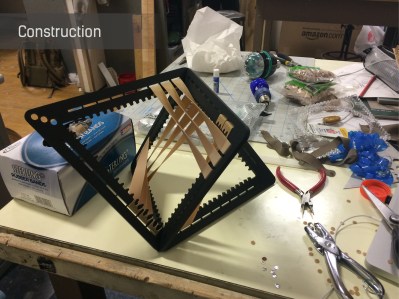
Having access to a laser cutter made the job much easier than it could have been and allowed [Matt] to go through many designs for the lamp frame. The two main pieces were cut from acrylic and include mounting pegs for the elastic bands. The two plastic pieces are designed to slot together, forming a sort of diamond shape.

The final version of the lamp required that the elastic bands had holes punched in them for mounting. The holes were placed over the small pegs to keep the bands in place. [Matt] used 3/4″ industrial elastic bands for this project. He then used a 120V 15W candelabra light bulb to illuminate the lamp. The final design is not only beautiful, but it can be flat packed and manufactured inexpensively.

If you want more inspiration for artistically designed lamps check out this one that uses the corrugation in cardboards as a shade pattern.

[via reddit]