Track Those Leftovers With This Little Timer

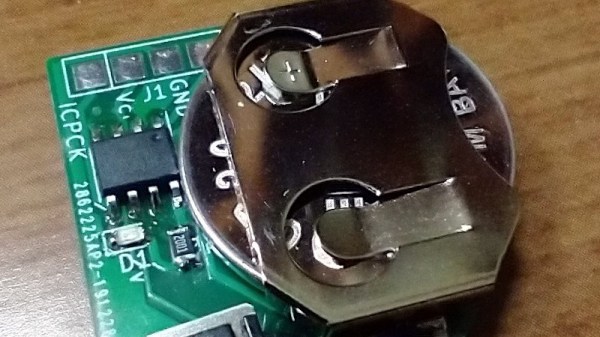
We’ve all at some point in our lives opened the fridge door and immediately wished we hadn’t. A miasma of stench envelops us as we discover that last Saturday’s leftovers have been forgotten, and have gone off. If only we had some way to keep track of such things, to avoid such a stench-laden moment. Step forward [ThinkLearnDo], with a little timer designed for exactly that purpose.

The operation is simple enough, press the button and place the unit on top of the container with the leftovers in it. If you haven’t eaten the leftovers within a week, the LED will start blinking. The blink is a subtle reminder to deal with the old food before it becomes a problem.

Onboard is a Holtek HT68F001 microcontroller with a coin cell for power, not much else is needed. The Holtek is an unusual choice, one of several brands of super-inexpensive Chinese microcontrollers we see less commonly than ATmegas and STM32s. This is exactly the place where such a minimal computer fits perfectly:  a way to add a little bit of smarts to a very cheap item with minimal strain on the BoM.

If these chips interest you, a while back we covered a run-down of the different families including the Holtek and the famous 3-cent Padauk chips.

All-In-One Automated Plant Care

Caring for a few plants, or even an entire farm, can be quite a rewarding experience. Watching something grow under and then (optionally) produce food is a great hobby or career, but it can end up being complicated. Thanks to modern technology we can get a considerable amount of help growing plants, even if it’s just one plant in a single pot.

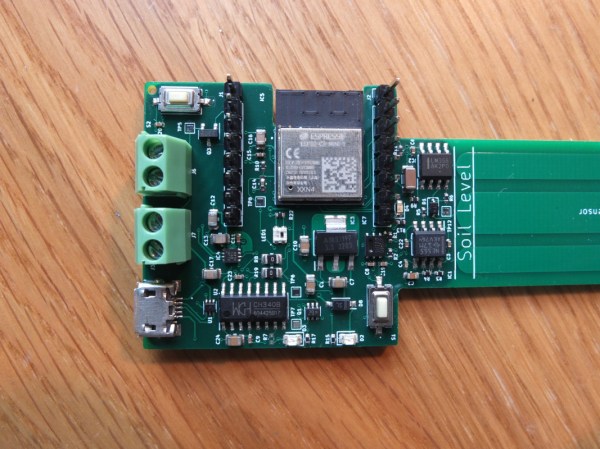
Plant Bot from [YJ] takes what would normally be a wide array of sensors and controllers and combines them all into a single device. To start, there is a moisture sensor integrated into the housing so that when the entire device is placed in soil it’s instantly ready to gather moisture data. Plant Bot also has the capability to control LED lighting if the plant is indoors.  It can control the water supply to the plant, and it can also communicate information over WiFi or Bluetooth.

The entire build is based around an ESP32 which is integrated into the PCB along with all of the other sensors and components needed to monitor a single plant. Plant Bot is an excellent all-in-one solution for caring for a plant automatically. If you need to take care of more than one at a time take a look at this fully automated hydroponic mini-farm.

Hackaday Links Column Banner

Hackaday Links: May 1, 2022

We start this week with news from Mars, because, let’s face it, the news from this planet isn’t all that much fun lately. But a couple of milestones were reached on the Red Planet, the first being the arrival of Perseverance at the ancient river delta it was sent there to explore. The rover certainly took the scenic route to get there, having covered 10.6 km over the last 424 sols to move to a position only about 3.5 km straight-line distance from where it landed. Granted, a lot of that extra driving was in support of the unexpectedly successful Ingenuity demonstration, plus taking time for a lot of pit stops along the way at interesting features. But the rover is now in place to examine sedimentary rocks most likely to harbor the fossil remains of ancient aquatic life — as opposed to the mainly igneous rocks it has studied along the crater floor so far. We’re looking forward to seeing what happens.

Continue reading “Hackaday Links: May 1, 2022”

A lock picking robot

This 3D Printed Robot Can Actually Pick Locks

Lockpicking is more of an art than a science: it’s probably 10% knowledge and 90% feeling. Only practice will teach you how much torque to apply to the cylinder, how to sense when you’ve pushed a pin far enough, or what it feels like when a pin springs back. Surely a robot would never be able to replicate such a delicate process, wouldn’t it?

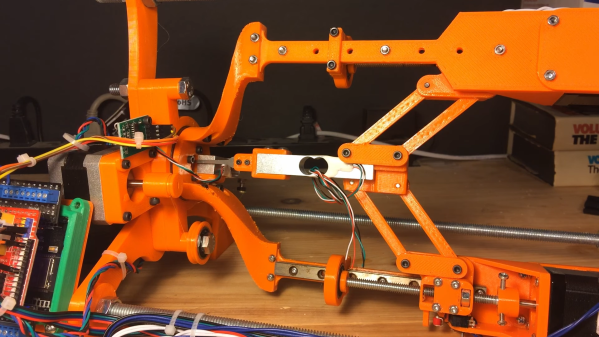
Well, not according to [Lance] over at [Sparks and Code], who thought that building a lock picking robot would be an interesting challenge. He started out with a frame to hold a padlock and a servo motor to apply torque. A load cell measures the amount of force applied. This helps to keep the lock under a constant amount of tension as each pin is picked in succession. Although slow, this method seemed to work when moving the pick manually.

The difficult part was automating the pick movement. [Lance] built a clever system driven by two motors that would keep the pick perfectly straight while moving it horizontally and vertically. This was hard enough to get working correctly, but after adding a few additional clamps to remove wobble in the leadscrew, the robot was able to start picking. A second load cell inside the pick arm would detect the amount of force on each pin and work its way across the lock, pin by pin.

At least, that was the idea: as it turned out, simply dragging the pick across all pins in one go was enough to open the lock. A much simpler design could have achieved that, but no matter: designing a robot for all these intricate motions was a great learning experience anyway. It also gave [Lance] a good platform to start working on a more advanced robot that can pick higher-quality locks in which the dragging technique doesn’t work.

We haven’t come across lockpicking robots before; perhaps the closest equivalent would be this 3D-printed Snap Gun. If you’re interested in all aspects of locks and how to apply them, check out our Physical Security Hack Chat with Deviant Ollam.

Continue reading “This 3D Printed Robot Can Actually Pick Locks”

How To Hide A Photo In A Photo

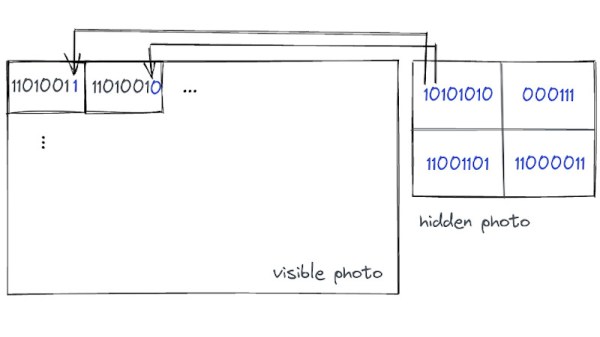
If you’ve ever read up on the basics of cryptography, you’ll be aware of steganography, the practice of hiding something inside something else. It’s a process that works with digital photographs and is the subject of an article by [Aryan Ebrahimpour]. It describes the process at a high level that’s easy to understand for non-maths-wizards. We’re sure Hackaday readers have plenty of their own ideas after reading it.

The process relies on the eye’s inability to see small changes at the LSB level to each pixel. In short, small changes in colour or brightness across an image are imperceptible to the naked eye but readable from the raw file with no problems. Thus the bits of a smaller bitmap can be placed in the LSB of each byte in a larger one, and the viewer is none the wiser.

We’re guessing that the increased noise in the image data would be detectable through mathematical analysis, but this should be enough to provide some fun. If you’d like a closer look, there’s even some code to play with. Meanwhile as we’re on the topic, this isn’t the first time Hackaday have touched on steganography.

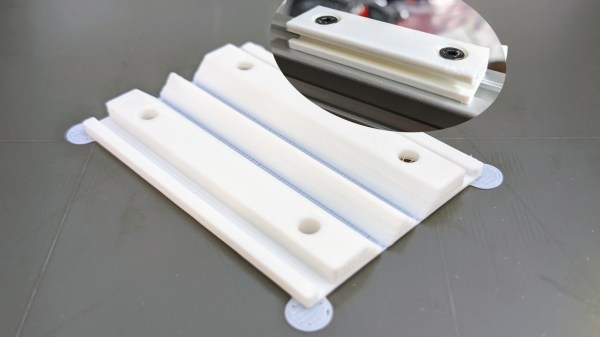
The eurorack rail piece, just printed in white plastic, not yet folded, with a folded example in the upper right corner

Bend Your Prints To Eliminate Supports

When designing even a reasonably simple 3D-printable part, you need to account for all the supports it will require to print well. Strategic offsetting, chamfering, and filleting are firmly in our toolkits. Over time we’ve learned to dial our settings in so that, hopefully, we don’t have to fumble around with a xacto knife after the bed has cooled down. On Twitter, Chris shows off his foldable 3D print experiments (nitter) that work around the support problem by printing the part as a single piece able to fold into a block as soon as you pop it off the bed.

The main components of this trick seem to be the shape of the place where the print will fold, and the alignment of bottom layer lines perpendicular to the direction of the fold lines. [Chris] shows a cross-section of his FreeCad design, sharing the dimensions he has found to work best.

Of course, this is Twitter, so other hackers are making suggestions to improve the design — like this sketch of a captive wedge likely to improve alignment. As for layer line direction alignment, [Chris] admits to winging it by rotating the part in the slicer until the layer lines are oriented just right. People have been experimenting with this for some time now, and tricks like these are always a welcome addition to our toolkits. You might be wondering – what kinds of projects are such hinges useful for?
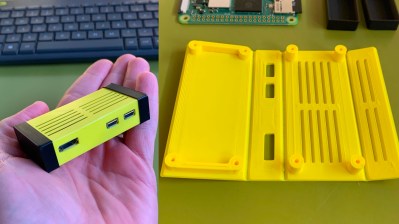
The example Chris provides is a Eurorack rail segment — due to the kind of overhangs required, you’d be inclined to print it vertically, taking a hit to the print time and introducing structural weaknesses. With this trick, you absolutely don’t have to! You can also go way further and 3D print a single-piece foldable Raspberry Pi Zero case, available on Printables, with only two extra endcaps somewhat required to hold it together.

Foldable 3D prints aren’t new, though we typically see them done with print-in-place hinges that are technically separate pieces. This trick is a radical solution to avoiding supports and any piece separation altogether. In laser cutting, we’ve known about similar techniques for a while, called a “living hinge”, but we generally haven’t extended this technique into 3D printing, save for a few manufacturing-grade techniques. Hinges like these aren’t generally meant to bend many times before they break. It’s possible to work around that, too — last time we talked about this, it was an extensive journey that combined plastic and fabric to produce incredibly small 3D printed robots!

We thank [Chaos] for sharing this with us!

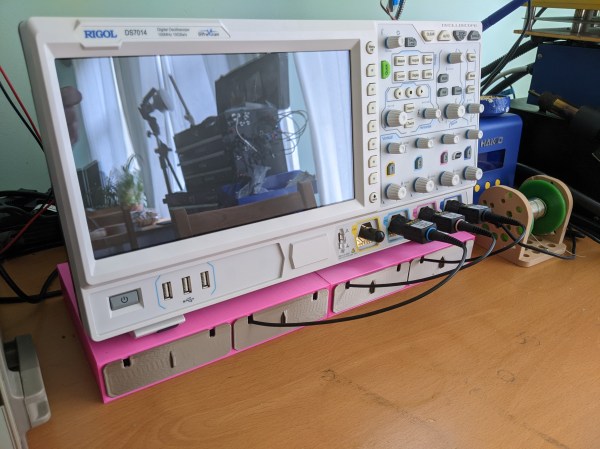
An oscilloscope with its probes stored in drawers below it

Clever Scope Probe Drawers Keep Your Workbench Tidy

Probes are an essential component of a good oscilloscope system, but they have the nasty habit of cluttering up your workbench. If you have a four-channel scope, it’s not just several meters of cable that get in the way everywhere, but also four sets of all those little clips, springs, cable markers, and adjustment screwdrivers that need to be stored safely.

[Matt Mets] came up with a clever solution to this problem: a 3D printed cable organizer that neatly fits below your scope. It has four drawers, each of which has enough space to store a complete probe and a little compartment for all its accessories. A cable cutout at the front allows you to keep the probes plugged in even when they’re not in use.

It’s a beautifully simple solution to a common problem, and with the STL files available on Printables anyone with a cluttered workbench can build one for themselves. If, however, you’d like to keep those probes even closer at hand, have a look at these probe caddies. Continue reading “Clever Scope Probe Drawers Keep Your Workbench Tidy”