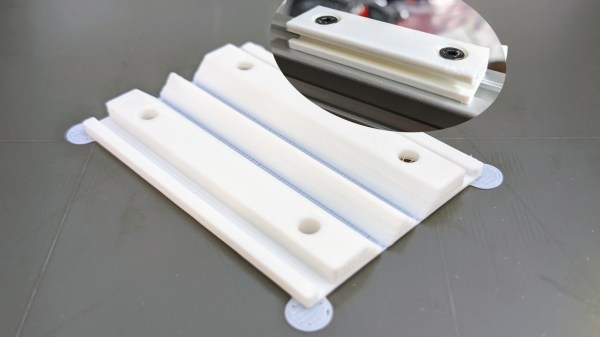
The eurorack rail piece, just printed in white plastic, not yet folded, with a folded example in the upper right corner

Bend Your Prints To Eliminate Supports

When designing even a reasonably simple 3D-printable part, you need to account for all the supports it will require to print well. Strategic offsetting, chamfering, and filleting are firmly in our toolkits. Over time we’ve learned to dial our settings in so that, hopefully, we don’t have to fumble around with a xacto knife after the bed has cooled down. On Twitter, Chris shows off his foldable 3D print experiments (nitter) that work around the support problem by printing the part as a single piece able to fold into a block as soon as you pop it off the bed.

The main components of this trick seem to be the shape of the place where the print will fold, and the alignment of bottom layer lines perpendicular to the direction of the fold lines. [Chris] shows a cross-section of his FreeCad design, sharing the dimensions he has found to work best.

Of course, this is Twitter, so other hackers are making suggestions to improve the design — like this sketch of a captive wedge likely to improve alignment. As for layer line direction alignment, [Chris] admits to winging it by rotating the part in the slicer until the layer lines are oriented just right. People have been experimenting with this for some time now, and tricks like these are always a welcome addition to our toolkits. You might be wondering – what kinds of projects are such hinges useful for?
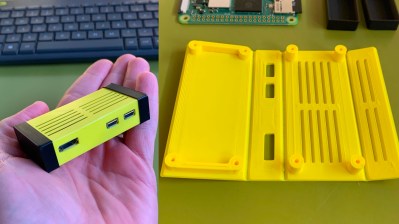
The example Chris provides is a Eurorack rail segment — due to the kind of overhangs required, you’d be inclined to print it vertically, taking a hit to the print time and introducing structural weaknesses. With this trick, you absolutely don’t have to! You can also go way further and 3D print a single-piece foldable Raspberry Pi Zero case, available on Printables, with only two extra endcaps somewhat required to hold it together.

Foldable 3D prints aren’t new, though we typically see them done with print-in-place hinges that are technically separate pieces. This trick is a radical solution to avoiding supports and any piece separation altogether. In laser cutting, we’ve known about similar techniques for a while, called a “living hinge”, but we generally haven’t extended this technique into 3D printing, save for a few manufacturing-grade techniques. Hinges like these aren’t generally meant to bend many times before they break. It’s possible to work around that, too — last time we talked about this, it was an extensive journey that combined plastic and fabric to produce incredibly small 3D printed robots!

We thank [Chaos] for sharing this with us!

Retro Portable Computer Packs Printer For The Trip

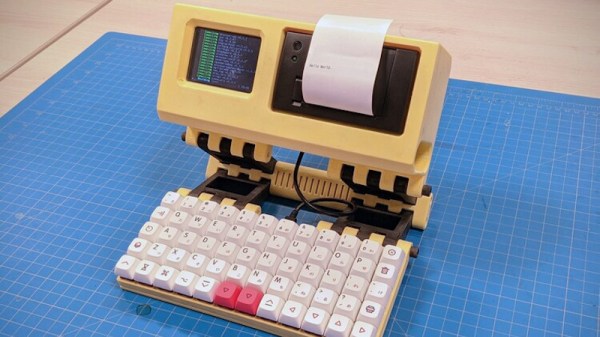
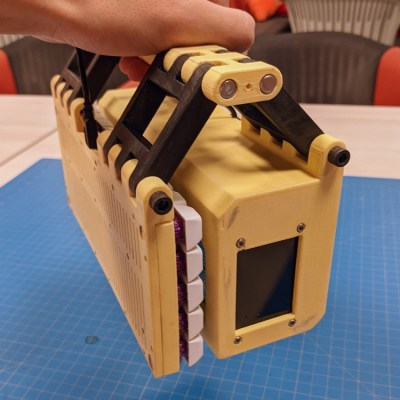
Looking like it dropped out of an alternate reality version of the 1980s, the Joopyter Personal Terminal is a 3D printed portable computer that includes everything you need for life in the retro-futuristic fastlane: a mechanical keyboard, a thermal printer, and the obligatory tiny offset screen. It’s a true mobile machine too, thanks to it’s onboard battery and a clever hinge design that lets you fold the whole thing up into something akin to a PLA handbag. You won’t want to leave home without it.

This gorgeous machine comes our way from [Gian], and while the design isn’t exactly open source, there’s enough information in the GitHub repository that you could certainly put together something similar if you were so inclined. While they might not serve as documentation in the traditional sense, we do love the faux vintage advertisements that have been included.

The upper section of the Joopyter holds a Raspberry Pi Zero W (though the new Pi Zero 2 would be a welcome drop-in upgrade), an Adafruit PiTFT 2.8″ display, a CSN-A2 panel mount thermal printer, and a Anker PowerCore 15600 battery to keep it all running. On the opposite side of the hinge is a hand wired keyboard powered by a Raspberry Pi Pico running KMK.

Speaking of that printed hinge, [Gian] says it comes on loan from [YARH.IO], which Hackaday readers may recall have produced a number of very slick 3D printed portable Linux machines powered by the Raspberry Pi over the last couple of years.

Continue reading “Retro Portable Computer Packs Printer For The Trip”

Conductive Origami Lights Up Your Life

It’s taken mobile phone developers years to develop electric circuits and displays that can fold. Finally he first few have come to market — with mixed reviews and questionable utility at best. For all that R&D, there are a lot of other cases where folding circuitry might have been more useful than it seems these handsets have been. One of those is conductive origami, which in this case allows for light fixtures that turn themselves on as they are unfolded.

This conductive origami is produced by [Yael Akirav] using a 3D printer to deposit the conductive material onto fabric. From there, the light fixture can be unfolded into its final position and turned on. This isn’t just a decorative curiosity though, the design of the folding material actually incorporates the ability to turn itself on as it is unfolded. One device brightens itself as it is slowly unfolded.

This is an interesting take on foldable circuits in general, especially with some of the functionality incorporated into the physical shape of the material. We’ve seen conductive elements embroidered into fabric before, but this takes it to a new level. Surely there are more applications for a device like this that we will see in the future as well.

Thanks to [t42] for the tip!

Design And 3D Print Robots With Interactive Robogami

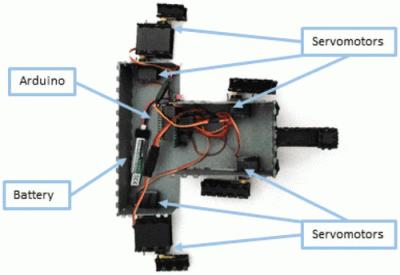
Internals of 3D printed “print and fold” robot. [Image source: MIT CSAIL]
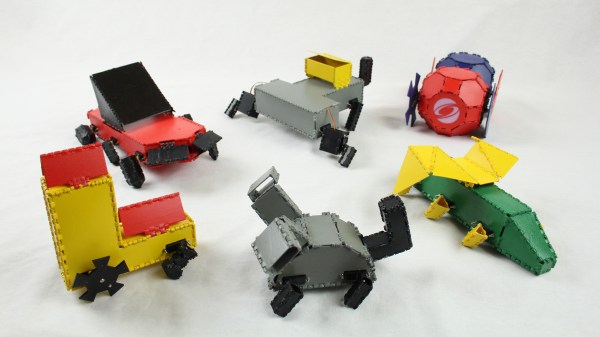
Robot design traditionally separates the body geometry from the mechanics of the gait, but they both have a profound effect upon one another. What if you could play with both at once, and crank out useful prototypes cheaply using just about any old 3D printer? That’s where Interactive Robogami comes in. It’s a tool from MIT’s Computer Science and Artificial Intelligence Laboratory (CSAIL) that aims to let people design, simulate, and then build simple robots with a “3D print, then fold” approach. The idea behind the system is partly to take advantage of the rapid prototyping afforded by 3D printers, but mainly it’s to change how the design work is done.

To make a robot, the body geometry and limb design are all done and simulated in the Robogami tool, where different combinations can have a wild effect on locomotion. Once a design is chosen, the end result is a 3D printable flat pack which is then assembled into the final form with a power supply, Arduino, and servo motors.

A white paper is available online and a demonstration video is embedded below. It’s debatable whether these devices on their own qualify as “robots” since they have no sensors, but as a tool to quickly prototype robot body geometries and gaits it’s an excitingly clever idea.

Continue reading “Design And 3D Print Robots With Interactive Robogami”

Foldable Dymaxion Globe

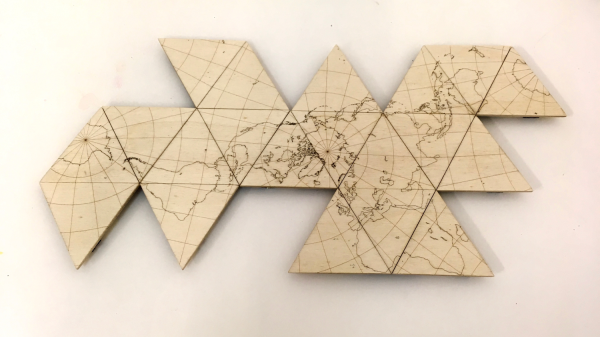
Some time back, we posted about [Gavin]’s laser-cut/3D printed Dymaxion Globe — if you haven’t read about it yet, you should check it out. [noniq] loved the idea, and like a true hacker, built and shared an improved Foldable Dymaxion Globe. It can snap together to form an icosahedron globe, or it can be laid flat to form a map.

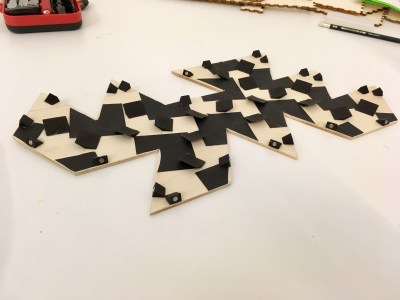
Duct tape, stoppers and magnet holders

Like the original, [noniq]’s version is laser cut and engraved, and uses some 3D printed parts. But it does away with the fasteners (that’s 60 pairs of nuts and bolts), and instead uses neodymium magnets to make all the triangle pieces snap together to form the icosahedron globe. The hinges are simply some pieces of gaffer-tape.

This design improvement creates a cleaner globe and also addresses some of the concerns posted in the comments of the earlier build. The design files are available for download on [noniq]’s blog — you need to 3D print some magnet holders and stopper plates, and laser cut the 20 triangle tiles. The stopper plates help ensure that the angle between tiles when it is put together is limited to 138 degrees, making it easier to assemble the globe.

Check out the video after the break to hear the satisfying “thunk” of neodymium magnets snapping together.

Continue reading “Foldable Dymaxion Globe”

Be A Hero At Your Next Hackathon With A Foldable CNC

Be the hero at your next hackathon with this foldable cnc. When the line for the laser cutter is four teams deep, you’ll come out ahead. It might even be accurate enough to pop out a quick circuit board. Though, [wwwektor] just wanted a CNC that could be taken from storage and unfolded when needed. Sit it on a kitchen table and cut out some ornaments, or hang it from the front door to engrave the house’s address. Who needs injection molded chrome plated numbers anyway?

It’s based around tubular ways, much like other 3D printed CNCs we’ve covered. The design’s portable nature gives it an inherently unstable design. However, given the design goals, this is reasonable. It uses timing belts, steppers, and ball bearings for its movement. The way the frame sits on the table it should deal with most routing tasks without needing adjustment to stay in plane with the surface it’s set-on. As long as you don’t need square edges.

There’s a video of it in operation after the break. We love these forays into unique CNC designs. We never know what new idea we’ll see next.

Continue reading “Be A Hero At Your Next Hackathon With A Foldable CNC”

Foldable Quadrotor Is Origamilicious

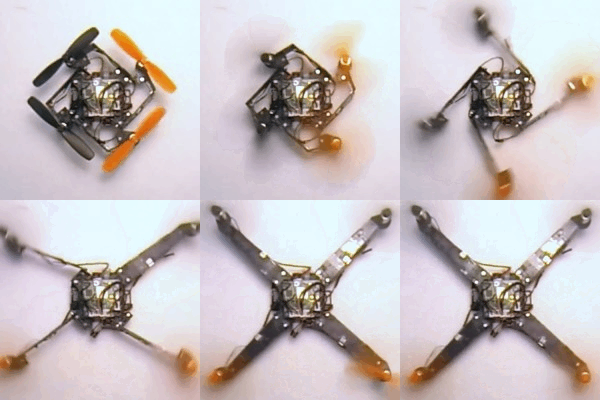
A team at the École Polytechnique Fédéral de Lausanne has developed and built a quadcopter with arms that unfold just before takeoff. The idea is that you can fold the device back up when you’re done with it, making it possible to store a bunch more of the quads in your backpack for instance.

The unfolding mechanism relies on the torque of the rotors spinning up to swing the arms into place. Once fully extended, a spring-loaded flap folds up, catches on some magnets, and forms an L-shaped structure that won’t re-fold without human intervention.

quadcopter_animUnder normal flying conditions, quads have a two left-handed propellers and two right-handed ones and the motors spin in opposite directions. In order to do the unfolding, two of the motors need to run essentially in reverse until the frame has clicked into place. They use a sensor (Hall effect?) to detect the arm locking, and then the rotors quickly switch back to their normal rotation before the quad hits the floor. In the video, they demonstrate that they’ve got this so well tuned that they can throw it up into the air to launch. Wow.

Everything’s still in prototype phase, and one of the next goals is “strengthening the arms so they can withstand crashes”, so don’t expect to see these in your local hobby store too soon. In the mean time, you’ll be able to see them in the flesh if you head up to the IEEE International Conference on Robotics and Automation in Seattle that started today and runs through Friday. If anyone goes, take more video and post in the comments?

Continue reading “Foldable Quadrotor Is Origamilicious”