Shadowed tool storage — where a tool outline shows at a glance what’s missing from storage — is a really smart way to keep your shop neat. They’re also super important for cases where a tool left behind could be a tragedy. Think, where’s-that-10-mm-socket-while-working-on-a-jet-engine? important. (It’s always the 10-mm socket.)
But just because shadow boards are smart, doesn’t mean they’re easy to make. That’s why [Scott Prince] came up with this semi-automated method for making toolbox shadow boards. The job of tracing around each tool on some sort of suitable material and cutting out the shapes seems straightforward, but the trick comes in organizing the outlines given the space available and the particular collection of tools.
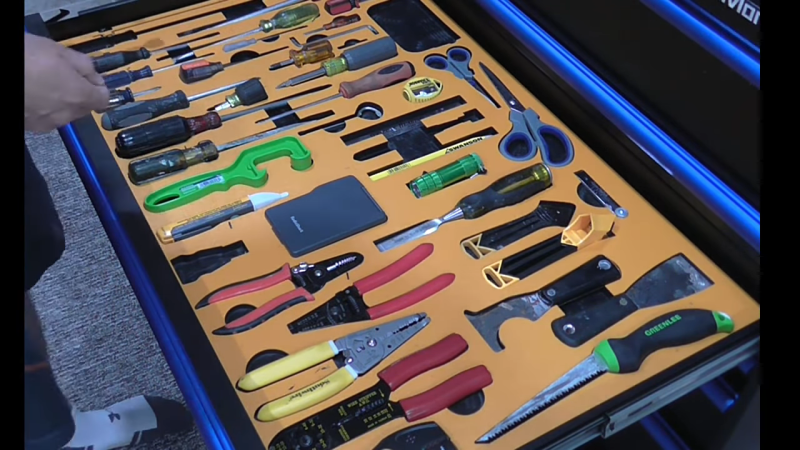
[Scott]’s method starts with capturing images of each individual tool. He used a PiCam and a lightbox housed, strangely enough, in a storage bench; we’d love to hear the full story behind that, but pretty much any digital camera would do for the job. After compensating for distortion with OpenCV, cropping the images, and turning the image into a vector outline of the tool, [Scott] was left with the task of putting the tools into logical groups and laying them out sensibly. After tweaking the tool outlines and adding finger cutouts for easy pickup, [Scott] put his CNC router to work. He chose to use a high-density polyethylene product made by his employer, which looks fantastic, but MDF would work fine too.
We have to admit to a fair degree of toolbox envy now that we’ve seen what shadow boards can do. We’re a bit torn, though — [Zach Friedman]’s Gridfinity storage system has a lot going for it, too.


Heh, you’ve reminded me I have to buy some more 10mm wrenches, I swear they have something like half-life time on them.
When you die, you will be reunited with all the 10mm sockets and wrenches you’ve lost in your life.
I’m surprised the 15 mm socket/wrench is not included with more sets.
My daughter’s bicycle uses those for the axles, and I’ve found a couple other instances as well.
That is when I realized I probably had only one 15 mm in all my tool boxes.
My suggestion from experience: leave a blank area for future expansion. Otherwise when you aquire just one more tool…
You need to acquire one more cabinet. That’s easy. And if the cabinet is too large, you’ll need to acquire one more garage. Until your garages are too large for your property, and you need to acquire a new land. That usually ends up by acquiring a new country, just because you have one extra screwdriver.
Now I see – that’s what happened to Putin.
You know me way too well for my comfort.
B^)
Long before the need for new land is the need for a new significant other.
As well as leaving some space around each tool so you can still cut out the space for THAT now broken/lost/’borrowed’ tool and still cut a new insert to fill the space that actually fits your replacement tool – they are never the same damn size or shape…
Which is why I think the Gridfinity type system is better, it can’t pack tools as tightly and neatly every time as its got the grid units forcing a certain feature size but its much more flexible as your tools and parts change.
That said I tend to just use cardboard, easy to cut, durable enough and very very cheap – only costs a tiny bit of woodglue (I prefer using PVA type glues to hot glue for it) and an afternoon playing with the knife and scissors, as nobody should ever actually have to buy cardboard…
That reminds me;
I used 2 different spark plug sockets on my Suzuki Sidekick.
One for removal, one for insertion, each did the particular action better than the other.
To fit more tools in same area, one can have them narrow side up in deeper pockets.
I am using Gridfinity these days.
For those interested: https://hackaday.com/2022/04/18/gridfinity-3d-printed-super-quick-tool-storage-and-retrieval/
Or for those who can’t use Google.
Or didn’t read the HaD post before commenting!
I scan my tools on a flatbed scanner, which when scanning as jpg gives me a fixed factor of 0.04237 to scale down after importing in qcad. Then it’s just a matter of tracing the outline.
Great minds think alike. Just be careful not to scratch the glass. Inkscape could do the outline tracing.
You could probably just lay the tools on a flatbed scanner to get their outlines.
While viable, scanning more than one tool becomes a chore. Im all for photographing these days, ene documents. You can even ocr and pfd them using a simple linux pipeline
I can’t decide if I am happy or sad that my tool chests are so full that tools have to sit on top of each other and this can’t work.
I have nowhere to put any more tool chests to correct this – I am at the point of seriously considering swapping a perfectly functional roll-cab full of lathe chucks and tools for a deeper one, just to get marginally more space for collets.
I do seem to have more collets than seems rational.
ER11 – Full set
ER16 – ”
ER20 – ” +
ER25 – ”
ER32 – ”
Tapping Chuck collets – partial set
Clarkson threaded – partial set
5C – Partial set
Deckel style for tool grinder – partial set
Burnerd Multi-size – More than a full set.
R8 – one collet and nothing to hold it in.
And, not collets, but 30+ BT30 and 30 INT toolholders some of which hold collets.
I have nowhere near enough collets, so if you want to loose a set…
Well, it seems that I don’t yet have enough, either. In that every time I need a collet the specific one that I need always appears to be already in use if I have it, or not available quickly if not.
Not available quickly implies you must have way way too many!! How else would it get so buried that you can’t find it…?
Seriously though know that feeling, its always the case that you don’t the perfect fixture or tooling for the job… Still that leads to some of the fun of machining, figuring out how to use what you have to get what you need, or making the tool to make the tool to make the part…
“hat leads to some of the fun of machining, figuring out how to use what you have to get what you need,”
(thumbs up!)
* lose
I’ve a surplus of polystyrene from insulating my garage. Have considered briefly hitting each tool with a blow torch and dropping it onto the polystyrene sheet, but I’m guessing any temperature which would melt the polystyrene would mess up the heat treatment…
It might also leave the tools permanently adhered to the foam, like Han Solo in carbonite.
What might work would be to arrange the tools in a wooden frame, lay cling-film (saran wrap?) on top and then cover in expanding foam. The hard part would be getting a goof, flat, back to the casting.
Maybe waterjet some open cell foam like in travel cases.
I really like this idea. Might actually have a try with this.
If you put the whole thing in a form, which would be really easily made from melamine or plywood then you could just slice the bottom flat with a knife or a wire. Once you’ve taken the form apart it would be re-usable. Could be a cheap and easy version.
The expanded polystyrene stuff I’ve played with really doesn’t like even a very low heat, should be low enough for there to be no harm to the heat treating. Though I suspect that will be very varied by the exact plastic blend and just how dense it is.
That said still seems like a bad idea, get your bodging prybar (large flat screwdriver) and just stab it heated up into the foam in the right places, but only if you don’t want to bother getting the guitar string and bench power supply out – hot wirecutter is very easy to make.
I particularly like how there’s a finger relief around a number of the more blunt objects, and none around most of the sharp objects.
I counted about 100 hand tools in front of me from tiny screwdrivers to electricians pliers. Yes I sometimes misplace a tool but a shadow of where it was is of no help to find where it is. I’d need a wall of space just for those 100 hand tools. But they are in an area of one square foot that swivels out or back out of the way, right at my right hand. High density vertical instead of spread out in 2D.
This tool storage method (first that I know of) was instigated after the Apolo1 fire when a pair of needle-nose pliers were found in the bay. Medical operations have their accounting which isn’t perfect, how many sponges?
I’m pretty sure you could arrange the tools manually and then sift plaster dust over them to get the outlines (or flour or whatever you have handy). Even if you are using CNC to cut the outlines, doing it this way and taking a photo compresses all that tracing into a single step.
As a retired mechanic, I see one fallacy. Horror of horrors a tool is lost. You will have to either modify the board to fit the new different tool, or find a tool exactly like it.
I’d call those Frenchfitted drawers and not a shadow board. The latter is more like a pegboard with tool outlines.
Would be nice if the Gridfinity article listed Alexandre Chappel work that Zach innovated from. Obviously you could play the inspiration following game forever though, I just think the link between the two is particularly strong and AC would benefit from more eye balls. AC has an interesting way of combining disciplines such as mixing woodwork and 3D printing together.
Zac respectfully and openly references it as his inspiration.
https://www.youtube.com/watch?v=OsLc76k4KeM&t=4s&ab_channel=AlexandreChappel
A tip for a shadowboard which I loved that I should pass on.
Hang your tools on the pegboard in their correct places. Spray a bit of hot pink spray paint over them. You don’t need much paint.
This gives you silhouettes of your tools, so you know if a tool is missing. But more importantly, a hot pink tool is easier for you to find if you set it down somewhere… or your friend “accidentally” borrows the tool.