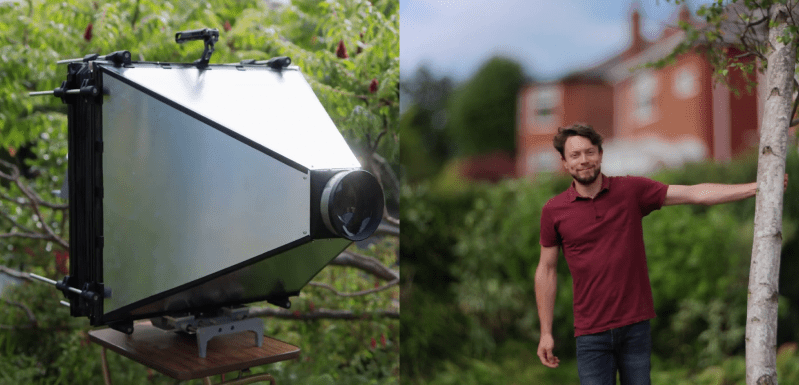
Bokeh is a photography term that’s a bit difficult to define but is basically soft, aesthetically pleasing background blur, often used to make a subject stand out. Also called “background separation” or “subject isolation”, achieving it optically requires a fast lens with an aperture below 2.8 or preferably lower. These lenses can get very expensive, but in the video after the break [Matt] from [DIY Perks] blows all the commercially available options out of the water. Using an old episcope projector, he built a photography rig with background separation equivalent to that of a non-existent 35mm f0.4 lens.
Unlike most conventional projectors used to project a prerecorded image, episcopes were used to project an image of physical objects, like books. To use this lens directly in a camera is impossible, due to the size of the imaging circle projected out the back of the lens. At a diameter of 500mm, there is simply no imaging sensor available to capture it. Instead, [Matt] built a projection screen for the image and photographed it from the opposite side with a normal camera.
The projection screen was made by sandwiching a sheet of diffuser film between two sheets of clear acrylic held in a frame of aluminum extrusions. To block out all other light, [Matt] added aluminum shrouds on either side of the screen, which also serves to mount the lens and a camera. The shroud on the lens’ side is mounted on a separate aluminum frame, enabling the image to be focused by adjusting the distance between the screen and lens. Linear rods and bearings on 3D printed mounts allow smooth motion, while a motor-driven lead screw connected to a wired remote does the actual adjustment. The gap between the two halves was covered with bellows made from black paper.
Initially, the projected image was very dark around the periphery, so [Matt] added Fresnel lenses on either side of the screen. This straightens out the light rays coming from the episcope lens before it hits the screen, and focuses it back into the lens of the camera, almost eliminating the vignetting. He used a very similar solution in his DIY 4K projector project.
The result looks almost dream-like, with softly blurred background and foreground while keeping the subject sharply in focus. Even though [Matt] is photographing a projected image inside the rig, it’s impossible to tell. This has the added advantage of allowing the use any camera, including a smartphone.
The [DIY Perks] builds have a tendency to put even high-end commercial projects to shame, like his slimmed down PS5, or a custom internal heatsink for a DSLR camera to keep it cool while filming at 8K.


It also depends on the focal length. An aperture of 5.6 may be quite enough for a 300 mm (full-frame) lens.
It’s a bit complicated, but you can somewhat get an estimate by multiplying the numerical aperture by the focal length. For long focal lengths (100+mm), aperture of 45+ mm can be considered as giving good background separation. For shorter focal lengths, smaller apertures are usually needed to achieve this effect.
I recently found a 70s gem – Vivitar Series 1 200mm f/3.0. Very little can be found about it on the net. Perfect for portraits.
Actually it depends first and foremost on the focus distance and the distance between the subject and the background. It is easily possible to get a blurry background even with a 20mm lens at f/16 if the subject is too close and the background too far away. And you can e.g. get a good bokeh for a portrait shot with a 50/4 lens just by having the subject take a couple morr steps away from the background.
Fast lenses help, but can also be easily counter-productive because of the shallow depth of field. I hardly ever go below f/2.2 on portrait shots because the nose and ears are otherwise alredy blurry if the focus is on the eyes. For the same reason I’m basically always above f/10 with my 105/2.8 macro lens…
f/5.6 is enough for long lenses, yes. I’ve taken lots of wildlife pictures with nice Bokeh with my Nikon 200-500/5.6 FF lens.
With such a shallow range of focus, now he needs to add a two axis tilt mount to the lens to get the focal plane to line up with things that are not perpendicular to the lens. That’s actually the original point of the tilt & shift camera – not just making real things look like they’re miniature models.
Tilt and shift wasn’t mentioned once in the article or video.
That’s right, which is why I did.
I wouldn’t qualify that as bokeh, just out of focus blur, a nice one though.
Yeah, “out of focus blur” is what bokeh techinally is. Those nice circles on lights in background are just for artistic purposes.
Those nice circles in background are technically circles of confusion, which is what causes background blur. So it is not artistic purpose. You cannot get background blur without light balls.
“You cannot get background blur without light balls.”
You can by controlling anodization at the lens aperture. That’s how the STF series lenses achieve background blur without circles/donuts/onion-rings/other aperture image artefacts.
Sorry to disturb your triangles, but what that essentially does is a different method of bokeh compensation by adding the gradient aperture.
If you have neutral compensation, you get a simple perfect filled circle. Decompensated lens has brighter rim around the circle or even more intrusive effects (maybe has to do with Fresnel zones?). Overcompensated like the STF result in soft circle which falls off when going from the centre.
Also, the STF method only works properly when the aperture is wide open. When it’s not, the gradient aperture shows abrupt change between the classic aperture and the grafient one. Which also means that at some apertures, you might get the soft circle which at some point abruptly ends and may not leak that great. Which is also why you are unlikely to find many pictures taken with the STF lens shot at any other aperture than thenlargest possible.
You can’t get OPTICAL background blur without circles. The defining feature of “bokeh for masses” are circles with sharp edges. Compare that to any other kind of blur, where you have blurred edges. And typically “selfies with bokeh” are made with dark backgrounds with some lights like car headlights in far plane. I’m speaking this all from a layperson position (what typical point&shoot user thinks), not from a professional position. I know how to program simulation of bokeh and various blurs in several programming languages ;).
Impressive build and impressive result.
Wow, the only lens coming close to this that I can think of in terms of background separation is the Canon 200mm F1.8.
Search for: Carl Zeiss Planar 50mm f/0.7
This lens was made for NASA and used by Stanley Kubrick for his movie “Barry Lyndon”
There seems to be a misunderstanding of terms here.
What the is being described here is depth of field rather than bokeh, though the two are closely related to each other.
Depth of field is what gives the separation, it’s defined by how much can still be described as sharp either side of the hyperfocal (point of maximum focus), and is affected by the focal length of the lens and the apeture.
Bokeh is the effect of the lens on what happens to the image as it goes out of focus. It is affected by the quality and build of the lens, but also more importantly the shape of the iris and how many leaves it has. As a result of it being a part of the iris, aperture also effects bokeh.
A good example of what bokeh actually is, consider a fairy light or other small point source of light out of focus in the background. Depending on the construction of the iris and lens this may appear as a hexagon or an octogon (number of leaves in the iris) or even a perfect circle, and it is this which defines bokeh. In essence it is not the going out of focus, but rather the manner in which a lens goes out of focus.
The upshot of this is you could have 2 lenses of the same focal length and take the same photo at the same aperture and while the depth of feild and thus background separation may be very similar the athetic could be very different and one may be more pleasing than the other.
Also, the bokeh gradually changes with some other parameters – how far an object is from you (due to some compensations, projection of a point may change with distance), where it is in image (many lenses flatten the light circles, sometimes even causing the light ball to intersect itself and escape in extreme cases, some cut off part of the light circle due to the front piece of the lens being too small compared to the aperture), focal length and focusing distance (old zoom lenses may behave strangely, old prime lenses change focal length when focusing), bokeh compensation (is it perfect filled circle? is its border lighter/darker? Is there any chromatic aberrations?). And many other variables.
“Bokeh” is merely a qualitative description of the ‘quality’ of the defocussed portions of the image (effectively, the point-spread-function for that particular focal distance and at that point on the image plane). It is an entirely subjective measure: some may desire ‘smooth Bokeh’ where the defocus blur’s PSF has uniform radial falloff and the PSF is uniform across the image plane. Some may desire ‘swirly Bokeh’, where the PSF is highly anisotropic across the image (progressively ‘narrower’ towards the edges in the tangential plane but not in the sagittal) Some may desire ‘Petzval Bokeh’, where the PSF is not only anisotropic across the image but also has a sharp falloff or even a radial peak.
Point sources like fairly lights make the instantaneous PSF at that point in the image plane visible, but that same PSF is applied to ALL of the out of focus areas of the image, not just to point sources. This is who some lenses will have ‘busy’ out of focus areas in front of or behind (or both) a subject whilst other will not, even when the depth of field is identical. It’s the reason why the Nikon DC (Defocus Control) lenses exist: they allow you to modify the PSF by introducing spherical aberration to the image in a controllable manner, to create the most pleasing out of focus effect in front of or behind the subject (but not both at the same time, as no apodisation is involved)
You cannot have ‘bokeh’ without defocus blurring, and depth of field gives you a quantitive measure of the amount of defocus blurring in a given scene. Bokeh is just a way to talk about the PSF behavior for those who do not know what the optics are actually doing in terms of signal theory, but can recognise “lens X looks nicer in the blurry bits than lens Y”
The results are great, it looks like a green screen or a photomontage.
If you want one, these are normally listed as ” ROSS PROJECTOR 17′ 432mm No2354 Epidiascope lens” Also called “Telecentric”. One is on ebay now.
https://www.ebay.com/itm/274984878021?hash=item4006603fc5:g:4~AAAOSw7MNef4LK
The most impressive part is how clean the image of the captured ‘ground glass’ (neither ground nor glass) is. Most implementations of this shoot-the-focal-plane-by-proxy technique (including commercial focal converters for Super-32 cameras, predating digital imaging) introduce significantly more grain to the image. Avoiding fringing and contrast loss from the fresnels is also imrpessive.
For those who remember the days of lumenlabs and diy projectors, the 18” lenses from Beseler opaque projectors were used with fresnel lenses in almost identical manner to make pretty good long throw diy projectors, I made one too..still have it somewhere