Ultimate Bokeh With A Projector Lens

Bokeh is a photography term that’s a bit difficult to define but is basically soft, aesthetically pleasing background blur, often used to make a subject stand out. Also called “background separation” or “subject isolation”, achieving it optically requires a fast lens with an aperture below 2.8 or preferably lower. These lenses can get very expensive, but in the video after the break [Matt] from [DIY Perks] blows all the commercially available options out of the water. Using an old episcope projector, he built a photography rig with background separation equivalent to that of a non-existent 35mm f0.4 lens.

Unlike most conventional projectors used to project a prerecorded image, episcopes were used to project an image of physical objects, like books. To use this lens directly in a camera is impossible, due to the size of the imaging circle projected out the back of the lens. At a diameter of 500mm, there is simply no imaging sensor available to capture it. Instead, [Matt] built a projection screen for the image and photographed it from the opposite side with a normal camera.

The projection screen was made by sandwiching a sheet of diffuser film between two sheets of clear acrylic held in a frame of aluminum extrusions. To block out all other light, [Matt] added aluminum shrouds on either side of the screen, which also serves to mount the lens and a camera. The shroud on the lens’ side is mounted on a separate aluminum frame, enabling the image to be focused by adjusting the distance between the screen and lens. Linear rods and bearings on 3D printed mounts allow smooth motion, while a motor-driven lead screw connected to a wired remote does the actual adjustment. The gap between the two halves was covered with bellows made from black paper. Continue reading “Ultimate Bokeh With A Projector Lens”

Ham Radio Hacking: Thinking Inside The Box

There are two ways to deal with improving ham radio receivers, or — for that matter — any sort of receiver. You can filter and modify the radio frequency including the radio’s intermediate frequency, or you can alter the audio frequency output. Historically, RF and IF techniques have been the most valued because rejecting unwanted noise and signals early allows the rest of the radio to focus on the actual signal of interest. However, audio filters are much easier to work with and until recently, DSPs that could handle RF frequencies were expensive and uncommon. However, [watersstanton] shows us how to make what could be the cheapest audio enhancer ever. It is little more than a modified cardboard box, and you can see and hear the result in the video below.

On the one hand, you shouldn’t expect miracles. On the other hand, you probably have box laying around and can try it in the next three minutes so why not give it a go? You can hear a bit of difference when using the box and not using the box.

Continue reading “Ham Radio Hacking: Thinking Inside The Box”

Tablet ina 3D printed stand, showing timetables on its screen

Revive Your Old E-Ink Tablet For Timetable Helper Duty

In our drawers, there’s gonna be quite a few old devices that we’ve forgotten about, and perhaps we ought to make them work for us instead. [Jonatron] found a Nook Simple Touch in his drawer – with its E-ink screen, wireless connectivity and a workable Android version, this e-reader from 2011 has the guts for always-on display duty. Sadly, the soft touch covering on the back disintegrated into a sticky mess, as soft touch does, the LiIon battery has gone flat, and the software support’s lackluster. Both of these are likely to happen for a lot of tablets, which is why we’re happy [Jonatron] has shared his story about this e-reader’s revival.

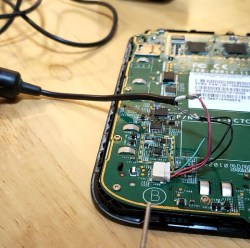
The tablet in question with back cover removed, battery wires connected to a USB cable for powerThe soft touch layer on the back didn’t go away with help of alcohol, but by sheer luck, an acetone bottle was nearby, and an acetone scrub helped get rid of the unpleasant stickiness. The tablet’s charging circuitry turned out to be unsophisticated – the tablet wouldn’t boot from MicroUSB input, and [Jonathan] wired up 5 volts from a USB cable straight into the battery input. Mind you, this might not be advised, as Lithium-Ion battery range is from 3 volts to 4.2 volts and a regulator would be called for, but [Jonatron] says it’s been working just fine.

Usually, you could just put a webserver on your local network and serve a page with useful information, adding code to refresh the page periodically – but the Nook’s browser didn’t support automatic refreshes. Not to be stopped, [Jonatron] wrote an app for the Nook’s Android install instead; rooting was required but went seamlessly. The Android install is old, and Android Studio for it is no longer downloadable, so he used an older development toolkit somehow still available online. There’s still a small Python-written webserver running on a spare Pi, conditioning the data for the app to fetch. Following best hacker traditions, both the app and the server are open-sourced! With help of a 3D printed stand, this tablet now displays train departure schedules – perfect application for an old e-reader like this.

Got a Nook Simple Touch in a drawer? Now you know you can easily convert it into a hackable E-ink display! We’ve seen numerous tablet restorations before, replacing charger ICs and eMMC drives, turning them into videophones to chat with our relatives and smart home controllers, and there’s even repair databases to help you in your revival efforts. We’ve been getting quite a few projects like these in our last Hackaday Prize installment, Hack It Back, and we hope to see more such rebuilds for our Wildcard round!

RC Lawnmower Is Built To Last

Mowing the lawn is one of those tasks that someone will always be optimizing or automating. To allow him to mow the lawn while seated comfortably in the shade, [Workshop from Scratch] built an RC Lawnmower in his signature solid steel frame style.

The chassis consists of a heavy welded steel frame from square tubing, with a pair of knobbly go-kart wheels on the back and large caster wheels on the front. The actual grass-cutting part is a 173cc petrol lawnmower engine with a steel hull, mounted on an articulating subframe which can be remotely raised and lowered using a linear actuator. The rear wheels are attached to a pair of custom sprocket hubs, driven via chain by two 200 W geared DC motors to allow skid steering.

The motors and electronics are powered by a set of 18 Ah lead-acid batteries wired in parallel. The petrol engine can also charge the batteries, but its current isn’t enough to keep up while mowing. However, it does help to extend the range. All the electronics are housed in a plastic enclosure with a power switch, key start for the engine, and battery charge indicator on the lid. The power from the batteries runs through a pair of automotive relays connected to the power switch and a set of fuses for protection. For safety [Workshop from Scratch] wired a relay to the engines’ coil to shut it off remotely, or when the radio link to the controller is lost. An action cam was also mounted on the electronics box to stream a first-person view to a smartphone over WiFi.

Overall this is a very well built project, especially mechanically, and looks like the perfect platform for further self-driving using Ardurover. [rctestflight] has demonstrated the capabilities of the open source autopilot with several rovers, including a tiny lawnmower that cuts grass with Exacto blades.

Continue reading “RC Lawnmower Is Built To Last”

The Rollercoaster Of Developing The Ultimate Hackable Keyboard

When designing anything with “hackable” in the punchline, scope creep is an integral part of the process. You end up trying to create something to potentially be an infinite number of things for an infinite number of users. [Zack Freedman] is going really deep down the rabbit hole with his MiRage keyboard and has been documenting the progress in his usual entertaining style, with some cautionary notes included.

The most fascinating tale from this come about as a result of adding RGB LEDs beneath the keys, while still allowing everything to function when the keyboard is split in two. Thanks to an IO expander chip in one side of the board, a standard TRRS audio cable is enough to link both sides together. But the addition of addressable LEDs meant more lines were required.

[Zack] thought he had found a solution in the form of SATA cables, but it turns out all SATA cables internally connect pins 1,3, and 7, making them useless for this application. He realized he had no choice but to add a second microcontroller to the “dumb” side of the keyboard and return to I2C over a TRRS cable. However, the RP2040-based Seeed XIAO’s I2C absolutely refused to play along. After a fortnight of frustrating debugging, it turns out there was a bug in the pin definitions. Fortunately, this also revealed that the XIAO had an undocumented secondary I2C interface, which he plans to configure as a peripheral to make the keyboard almost infinitely expandable with additional keys.

An earlier version of the MiRage featured tactile OLED displays, but it turns out the thin panes of glass don’t handle repeated flexing well, so they had to be scrapped. In their place came a touchscreen E-paper display, but now this seems to be evolving into a pluggable module for any input device that your heart desires, including possibly a haptic SmartKnob. Another major update are PCB footprints that support both CHOC and MX switches.

It all started with the MiRage V1 keyboard intended to for use in an updated version of [Zack]’s cyberdeck. After realizing how many people were interested in the keyboard but not the cyberdeck, he shifted focus to refining the MiRage.

This project still has some way to go, so we’ll certainly be keeping our eye on it. In the meantime, we’ve recently covered another exceptionally customizable keyboard that might catch your fancy.

Continue reading “The Rollercoaster Of Developing The Ultimate Hackable Keyboard”

Toyota’s Cartridge Helps Make Hydrogen Portable

Hydrogen has long been touted as the solution to cleaning up road transport. When used in fuel cells, the only emissions from its use are water, and it eliminates the slow recharging problem of battery-electric vehicles. It’s also been put forth as a replacement for everything from natural gas supplies to laptop batteries.

Toyota has been pushing hard for hydrogen technology, and has worked to develop vehicles and infrastructure to this end. The company’s latest efforts involve a toteable hydrogen cartridge – letting you take hydrogen power on the go!

Continue reading “Toyota’s Cartridge Helps Make Hydrogen Portable”

Homemade SawStop Attachment Is Just About As Sketchy As It Sounds

TL;DR — when [Colin Furze] is your “safety inspector,” you really should be reconsidering your project goals.

Most of us have probably by now seen the SawStop brand of self-stopping table saw, which detects when something meatier than wood has the bad taste to touch the spinning blade, more or less instantly stopping it and preventing sudden traumatic amputations. It’s an outstanding idea, and we’d love to see the technology built into all table saws. But alas, SawStop saws are priced out of reach for many woodworkers, which left [Ruth Amos] to roll her own DIY version of the system.

It should be stated right off the bat that none of what [Ruth] does here is a good idea, and that everything shown is really just a proof of concept. The basis for her build was a somewhat flimsy-looking contractor-style saw, to which [Ruth] attached an Arduino set up to detect when something conductive touches the blade. She shares no particulars on the sensing method, but our guess is capacitive coupling. She then sets about experimenting with a series of above-table gizmos to arrest the blade, with limited success, plus all the attachments would make the saw essentially useless. But working above the table does make sense in the prototyping phase, and allowed her to figure out what wouldn’t work.

In the end, it was an electromagnetic clutch from an electric lawnmower that seemed to do the trick, albeit at the expense of heavy mods to the saw and a considerable increase in the system’s angular momentum. Nonetheless, the blade stops pretty close to instantly in the old hot dog test. It doesn’t drop the blade below the table, of course, and the hot dog is a little worse for the wear, but it’s still pretty impressive.

We’ve discussed SawStop’s technology before and why it isn’t perhaps as widely available as it should be, if you’re curious.

Continue reading “Homemade SawStop Attachment Is Just About As Sketchy As It Sounds”