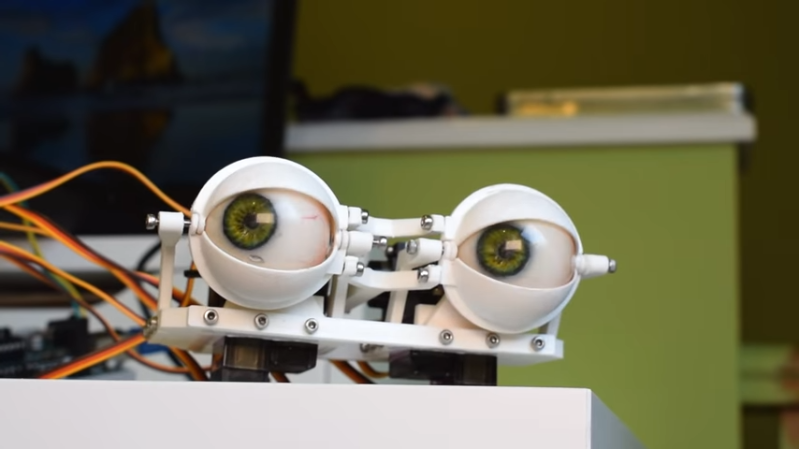
It’s not Halloween yet, but if you’re planning a technically-complicated costume, it might serve you well to start building now. To that end, here’s a guide from [Ikkalebob] on how to produce a compact animatronic eye mechanism.
The eye is inspired by mechanisms used in professional animatronics. However, that doesn’t mean it’s hard to build. Complex machining is done away with in favor of readily reproducible 3D-printed components. The eyes are able to look in different directions and can move realistically, and the build includes working eyelids that have a great blinking action to them that feels very natural. An Arduino Uno is charged with running the eyes, paired with a bunch of hobby servos and an Adafruit PCA9685 servo driver. A hefty 5V, 4 amp power supply is on hand to deliver enough juice so the servos move smoothly without stuttering.
It’s the kind of thing that’s perfect for your spooky familiar, or installing eyes in the back of your head. It would be perfect to hide behind a window or in the bushes, too. Video after the break.


Glad they are still around. Found his videos about 6 months ago and saw he hadn’t posted in almost 2 years.
So these are from Radio Shack?
I don’t see the ability to wink.
(Good job otherwise)
If you want the ability to wink check this out: https://www.thingiverse.com/thing:2668124
Doesn’t get more compact than this.
As well as the option supplied by the other commenter, it wouldn’t be too hard to double up the eyelid servos.
For reference, previous iteration: https://hackaday.com/2019/11/13/this-arduino-keeps-its-eyes-on-you/
Nice & funny !
Should add the ability to change the size of the pupil and have a binocular focus.
Someday I’m going to build this, put it in front of my window looking out and have it follow people walking past ;)
I’ve seen the eyelid mechanism on kigurumi masks, I doubt there’s room for the eyes. would be cool if you had a masked robot there for a week and then for a day it’s a real person wearing a mask so everyone thinks it was alive all along.
I’ve always looked at 3D printers from afar along with the CAD work. Any pointers to _current_ tutorials for CAD software and affordable (< $500) 3D printers? A project like this appears to me to be doable. Previously I've used small, ~30x22mm, screens to achieve the eyeball effect. And since I took the trash out last week, I have room for one more hobby item.
Have you ever done any CAD before? FreeCAD is very capable but has a steep learning curve. Settle for printing a cylinder at first, and work up from there. If you’re a programmer, OpenSCAD will make sense to you. I keep hearing good things about SolveSpace and it looks beautiful, but haven’t tried it. All of these have plenty of tutorials on youtube, but none of them will mean anything if you’re not the target audience. There just isn’t enough info here to make a good software recommendation.
For the printer, you can’t go wrong with an Ender. Assume you’ll upgrade printers after 2 years anyway, so start nice and basic. MicroCenter occasionally has $100-off coupons for the $199 Ender 3 Pro, and I adore mine. I put a $13 dual-gear extruder upgrade on it and otherwise it’s bone-stock and makes great prints.
Thanks for the input.