When you just can’t 3D print something as a monolithic part, you’re going to have to join pieces together. In such cases, most of us instinctively include threaded inserts or nut slots in the design, or even reach for a tube of CA glue. But perhaps you should be thinking more along the lines of heat-staking your printed parts together.
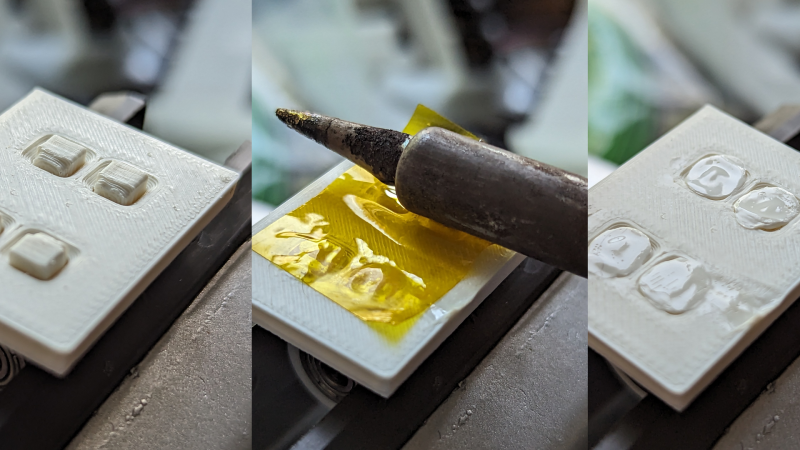
Although you might not be familiar with the term, if you’ve looked inside anything made out of plastic, chances are good you’ve seen a heat-staked joint. As [Richard Sewell] explains, a heat-staked joint is nothing more than the classic mortise-and-tenon made from plastic where the tenon stands proud of the joint face so it can be softened with heat. The tenon spreads out so the joint can’t be pulled apart. A variant on the theme includes a mortise with a generous chamfer so the melted tenon can spread out, providing not only extra resistance to pull-out be also a more flush surface.
To melt the joint, [Richard] simply uses a soldering iron and a little pressure. To spread out both the heat and the force a bit, he uses the barrel of the iron rather than a tip, although we could see a broad chisel tip being used for smaller joints. Either way, a layer of Kapton tape helps keep the iron from getting gunked up with melted plastic. [Richard] lists a host of advantages for this kind of plastic joinery, including eliminating the need for additional hardware. But we think the best feature of this joint is that by avoiding monolithic prints, each aspect of a part can have its layer lines optimized.
While it probably isn’t applicable everywhere, heat-staking looks like a technique to keep in mind. We’d love to see [Stefan] over at CNC Kitchen do some of his testing magic on these joints, like he did for threaded inserts.


You see it in some calculators.
So, you’ve worked on some HP’s.
B^)
I like to make hot rivets made from filament. It’s kind of like heat staking.
I’ve done the same for multiple part prints by putting 1.9 mm holes through, and pins of filament melted and peened over on both sides.
I love filament rivets. It’s nice for hinges.
I’ll bear this in mind, and I’m sure there will be situations where it’s a perfect fit, but TBH the problem with joining parts is almost never the actual joining – it’s that you lose the global dimensional accuracy that comes from producing a part in a single CNC operation. The rough surface of printed parts means they don’t mate together super accurately, especially when the joint is complicated and/or one or both of the surfaces is a bottom layer. Plus, both the mortises and tenons in this technique will create additional constraints on part orientation.
I often use a slightly related technique woodworking trick though, where I glue parts with a straight cut (with a 0.15mm gap), and align them using dowels made from offcuts of 1.75mm filament. The 2mm holes will print in any orientation, you can clean them up with a drill, and it’s stronger / more accurate than trying to print delicate registration bumps. Plus it’s super easy to model.
(lengths of filament also make good hinges)
Apply water-thin CA. It wicks into thin gaps before curing and its shear strength is huge.
Peel strength, not so huge, and it’s brittle.
I love the kapton tape trick. I haven’t seen that before. I wouldn’t mind getting a cheap iron and kapton taping over the end to have a permanent heat staking tool. I’m not sure if that would work, or the kapton needs to be changed very regularly.
I recently used heat staking in some injection molded brackets for electronics. Most of the time I have used heat set inserts for attachment, or hot air to clean up printed parts. My previous attempts to join parts with adhesives or heat have been messy and unsatisfactory. I used friction welding several years back, and sometimes reversibly join parts with diametrically magnetized magnets (like accessories for scientific instruments).
I like the approach using short lengths of filament to pin parts together, and heat staking with them does seem like a nice approach. I haven’t tried friction welding a pin into a hole that spans two parts, but that might also work with a drill or Dremel.
Richard Sewell’s (Jarkman) web site has a bunch of other cool and beautiful goodies. http://jarkman.co.uk
The Air giants look neat. https://www.airgiants.co.uk/
So is this ball bearing sequencer. http://jarkman.co.uk/catalog/cnc/bearingsequencer.htm
The 100w lead stained-glass irons would probably make this ezpz.
My teeny little pinecil was pretty quick, I think you’d only need that for absolutely massive pins. Maybe someone should try.. :-)
I tended to reuse the same bit of kapton tape, I think it would last a while. But I think having the kapton stay with the melted plastic till it was cold helped to keep the staked part flat and shiny, doing it with a kapton-wrapped iron might not come out quite so tidy.
Filament pins does indeed sound like a nice idea. I think it’s going to be great for some joint geometries, but it doesn’t get you the sort of mortice-and-tenon stiffness that a nice square peg can give you, and it doesn’t work if you don’t have two parallel outer sides available for the two ends.
Heat staking seems to be closer to upsetting a rivet to me then it is to a mortise and tenon, you could certainly print mortises, but they would need heat if they were precise enough (though you could make them permanent by fusing the tenons in).
Sigh, WOULDN’T need heat, that is.
Well, it’s kind of both. A 3mm square tenon in a square hole in a 3mm sheet gets you excellent location and moderate rigidity, and those both get better when you squish the end over, it takes up a lot of the tolerances. And no matter what, you need to stop the tenon pulling out somehow.
Some of the joints I did were more like tenons, and some more like rivets. But it’s really its own thing.