Tricky 3D Printed Joinery Problem? Give Heat Staking A Try

When you just can’t 3D print something as a monolithic part, you’re going to have to join pieces together. In such cases, most of us instinctively include threaded inserts or nut slots in the design, or even reach for a tube of CA glue. But perhaps you should be thinking more along the lines of heat-staking your printed parts together.

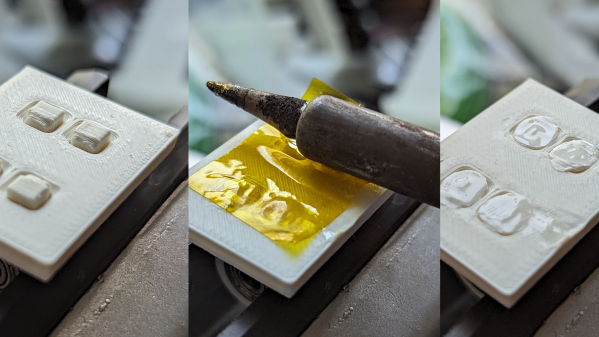
Although you might not be familiar with the term, if you’ve looked inside anything made out of plastic, chances are good you’ve seen a heat-staked joint. As [Richard Sewell] explains, a heat-staked joint is nothing more than the classic mortise-and-tenon made from plastic where the tenon stands proud of the joint face so it can be softened with heat. The tenon spreads out so the joint can’t be pulled apart. A variant on the theme includes a mortise with a generous chamfer so the melted tenon can spread out, providing not only extra resistance to pull-out be also a more flush surface.

To melt the joint, [Richard] simply uses a soldering iron and a little pressure. To spread out both the heat and the force a bit, he uses the barrel of the iron rather than a tip, although we could see a broad chisel tip being used for smaller joints. Either way, a layer of Kapton tape helps keep the iron from getting gunked up with melted plastic. [Richard] lists a host of advantages for this kind of plastic joinery, including eliminating the need for additional hardware. But we think the best feature of this joint is that by avoiding monolithic prints, each aspect of a part can have its layer lines optimized.

While it probably isn’t applicable everywhere, heat-staking looks like a technique to keep in mind. We’d love to see [Stefan] over at CNC Kitchen do some of his testing magic on these joints, like he did for threaded inserts.

Designing To Remove Supports

If you want to 3D print arbitrary shapes with an FDM printer, you often find you need supports. If you have dissolvable support material, that might not be a big issue, but if you use the same material for support as you print in, removing it can be difficult, depending on the location of the support and your slicer. At the very least, it is going to require more time and filament to print and at least some post-processing. [Slant 3D] asserts that you can always redesign the part using chamfers and fillets to avoid needing support to start with. Watch the video, below.

Of course, sometimes you just need to flip the part around. For example, the part in question — which is just an example — could just be rotated to avoid support, but that isn’t the point, of course. A fillet, however, still might need support, so you wind up having to do a double fillet to really avoid support.

Continue reading “Designing To Remove Supports”

Assessing Nozzle Wear In 3D-Printers

How worn are your nozzles? It’s a legitimate question, so [Stefan] set out to find out just how bad 3D-printer nozzle wear can get. The answer, as always, is “It depends,” but exploring the issue turns out to be an interesting trip.

Reasoning that the best place to start is knowing what nozzle wear looks like, [Stefan] began by printing a series of Benchies with brand-new brass nozzles of increasing diameter, to simulate wear. He found that stringing artifacts, interlayer holes, and softening of overhanging edges and details all worsened with increasing nozzle size. Armed with this information, [Stefan] began a torture test of some cheap nozzles with both carbon-fiber filament and a glow-in-the-dark filament, both of which have been reported as nozzle eaters. [Stefan] found that to be the case for at least the carbon-fiber filament, which wore the nozzle to a nub after extruding only 360 grams of material.

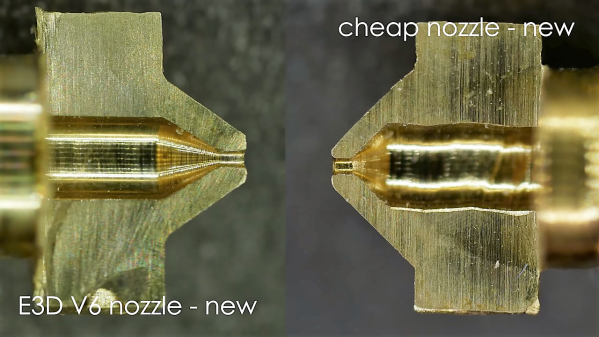
Finally, [Stefan] did some destructive testing by cutting used nozzles in half on the mill and looking at them in cross-section. The wear on the nozzle used for carbon-fiber is dramatic, as is the difference between brand-new cheap nozzles and the high-quality parts. Check out the video below and please sound off in the comments if you know how that peculiar spiral profile was machined into the cheap nozzles.

Hats off to [Stefan] for taking the time to explore nozzle wear and sharing his results. He certainly has an eye for analysis; we’ve covered his technique for breaking down 3D-printing costs in [Donald Papp]’s  “Life on Contract” series.

Continue reading “Assessing Nozzle Wear In 3D-Printers”