HF In Small Spaces

Generally, the biggest problem a new ham radio operator will come across when starting out on the high frequency (HF) bands is finding physical space for the antennas. For a quick example, a dipole antenna for the 20 m band will need around 10 m of wire, and the lower frequencies like 80 m need about four times as much linear space. But if you’re willing to trade a large space requirement for a high voltage hazard instead, a magnetic loop antenna might be just the ticket.

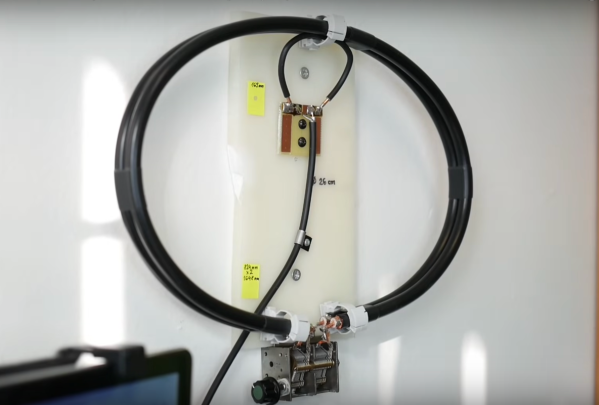
Loop antennas like these are typically used only for receiving, but in a pinch they can be used to transmit as well. To tune the antennas, which are much shorter than a standard vertical or dipole, a capacitor is soldered onto the ends, which electrically lengthens the antenna. [OM0ET] is using two loops of coax cable for the antenna, with each end soldered to one half of a dual variable capacitor which allows this antenna to tune from the 30 m bands to the 10 m bands, although he is using it mostly for WSPR on 20 m. His project also includes the use of an openWSPR module, meaning that he doesn’t have to dedicate an entire computer to run this mode.

The main downsides of antennas like these is that they are not omnidirectional, are not particularly good at transmitting, and develop a significantly high voltage across the capacitor as this similar mag loop antenna project demonstrated. But for those with extreme limitations on space or who, like [OM0ET] want a simple, small setup for running low-power applications like WSPR they can really excel. In fact, WSPR is a great mode for getting on the air at an absolute minimum of cost.

Continue reading “HF In Small Spaces”

Why Not Try A DIAC?

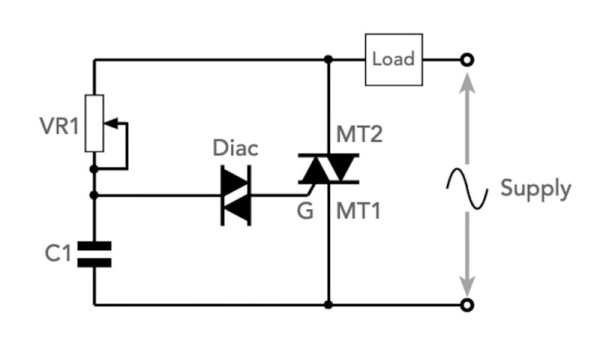
There are plenty of electronic components which were once ubiquitous but once the niche which led to their existence has passed, they fade away to remain a junkbox curio. The DIAC is the subject of a recent ElectronicsNotes video, and while it might not quite yet have slid into total obscurity yet it’s definitely not the most common of parts in 2023.

If you’ve encountered one it will almost certainly be in the trigger circuit of a lighting dimmer or motor controller, where its bidirectional breakover makes for symmetrical control of a triac gate. This extremely simple circuit allows for perfect control of AC-powered devices, and could once be found everywhere. Its demise over recent years tells an interesting story of our changing use of electricity, as not only have other devices such as smart lights and brushless motors appeared which preclude traditional dimmers, but also we now demand better RF performance from our lighting controls.

The DIAC is still a handy part to know about, and you can take a look at the video below the break. We would normally try to link to another Hackaday story using a DIAC, but is it telling that we couldn’t find one? If you can, link it in the comments!

Continue reading “Why Not Try A DIAC?”

Recovering A Busted Video Capture Device With Firmware Flashing Tricks

Sometimes, you have a piece of hardware that just up and stops working on you. In today’s fast-paced world, it’s easy to toss something broken and move on. [BuyItFixIt], as you imagine, makes it their purpose to, well, fix things instead. Their latest efforts involved resurrecting a dead AVerMedia Live Gamer 2 Plus capture device sourced off eBay.

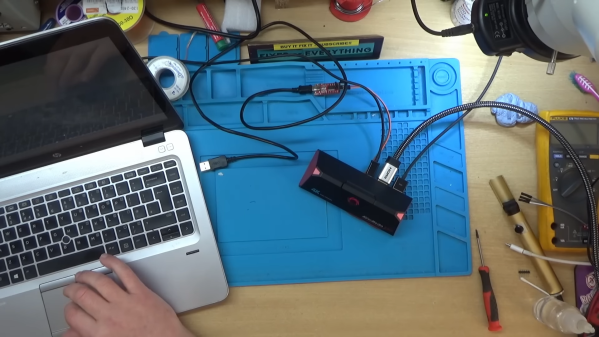
The device was advertised as being dead, with no power. Probing around the board when powered up showed that there was some basic activity going on with one of the flash chips, but the device simply wouldn’t spring to life. This suggested that perhaps the flash had become corrupted, which was confirmed when reading the chip mostly returned 0xFF. Sadly, the device was so badly bricked that the usual update methods via SD card simply wouldn’t work.

Eventually, hunting down a debug header provided a way in. [BuyItFixIt] was able to find a way to flash firmware over this connection instead, but there was a problem. The firmware they had was formatted for loading via SD card, and wouldn’t work for the debug mode entry route. Instead, getting the device going would require recovering firmware from a similar working device, and then using that as a guide to assemble a proper workable firmware update to get the device back to an operational state.

It’s a great tale of perseverance and triumph, particularly given many would give up after the first update attempt failed. We’ve seen [BuyItFixIt] pull off some heroic repairs before, too. Video after the break.

Continue reading “Recovering A Busted Video Capture Device With Firmware Flashing Tricks”

Tricky 3D Printed Joinery Problem? Give Heat Staking A Try

When you just can’t 3D print something as a monolithic part, you’re going to have to join pieces together. In such cases, most of us instinctively include threaded inserts or nut slots in the design, or even reach for a tube of CA glue. But perhaps you should be thinking more along the lines of heat-staking your printed parts together.

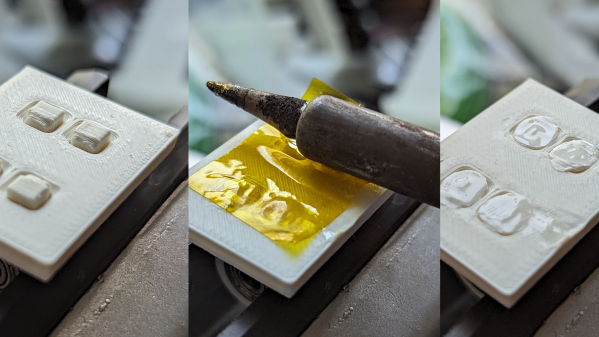
Although you might not be familiar with the term, if you’ve looked inside anything made out of plastic, chances are good you’ve seen a heat-staked joint. As [Richard Sewell] explains, a heat-staked joint is nothing more than the classic mortise-and-tenon made from plastic where the tenon stands proud of the joint face so it can be softened with heat. The tenon spreads out so the joint can’t be pulled apart. A variant on the theme includes a mortise with a generous chamfer so the melted tenon can spread out, providing not only extra resistance to pull-out be also a more flush surface.

To melt the joint, [Richard] simply uses a soldering iron and a little pressure. To spread out both the heat and the force a bit, he uses the barrel of the iron rather than a tip, although we could see a broad chisel tip being used for smaller joints. Either way, a layer of Kapton tape helps keep the iron from getting gunked up with melted plastic. [Richard] lists a host of advantages for this kind of plastic joinery, including eliminating the need for additional hardware. But we think the best feature of this joint is that by avoiding monolithic prints, each aspect of a part can have its layer lines optimized.

While it probably isn’t applicable everywhere, heat-staking looks like a technique to keep in mind. We’d love to see [Stefan] over at CNC Kitchen do some of his testing magic on these joints, like he did for threaded inserts.

Avocado-Shaped Robot Makes Its Way Through The Rainforest

When you think of a robot getting around, you probably think of something on wheels or tracks. Maybe you think about a bipedal walking robot, more common in science fiction than our daily lives. In any case, researchers went way outside the norm when they built an avocado-shaped robot for exploring the rainforest.

The robot is the work of doctoral students at ETH Zurich, working with the Swiss Federal Institute for Forest, Snow, and Landscape research. The design is optimized for navigating the canopy of the rainforest, where a lot of the action is. Traditional methods of locomotion are largely useless up high in the trees, so another method was needed.

The avocado robot is instead tethered to a cable which is affixed to a high branch on a tree, or even potentially a drone flying above. The robot then uses a winch to move up and down as needed.  A pair of ducted fans built into the body provide the thrust necessary to rotate and pivot around branches or other obstacles as it descends. It also packs a camera onboard to help it navigate the environment autonomously.

It’s an oddball design, but it’s easy to see how this design makes sense for navigating the difficult environment of a dense forest canopy. Sometimes, intractable problems require creative solutions. Continue reading “Avocado-Shaped Robot Makes Its Way Through The Rainforest”

Transforming EDF Backpack For A Speed Boost

Fighting against a tough headwind on your daily cycle can be a drag, but [Emiel] of The Practical Engineer, has a loud and bold solution. In the Dutch video after the break, he builds a transforming backpack with two electric ducted fans (EDFs), and takes to the bike paths.

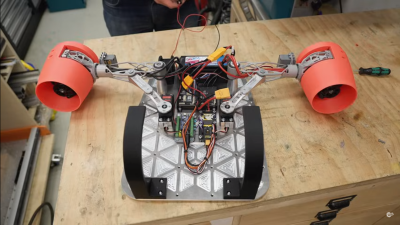
An EDF moves a small volume of air at high velocity, which doesn’t make them great for low speed applications. But they’re nice and compact, and safer than large propellers. [Emiel] didn’t skimp on the rest of the hardware, with the motors attached to metal 3D printed arms, mounted on a machined aluminum steel plate.

The arms were printed courtesy of a sponsor, and created via generative design in Fusion 360 to make them both light and strong. A pair of large servos swing the arms up, while smaller servos rotate the motors into the horizontal position. The arm servos are controlled by an Arduino, and activated by a simple toggle switch attached to the backpack’s shoulder strap. A wireless remote similar to that of an electric skateboard is used to control the EDFs.

Fitted in a [Emiel]’s old backpack, the result looks somewhat innocuous (if you don’t look too closely) until it unfolds its hidden power—twin jets ready to blast away any pesky headwinds with the push of a button. It’s a fun solution that is sure to attract attention, and a great excuse to create heavy duty mechanics.

Continue reading “Transforming EDF Backpack For A Speed Boost”

Fixing A Tractor Dashboard From Over 10,000 Miles Away

[BuyItFixIt] is well known as a dab hand at, well, fixing things… and presumably buying them, too. Recently, they received an email calling for help of the former kind. One of their Australian viewers owned the same model of tractor, but with a dead digital dash. Thankfully, help was at hand!

The problem turned out to be due to a dead EEPROM on the Australian tractor. In contrast, [BuyItFixIt] had a perfectly working dashboard on their tractor. Thus, they set about disassembling the dash and dumping the EEPROM to try and sort the stricken farm implement. This posed some risk of ending up with two dead dashboards, necessitating a careful hand. In any case, the Case tractor had a fairly simple dash with a majority of through-hole components, making it fairly easy to work with. The Microchip 93LC46B chip was in a DIP package, and was removed with the aid of some low-melting point solder in short order. The contents of the EEPROM were then dumped to a file using a XGecu T48 programmer.

With the file sent off via email, the Australian tractor owner flashed a fresh EEPROM and reinstalled it in their cluster. They were greeted with success, with the only complication being that the hours reading on the cluster had to be corrected to match the previous reading on their machine.

It’s a fairly simple story of fixing an embedded system, but it’s an educational one. It also comes with a deeper dive into how the CASE dashboard works. Just about anyone with basic electronic skills could pull this off and save an entire tractor in the process. It’s great to see these jobs documented so that we can all learn useful basic skills like these. Video after the break.

Continue reading “Fixing A Tractor Dashboard From Over 10,000 Miles Away”