Unless you’re into circuit sculptures, generally speaking, a working circuit isn’t the end-point of a lot of electronics projects. To protect your new creation from grabby hands, curious paws, and the ravages of nature, you’ll probably want some kind of enclosure. These days a lot of us would probably run it off on the 3D printer, but some people would rather stay electronics hobbiests without getting into the 3D printing hobby. For those people, [mircemk] shares how he creates professonal-looking enclosures with handtools.
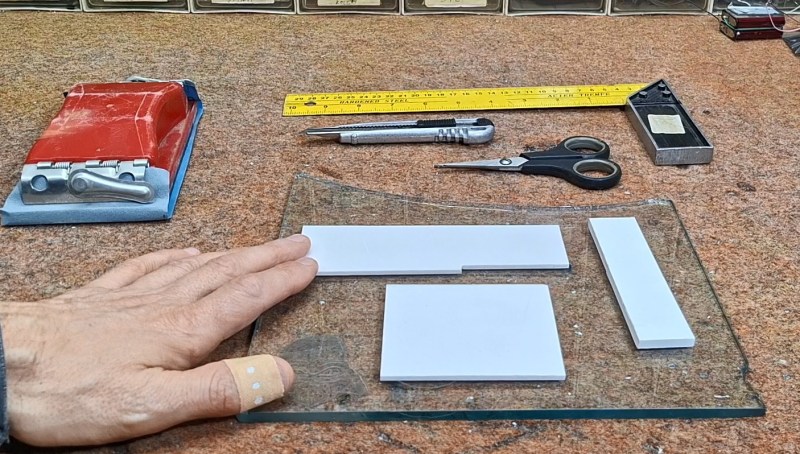
The name [mircemk] will seem familiar to longtime readers– we’ve featured many of his projects, and they’ve always stood out for the simple but elegant enclosures he uses. The secret, it turns out, is thin PVC sheeting from a sign shop. At thicknesses up to and including 5 mm, the material can be bent by hand and cut with hobby knives. It’s obviously also amenable to drilling and cutting with woodworking tools as well. Drilling is especially useful to make holes for indicator LEDs. [mircemk] recommends cyanoacrylate universal glue to hold pieces together. For holding down the PCB, the suggestion of double-sided tape will work for components that won’t get too hot.
Rather than paint, the bold contrasting colours we’ve become used to are applied using peel-and-stick wallpaper, which is a great idea. It’s quick, zero mess, and the colour is guaranteed to be evenly applied. It might even help hold the PVC enclosure together ever so slightly. You can watch him do it in the video embedded below.
We hate to say it, but for a one-off project, this technique probably does beat a 3D printed box for professional looks, assuming you have [mircemk]’s motorskills. If you don’t have said motor skills, check out this parametric project box generator. If you’d rather avoid PVC while making a square box to hold a PCB, have you considered using PCBs?
Thanks to [mircemk] for the tip! If you have a tip or technique you want to share, please box it up and send it to the tipsline


Eh, i disagree completely with the punchline. I’ve made a lot project boxes with a lot of different techniques and 3D printing is definitely at the apex of the effort / result curve for me. The thing is, the unique thing that mircemk brings is not so much skill as patience and attention to detail. 3D printing is a force multiplier for a lot of these kinds of projects, whether you have a willingness to work hard or not.
That said, there’s a lot of enclosures that 3D printing just isn’t good at. Especially large things or things that need to be especially rugged. But for a little box to contain a circuit and a couple switches or knobs, 3D printing is really convenient and if you’re willing to do this much work on the fine touches, 3d printing will reward that as well as any other process will.
Similar experience here. I’ve done solvent welding, gluing, 3d printing, and lots of other approaches.
For small boxes I will always print them. Even if they come out warped due to the sharp edges. For larger ones I am leaning more toward laser cut acrylic/wood. It’s easy to get puzzle piece type fits with a laser cutter and it’s really really fast. That makes gluing so much easier and faster.
I’m not great at cutting by hand. Even when I am there is a bit of a gamble as to whether plastic will obey my cuts when I go to bend it.
Awesome boxes with a colorful retro look
Please make an article about diy sheet metal enclosures, and let’ hear the replies, lol!
Not everyone has a 3D printer. Even if they do, not everyone has 3D CAD skills.
(But thank goodness I do!)
So many of the projects are already available as .stl files already and 3D printers are quite budget friendly these days.
I also, once upon a time, did not have a 3d printer nor 3D cad skills. Then I bought a printer kit, assembled it, learned to print, and then learned OpenSCAD before learning FreeCAD. I found utility in the entire journey. My advice to people wanting electronics enclosures without 3D skills: never stop learning.
I’d like to see OpenSCAD used to create a highly flexible script that could be used to generate STLs for enclosures provided dimensions (x, y, z, wall thickness, rounded corner radius, etc.), hole locations and diameters on which box face, standoff locations and diameters on which box face, lids, reinforcement ridges, etc. This would take a very well though out way to allow parameter inputs by the user. I’ve seen enclosure scripts for OpenSCAD, but none are that capable.
I wonder how good Claude is at writing OpenSCAD scripts.
I’ve just looked at YAPP and the required complexity of user inputs has led me to just try using Claude to generate an OpenSCAD script or FreeCAD macro for a specific box design.
Stop. Printing. Boxes. And. Flat. Plates. With. Holes.
ABS project boxes are dirt cheap and can be had in almost any size.
They are also FAR less wasteful.
Sorry, the holes I drill, or worse the square holes I attempt to drill and file, in a project box always come out looking like pure crap. And they are never the exact size I need. And I have to order them and wait for shipping.
Invest in a set of step-drills and thank me later.
These are dirt cheap these days, I have a few sets in metric and imperial.
@Ian – Totally agree on flats. 3d printing flat panels is just dumb selection (on many levels) of manufacturing process. You can do really nice designs by just cutting a piece of board. If you want to advance a bit – you can v-groove and bend some joints for better finishes (I do that with hand router/trimmer on dibond). If you have some intricate details 3D printing may help.
Flat panels are relatively quick to print though, since they usually don’t have a lot of volume. If you’re smart about it, you can do a thin face against the build plate with ribs on top to add rigidity without adding much material, and you get precise hole and feature placement by default. You can add snap-fit tabs, risers, pockets, flanges or grooves around the edge… you can make some nice panels you couldn’t easily produce otherwise.
Of course if you’re printing inch thick rectangular slabs with 80-100% infill, just to get one or two holes down, that’s a waste of time.
Eh.. hard disagree there. For complex projects (both work and personal), I end up needing to model the entire assembly and any other constraining factors that might influence both the design and it’s usability (it’s good practice and I encourage everyone to get into this habit) – if I’m going through all that trouble, then printing the box is a non-issue and is actually faster and more efficient.
In the end, it all comes down to how good you are with modelling and understanding your manufacturing process to produce an enclosure that has the look and feel of a professional product. I’ve done this countless times for prototypes that were then presented to the board and many, many investors, passing as a fully-realized product with flying colors every single time.
My time is valuable, so I optimize everywhere I can – including with making boxes.
There are grave dangers in producing a prototype that looks like a finished product. For one, your polished up 3D print may not be mass-manufacturable cheaply by conventional means, or the result turns out very different for fit and finish, and the managers and investors won’t understand or believe that: it’s obviously possible because you showed them the product already.
Counterpoint, printing is usually cheaper than buying (at least in my project sizes), I don’t have to wait a week for shipping, and I don’t have to drill, saw, file etc., the required holes
Premade boxes are far more wasteful in time. If I 3D print one, I will have it in 2 hours. If I need to obtain a plastic one, I won’t get it for 96x the time. If your answer is to stock boxes that I don’t need now but might later, what is that if not waste?
Nice thing about working with PVC sheet (well really anything, but that stuff is nice to cut and glue) is that you can build it incrementally. “Oh this part doesn’t fit, let me drill out a bit.. then I’ll glue extra part here.”
Often you are done faster that it would even take to CAD out the box, let alone wait it to print.
Beautifully done, and designed for easy rework. However, he recommends NOT using cyanoacrylate glue. The reason being that it releases corrosive gasses that wreak havoc on electronic components. The glue he is using looks like a specialized or PVC friendly adhesive.
Thanks! I’ll change that in the text. It didn’t look like CA to me either.
My local mostly inexhaustible source of signs for recycling is the local/federal politicians’ overinflated egos. Every time there are elections there would be dozens of forgotten signs left around after the fact, if one knows where to look for them (literally, everywhere).
I also enjoy random drive-by signposts showing up in my front yard uninvited, roof repair, etc. If I didn’t give my explicit permission to use my yard as the Free Billboard, then it disappears. Thanks for these privately-funded advertising efforts, I am set for the next few years :-]
In the sign biz, these are known as “Bandit” signs. Cuz the majority of them get ‘stolen’ (or just pulled up and thrown away) and because they are illegal almost everywhere, and certainly on the gov’t road right-of-way.
Nosed around a bit and am still uncertain whether the material is expanded PVC (foam), laminated board, or something else. Any idea?
You can also get flat sheets in other materials ranging from ABS to exotic fluropolimers.
OR just buy ABS project boxes which have been available in any size you could want for 30 years and I GUARANTEE will cost less than the filament used to print a basic box.
I help the 2 local hackerspaces wit stocking things, including project boxes.
I usually pay less than $50 shipped for a HUNDRED boxes is the size pictured.
We charge $2-$5 for basically any sized box.
And we STILL have people break the rules and tie up the dang printers making their own project boxes.
We have signs on the printers.
We have signs on the computers that run the printers.
We have a line painted on the floor leading from the printers/computers to the sheet stock and project box shelf, wit a drill press RIGHT THERE.
And people still print boxes and flat sheets with holes.
And then they get pissed when I have to take their printer privileges away.
What the hell is wrong with people NEEDING to print this stuff?
Note: those printers run CONSTANTLY. The people breaking the rules are stopping others who are using the machines properly. It isn’t just some arbitrary rule to reduce waste.
I would hate if our hackerspace was limiting the ways in which I can make my projects. Also it requires a different set of skills to CAD out a box than to accurately drill and (especially) cut out rectangular holes – sometimes a set of motor skills that are not available to everyone.
Just buy some more printers and set the usage fees to cover that.
Of course it’s reasonable if people come in to print standard boxes they just downloaded off the net.
But yeah, a drill press without C/NC and the skill to use it… your holes are coming out all over the place. First problem: you have a flat sheet and some pattern you want to get down to 0.1 mm tolerance in some particular location, so your buttons or potentiometer shafts line up with the holes and it’s not all wonky – how do you aim the drill?
Takes some planning. You got to draft out a template and print it, then glue it on the sheet you just cut, then mark the holes, then center drill them so the bit won’t wobble out – but first you’ve got to cut the sheet. Is it rectangular or arbitrarily shaped? How’s that gonna work? Where do you do that? Table saw? Laser? On the knee?
All this is quickly wasting your time instead of printer time.
Printed (on laser printed, it’s less than a minute) pattern + spring punch centering eyelet marker (I bought one recently and it’s much more comfortable than classical center punch with hammer).
Of course it’s for case when round holes is enough for you.
You don’t want to spring punch materials like acrylic sheets, at least without checking if it’s cast or extruded first.
For some reason there is no “reply” button under your comment below.
“You don’t want to spring punch materials like acrylic sheets, at least without checking if it’s cast or extruded first.” – good reason, thanks. I’m not used to fragile leafs like that. If I’ll do – I’ll use awl or soldering iron with T12-ILS tip (anyway I have no other use for ILS tip) to mark points.
They want to print their own boxes because the project boxes you sell are unsuitable or difficult to design around.
Many ready-made boxes are “nice”, but they come with weird draft angles and lobes and ribs protruding into the box, and you’d have to design around that. It’s easier to just draw your own damn box with all the interior features you want.
Well I could think of a few reasons.
Better looks and integrated lettering
Exact hole positions (drilling holes in the exact spot you want them is a skill)
Holes that are not round (even more of a skill thing)
Integrated bezels and mounting points for things like displays
Some people go for looks, and a lot of (cheap) project boxes look … wel cheap.
…
I could go on, so I don’t think wanting to print things enclosures is completely unreasonable. Or should be VERBOTEN.
A part of that workload (the flat sheets with holes part) could be transferred to a thing like a laser cutter/engraver. That is especially viable if you have project boxes available that accept a flat frontpanel.
Very few 3D printed items look good until you sand/bondo/paint them properly. It’s the same aesthetics as laser cut plywood with scorched edges and over-protruding finger/tab joints, that’s saying “I just couldn’t be bothered”.
What do you mean? All the holes I drill are out of round – that’s the easiest skill in the world.
If the printers are constantly in use, you probably need more printers at your space, not arbitrary rules about what people can print.
Maybe because THEIR project is ALL about designing a very specific box before going mass production or to tightly fit their pcb of their cyberdeck ?
Again, premade boxes are only cheaper if your time is worthless. With 3D printing, you take your time and make it the printer’s time (which seems to be a problem in your case).
My favourite enclosure is a front panel that can be rack mounted. Eurorack is one nice standard to use.
Prototypes in cardboard work and look great.
Using plastic boards like Mirko is a great alternative. If you need ultra-precision just design a PCB and it will come back perfect with holes and labels.